


Hardware components | ||||||
 |
| × | 1 | |||
 |
| × | 1 | |||
 |
| × | 1 | |||
Software apps and online services | ||||||
 |
| |||||
As a long-time music lover, I’ve always been fascinated by how performers connect with their instruments. Whether it’s a guitarist bending strings, a pianist flowing across keys, or a DJ shaping sound with nothing but hand movements over a mixer, there’s something powerful about expressing music through motion.
Looking through my drawer, I found an ESP32, a few VL53L0X distance sensors, and an addressable LED strip. At first, they felt unrelated — but then an idea clicked.
I kept thinking about DJs and live performers who move their hands in the air, controlling sound almost instinctively. What if those gestures could actually become music?What if motion itself could trigger beats, samples, and effects?
That question became the spark for AirMIDI.
AirMIDI is a touchless, gesture-controlled musical instrument that lets you play music in mid-air. By waving your hands over distance sensors, you can trigger sounds, control parameters, and perform expressive gestures — all without touching a single button. A vibrant LED strip responds in real time, turning invisible motion into a visual performance as well.
This project isn’t about replacing traditional instruments. It’s about exploring a new way to interact with sound — one that feels intuitive, expressive, and a little bit magical. Built entirely from components found in my Junk Drawer.
The project is designed primarily to work with mobile music apps like Koala Sampler, using Bluetooth Low Energy (BLE) MIDI for wireless communication.Visual feedback is provided using a WS2812B RGB LED strip, making the instrument intuitive, expressive, and stage-ready.
What Is a MIDI Controller?A MIDI controller is a device that does not generate sound by itself, but instead controls other musical instruments or software.
MIDI stands for Musical Instrument Digital Interface.It is a communication standard that allows electronic musical devices, computers, and mobile apps to talk to each other.
When you press a key on a MIDI keyboard, hit a pad, turn a knob, or move a fader, the controller sends MIDI messages. These messages tell the connected instrument or software what to do, such as:
- Play a note
- Stop a note
- Change volume
- Modify effects
- Adjust filters or parameters
In the case of AirMIDI, hand gestures replace physical keys and knobs, but the idea is the same — gestures are converted into MIDI messages.
Common MIDI Terms ExplainedMIDI NoteA MIDI Note represents a musical note or sound trigger.
Example:
- Note 36 → Kick drum
- Note 38 → Snare drum
A MIDI note message usually has two parts:
- Note On – start playing the sound
- Note Off – stop playing the sound
In AirMIDI:
- A tap gesture sends a Note On
- After a short time, a Note Off is sent
Velocity describes how fast or how hard a note is triggered.
- Range:
0–127 - Higher velocity → louder or more intense sound
- Lower velocity → softer sound
Even though AirMIDI has no physical keys, velocity can be derived from:
- Speed of hand movement
- Duration of a tap
- Distance change
MIDI supports 16 channels (1–16).
Channels allow multiple instruments to share the same MIDI connection without interfering with each other.
Example:
- Channel 1 → Drums
- Channel 2 → Bass
- Channel 3 → Synth
AirMIDI typically uses Channel 1, but this can be changed in software.
Control Change (CC)A Control Change (CC) message is used to control continuous parameters.
Examples:
- Volume
- Filter cutoff
- Reverb amount
- Delay feedback
CC messages include:
- CC number (which control)
- Value (0–127) (how much)
In AirMIDI:
- Push / pull gestures can be mapped to CC messages
- These can control filters or effects in apps like Koala Sampler
- ESP32 Development Board(used for BLE MIDI, sensor processing, and LED control)
- VL53L0X Time-of-Flight Distance Sensors ×3Used to detect hand presence, taps, holds, swipes, and push/pull gestures
- WS2812B Addressable RGB LED Strip (48 LEDs)Provides visual feedback for idle state and gestures (I have taken 144LEDS/m strip for more dense light effects)
- External 5V Power SupplyRequired for stable operation of the LED strip
- Jumper Wires & Breadboard / PCB
- A cardboard box to fit all the components. A vinyl frosted sheet is used on LED strip to disperse the light.
For this Project I am using three VL53L0X ToF sensors, but we can further increase the sensor count to add more and precise gestures.
Software & Libraries- Arduino IDE
- Adafruit VL53L0X Library
- Adafruit NeoPixel Library
- ESP32 BLE MIDI Library (Github)
- Touchless gesture control
- Tap detection on three independent zones
- Hold gestures for mode switching
- Swipe left / right gestures
- Push / pull gestures for continuous control
- Wireless BLE MIDI output
- Visual feedback using RGB LEDs
- Debounced, stable gesture detection
- All sensors share the same I²C bus
- Each sensor is assigned a unique I²C address using its XSHUT pin
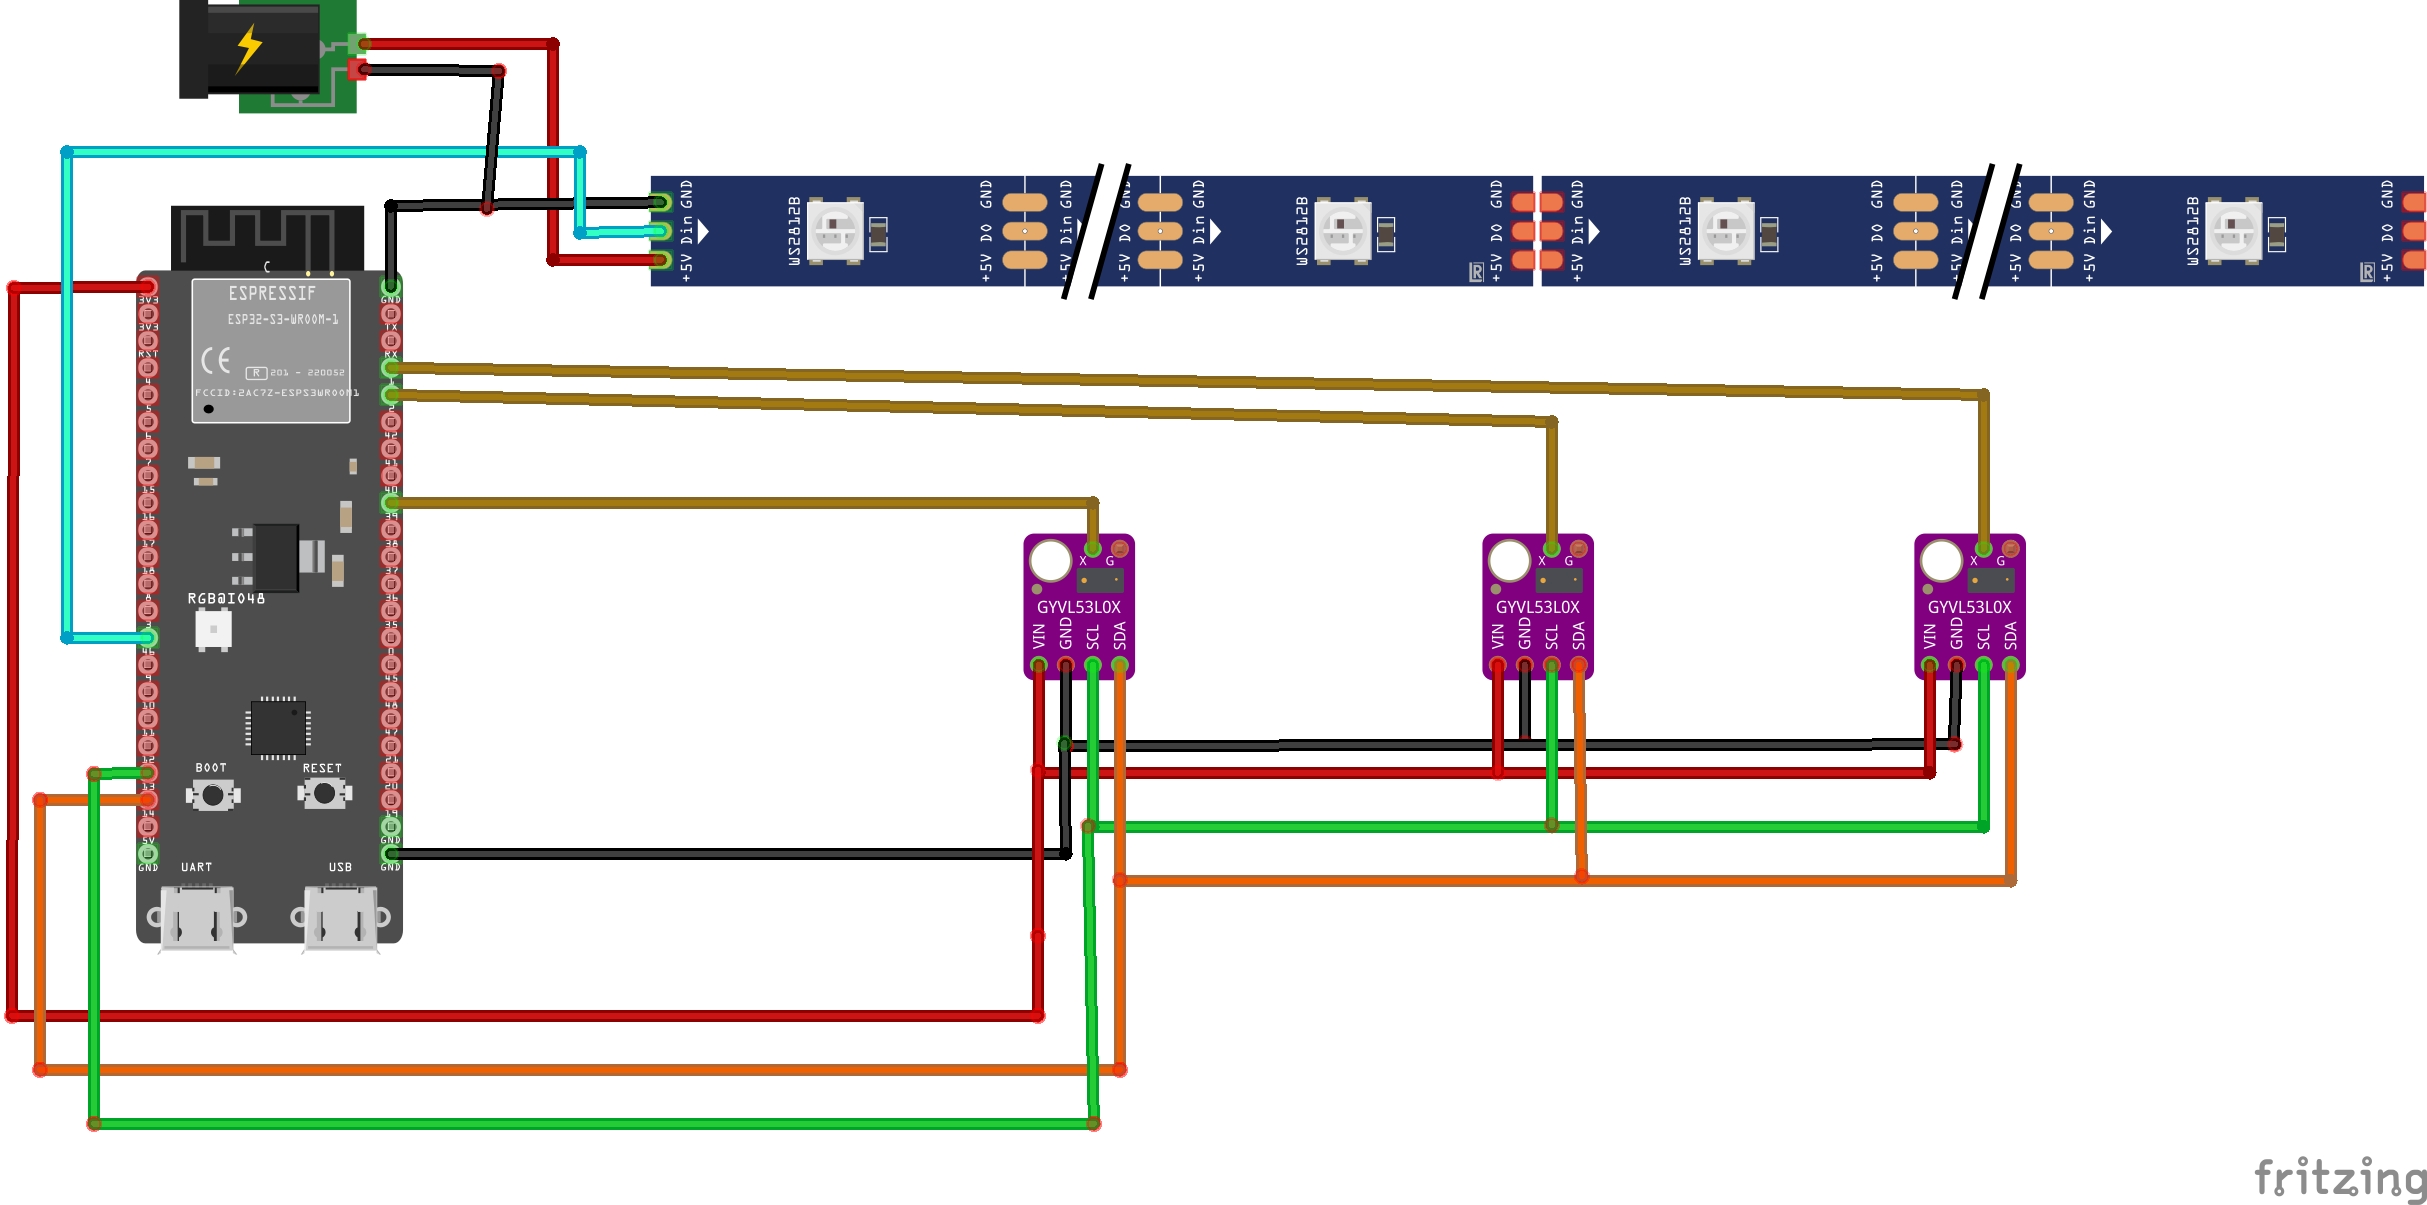
Connections:
SDA→ ESP32-S3 Wroom Module GPIO 14SCL→ ESP32 GPIO 13XSHUT→ Individual GPIO pinsVIN→ 3.3VGND→ GND
DIN→ ESP32 GPIO 35V→ External 5V supplyGND→ Common ground with ESP32
A cardboard enclosure was used to house all the components. Small individual slots were cut on the front panel to mount the three time-of-flight (ToF) sensors in equal distance, ensuring proper alignment for accurate gesture detection. Below the sensor openings, a long horizontal slot was created for the WS2812B LED strip.
The LED strip was positioned approximately 2–3 cm behind the slot, and a frosted diffuser sheet was placed over the opening to soften and evenly spread the light, creating a smooth and visually pleasing effect.
All electrical connections were soldered according to the provided schematic. Once verified, the wires and components were securely fixed inside the enclosure using a hot glue gun, ensuring stability and preventing movement during use.
The three VL53L0X sensors are placed horizontally with equal spacing, creating three interaction zones:
- Left
- Center
- Right
Each sensor continuously measures the distance to the user’s hand over the I2C.
Gesture Detection Logic🔹 Tap- A quick hand movement in and out of a sensor’s active range
- Used to trigger MIDI notes (pads)
- Keeping the hand within range for a defined duration
- Used to arm special modes (like swipe)
- A sequential activation of sensors (left → center → right or vice versa)
- Used for navigation or control changes
- Moving the hand closer or farther from the sensors
- Used for continuous MIDI control (CC)
All gestures are time-based and debounced to avoid false triggering.
Wireless MIDI CommunicationOnce a gesture is detected and converted into a MIDI message by the ESP32, the data is transmitted wirelessly using Bluetooth Low Energy (BLE MIDI). BLE MIDI is a modern MIDI transport method that allows low-latency, cable-free communication between controllers and music software.
In this project, the ESP32 acts as a BLE MIDI peripheral, advertising itself as a MIDI device. On the receiving end, the Koala Sampler app on iOS recognizes AirMIDI as a standard MIDI controller. After pairing, MIDI notes and control messages generated from hand gestures are directly mapped to sampler pads, effects, or parameters inside the app using Koala’s MIDI Map feature.
In addition to iOS devices, AirMIDI can also be connected to computers (Windows, macOS, or Linux) that support BLE MIDI. When paired with a computer, AirMIDI can control, Digital Audio Workstations (DAWs) such as Ableton Live, Logic Pro, or FL Studio.
Arduino IDE Code
1. Install ESP32 Board Files by adding following link to File -> Preferences https://espressif.github.io/arduino-esp32/package_esp32_dev_index.json
2. Install following libraries to start with code:
Adafruit VL53L0X (Time-of-Flight sensors)
Adafruit NeoPixel (LED strip control)
BLEMIDI_Transport + BLEMIDI_ESP32 (Bluetooth MIDI / Koala)
Now, lets understand the code flow:
Modes of OperationThe device provides two main performance modes:
- Tap Mode (Note Mode) - Used to trigger percussion or one-shot samples.
- FX Mode - Used to manipulate real-time effects such as filters, reverb, or pitch using continuous control (CC).
Tap Mode – Note Trigger Logic
- Gesture Input: Hand distance from each VL53L0X sensor is analyzed.
- Triggering: Short “tap” gestures are detected based on sensor entry + fast release.
Notes:
- There are three banks.
- Each bank contains three MIDI notes (one per sensor).
- Users can map these notes to samples inside a MIDI app.
LED Feedback:Only the LED segment corresponding to the tapped sensor lights up, showing which note was triggered.
Gesture Detection:Tap detection is based on:
- distance window
- time window
- release speed
FX Mode – Swipe Activation
Activation Gesture: Swipe across the three sensors to toggle FX mode on/off.
FX Sensors:Each sensor controls one effect (example):
- Left → Filter
- Center → Reverb
- Right → Pitch
Push/Pull Control: Distance is continuously measured and mapped to MIDI CC values.
Mapping Logic: Sensor distance (in mm) → Continuous CC (0-127)
LED Feedback: LED strip displays FX intensity and active sensor color.
MIDI CommunicationNote Triggering:MIDI notes are transmitted through:
MIDI.sendNoteOn()
MIDI.sendNoteOff()
Effect Control:Continuous CC values are transmitted using:
MIDI.sendControlChange()- Select Bank (optional via hold gesture)
- Tap Sensor - Trigger Note
- Swipe Across Sensors - Enter FX Mode
- Move Hand - Push/Pull CC values
- Swipe Again - Exit FX Mode
- Notes per bank are user-assignable inside the MIDI app.
- FX mode does not trigger notes.
- Multiple sensors can modulate CC simultaneously.
- FX and TAP modes are mutually exclusive to avoid interference.
You can check full Code on Github.
AirMIDI started as a simple idea inspired by motion, music, and curiosity, and evolved into a fully functional, touchless MIDI controller built entirely from components found in a junk drawer. Through this project, it became clear that meaningful and expressive musical instruments do not always require complex hardware or expensive parts—sometimes, creativity and thoughtful design are enough.
One of the most important lessons from this project was the importance of timing, debouncing, and feedback. Gesture-based interfaces are highly sensitive to noise and unintended movements, and achieving stability required careful tuning of thresholds and delays.
Most importantly, this project embodies the spirit of the Hackster Junk Drawer Challenge—turning unused components into something creative, functional, and expressive. What began as spare parts in a drawer became an interactive musical instrument that encourages experimentation and performance.


Comments