


Hardware components | ||||||
 |
| × | 1 | |||
 |
| × | 2 | |||
 |
| × | 1 | |||
Software apps and online services | ||||||
 |
| |||||
| ||||||
Hand tools and fabrication machines | ||||||
 |
| |||||
 |
| |||||
 |
| |||||
IntroductionThe inspiration for this project came from a bittersweet moment: I had to part with my motorcycle, which I'd ridden for six years. After three months, the urge to ride became overwhelming, so I decided to build this. I recreated some of my favorite real-life touring routes in the game, bringing a personal touch to the virtual world.
Standard controllers for bike games often rely on button operations, which can feel detached from the experience of riding. My goal was to create a hands-on controller that truly simulates the sensation of riding a motorcycle. This controller requires no button operations whatsoever. You steer by tilting, accelerate by twisting the throttle, and brake by squeezing the lever, allowing for a highly realistic and immersive experience.
Unfortunately, I couldn't replicate the foot-operated gear shifting of a manual transmission, but I hope to implement that feature in a future version. This racing controller was built in Unity, which means it can be freely customized to fit your needs.
3DModelI used Fusion 360 for the modeling. The design is based on my beloved former motorcycle, the Ninja 250SL. However, the only functional parts of this controller are the starter switch, throttle, and brake; the other buttons and the clutch lever are included as decorative elements. The size is about 90% of the original.
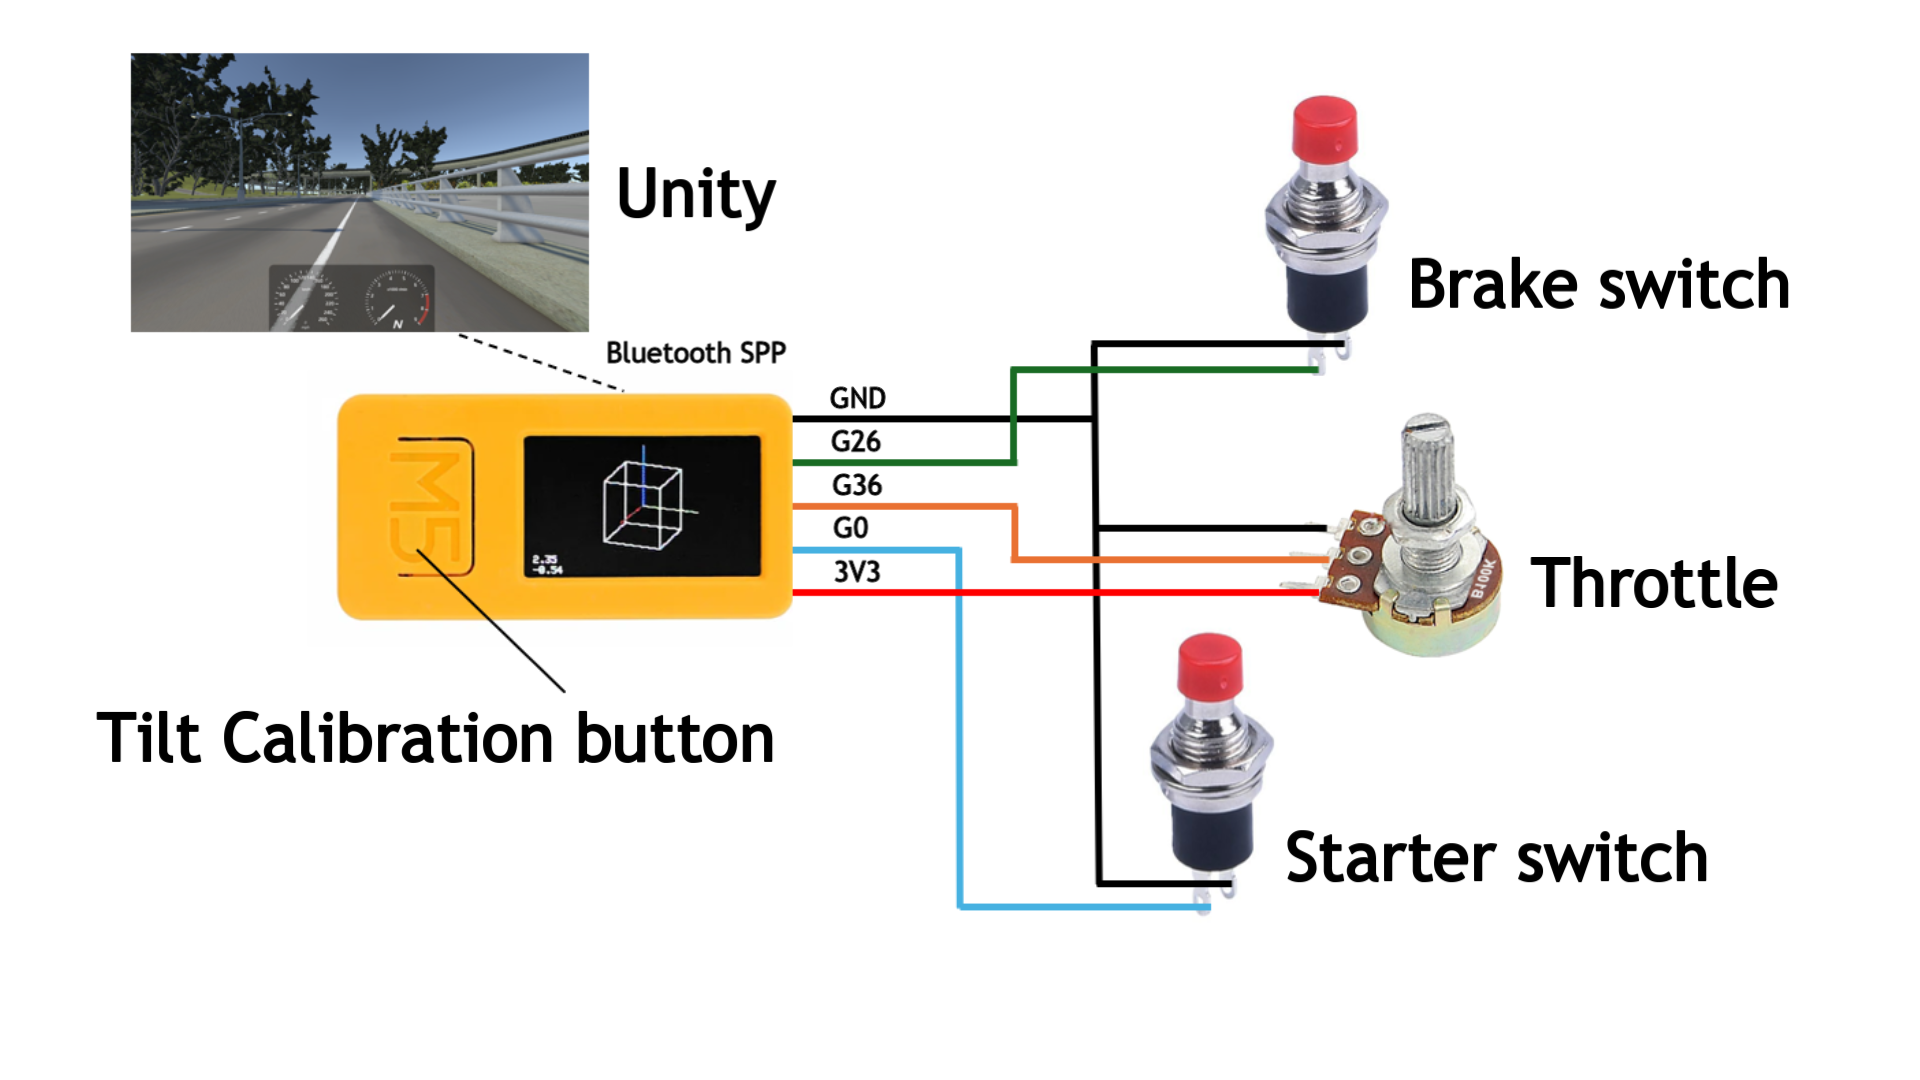
Hardware ComponentsThe only microcontroller used was a single M5stick. The other components, as shown in the image, are pushbuttons for the brake and a starter switch to activate the cell motor, along with a variable resistor for the throttle. These are simply plugged into the side pin sockets of the M5stick.
Game Screen CreationI developed the game's visuals in Unity, using the free asset Vehicle Physics Pro as a base. This asset allows for realistic vehicle physics and can simulate detailed car behavior.
Vehicle Physics Pro - Community Edition | Physics | Unity Asset Store
I then heavily modified it to create my own custom courses. Since Vehicle Physics Pro is designed for car games, it originally displayed the front of a car on the screen; however, for my motorcycle game, I hid this element to enhance immersion. I also remapped the controls from the PC's arrow keys to physical switches, enabling a more realistic riding feel.
M5Stick monitorThe monitor displays the speed value obtained from Unity. On the left side, a fuel gauge is included, which is designed to decrease by one bar every minute, with the final bar turning red. The number on the right side indicates the tilt of the controller. Pressing the large button on the M5 allows for calibration, which, when performed at the start of each game, ensures you can play with the proper posture.
How to BuildCreate the following four scripts in Unity from the code provided in the code blocks:
- M5StickSerialSteering.cs → attach to an empty M5Input GameObject (create yourself)
- M5SpeedSender.cs → attach to an empty M5Input GameObject (create yourself)
- VPP_M5SteerBinder_Lite.cs → attach to an empty M5InputBinder GameObject (create yourself)
- VPP_M5IgnitionBinder.cs → attach to an empty M5IgnitionBinder GameObject (create yourself)
Attach VPP_M5SteerBinder_Lite.cs to the VPP Sport Coupe object.
Finally, upload M5StickFirmware.ino to your M5Stick.
Connect the M5Stick to your PC via Bluetooth. Unity will automatically detect and connect through the assigned COM port.
ConclusionThis project, I believe, has made the most of the M5StickC's potential. Thanks to its built-in acceleration sensor and versatile GPIO pins, I was able to create a complex controller in a very compact and simple form.
The entire body and components can be 3D-printed, and the circuit is incredibly simple to assemble, requiring nothing more than jumper wires and a breadboard.
I hope this project serves as an inspiration for fellow motorcycle enthusiasts and makers, helping them discover a new kind of "riding fun, " just as it did for me.


Comments