


Hardware components | ||||||
 |
| × | 1 | |||
 |
| × | 1 | |||
 |
| × | 1 | |||
 |
| × | 1 | |||
Software apps and online services | ||||||
 |
| |||||
Hand tools and fabrication machines | ||||||
 |
| |||||
Supplies:
Arduino nano0.96" Oled DisplayBatteryBattery Charging ModulePulse SensorJumper Cable3d printed Case
Solder the Wire in all ComponentsConnect Charging Module With Battery
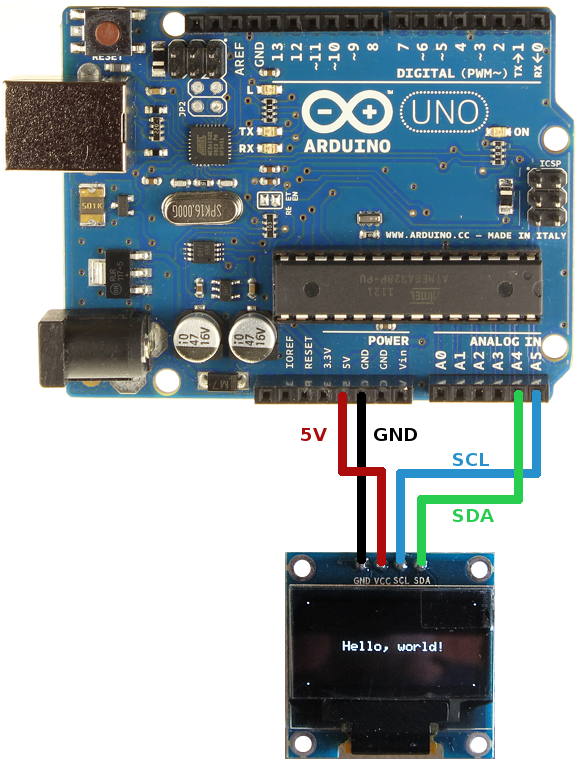
Step 2: ConnectionPulse Sensor With ArduinoPin-1 (GND): Black Color Wire – It is connected to theGND terminal of the system.Pin-2 (VCC): Red Color Wire – It is connected to the supply voltage ( +5V otherwise +3.3V) of the system.Pin-3 (Signal): green Color Wire – It is connected to the pulsating o/p signal.Oled Display with ArduinoArduino Nano OLED WiringThe image below shows how to connect the Geekcreit 0.96 inch OLED I2C display to Arduino. Pin connections are as follows for wiring the OLEDdisplay to an Arduino Nano.OLED GND – Arduino GNDOLED VCC – Arduino 5VOLED SCL – Arduino Uno A5OLED SDA – Arduino Uno A4
Step 3: ProgramingFor the project ECG Display using Pulse Sensor with OLED & Arduino, you need to add 2 libraries.
So first download the library from here.1. Adafruit SSD1306 LibraryAdafruit GFX Library
w compile and upload this code to your Arduino IDE.
#define OLED_Address 0x3C // 0x3C device address of I2C OLED. Few other OLED has 0x3DAdafruit_SSD1306 oled(128, 64); // create our screen object setting resolution to 128x64int a=0;int lasta=0;int lastb=0;int LastTime=0;int ThisTime;bool BPMTiming=false;bool BeatComplete=false;int BPM=0;#define UpperThreshold 560#define LowerThreshold 530void setup() {oled.begin(SSD1306_SWITCHCAPVCC, OLED_Address);oled.clearDisplay();oled.setTextSize(2);}void loop(){if(a>127){oled.clearDisplay();a=0;lasta=a;}ThisTime=millis();int value=analogRead(0);oled.setTextColor(WHITE);int b=60-(value/16);oled.writeLine(lasta, lastb, a, b, WHITE);lastb=b;lasta=a;if(value>UpperThreshold){if(BeatComplete){BPM=ThisTime-LastTime;BPM=int(60/(float(BPM)/1000));BPMTiming=false;BeatComplete=false;tone(8, 1000, 250);}if(BPMTiming==false){LastTime=millis();BPMTiming=true;}}if((valueBeatComplete=true;oled.writeFillRect(0, 50, 128, 16, BLACK);oled.setCursor(0, 50);oled.print("BPM:");oled.print(BPM);oled.display();a++;}
Step 4: Print the Case With 3D PrinterOnce printed, fix all components in the box.
Now you can use it
Thanks For Watching 🙏🏻
Step 6: Nextpcb PCB Manufacturers1st Thanks To Nextpcb for Sponsor This VideoDo you know NextPCB ?NextPCB is reputed as one of the most popular PCB manufacturers in china. Situated at the heart of Shenzhen, NextPCB has been in the PCB manufacturing and assembly industry for over 15 years, providing some of the most innovative printed circuit boards, with assembly technologies of the highest quality standards, fastest delivery turnaround (as fast as 24hours), lowest manufacturer direct prices, and support via dedicated customer service professionals.Using some of the latest machines and equipment, NextPCB provides two major services; PCB Manufacturing and PCB Assembly.


Comments