


Software apps and online services | ||||||
 |
| |||||
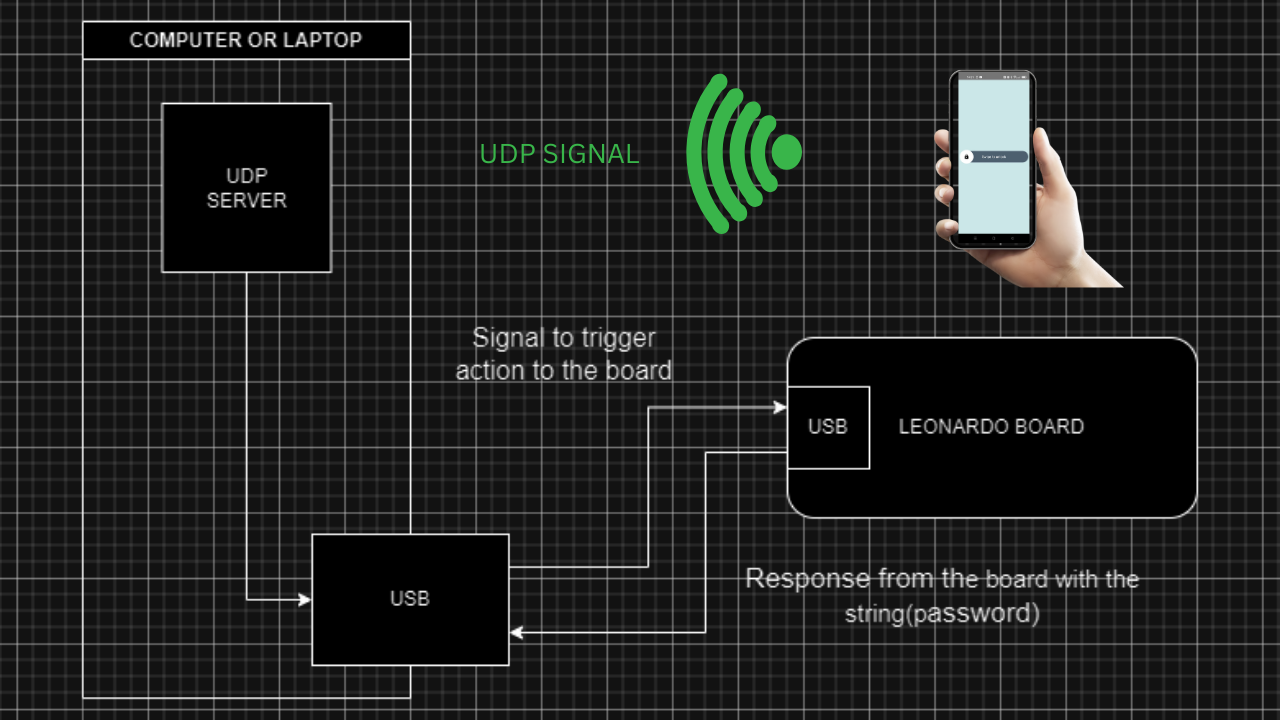
Welcome again to this new Amburo tutorial. This is the third part of the noLoginSeries. On this occasion, we will be discussing one, among many ways, of sending a UDP signal to unlock our computer. As you might guess this way is through an Android device. It can be of course a tablet or a phone, but a phone would make more sense since everybody has one in their pocket most part of the day. So we will be showing the code in our Android studio that implements a basic app with the basic configuration that we explain in this superfast tutorial chapter.
So let's get into the code:
Supplies:
For this part of the project, you will need a computer(in which you want to log in), a phone (that will be your authenticate device), Install Android Studio, and of course, check the previous tutorial.
Step 1: Checkout The CodeYou can download the code from here: UnlockSwipeAndUdp
You will be able to play around with it by changing things to fit your needs.
Step 2: Main Activity ClassAs you can see we have our main Activity class extending Activity that will bring us the inherit oncreate method to let us set the basic configurations. Among the basic configurations, we will set the swipe button id and its main change listener. Bear in mind that you will have to implement the swipe button library and of course, have ready the main activity layout with swipe object configuration.
Going back to our swipe button listener we will set the base logic to change the button state by using the lockstate variable, adding one to it, and checking if it's even by the modulo operator. By doing this we can detect when the button was swiped, once we detect that, we call the sendBroadcast method with the message to be broadcasted.
Step: Send Broadcast MethodNow, this method has all the necessary instructions to prepare and send the incoming string parameter as a broadcast message. That basically means that will send the message to the network. This method has an auxiliary method that basically returns the network address of our local network dynamically. This will let us execute this program in all networks we are connected with; without having to put/modify the actual address. And will let us use this app on different networks. Once the method sendBroadcast gets the local network it will send the packet built by the actual message, the length, the address, and the port, which by now will be fixed to this number, which of course you can change. Once the packet is sent successfully, another message will be constructed and returned as a method return also we will be logging that message.
Step 4: One More ThingGoing back to the oncreatemethod, the return of the sendbradcast method will return that message and print it to the device screen as a toast. We will set to sleep the app for 4 seconds to show that message and finally call the inherit finish method to close the activity and let it start again in future log-ins.
Step 5: What Is NextThat is basically it, notice how all we have learned up to this point. We let ourselves expand our work tremendously because we can connect many devices and make them interact in many ways. following this path in the next tutorial, we will be joining this series with the voice control series and we will be loggingin with our voice instead of a swipe button with an Android device.


Comments