


Hardware components | ||||||
 |
| × | 1 | |||
 |
| × | 1 | |||
 |
| × | 1 | |||
 |
| × | 1 | |||
 |
| × | 1 | |||
Software apps and online services | ||||||
 |
| |||||
 |
| |||||
Hand tools and fabrication machines | ||||||
 |
| |||||
 |
| |||||
 |
| |||||
 |
| |||||
 |
| |||||
 |
| |||||
 |
| |||||
The idea for this project came from the real radar systems used in airports, ships, and defense applications. I wanted to create a simple and affordable mini version of a radar system that students can easily understand and build. Using Raspberry Pi Pico, an ultrasonic sensor, and a servo motor, I designed a project that scans the surroundings and detects nearby objects just like a real radar.During development, I learned about sensor interfacing, motor control, and real-time object detection. This project not only improved my programming and electronics skills but also showed how basic components can be combined to create an innovative system. It is a great educational project for beginners interested in robotics and embedded systems.
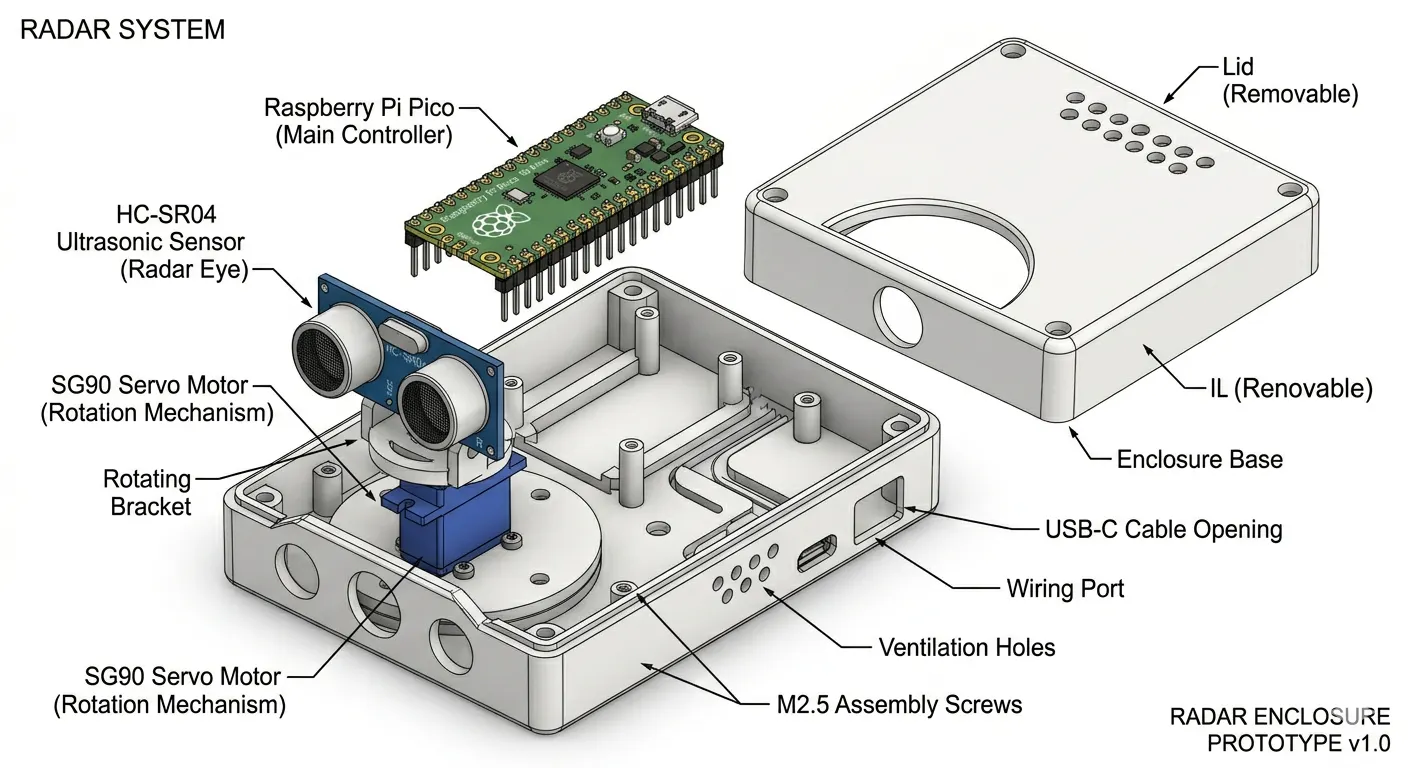
Custom 3D-Printable Enclosure for Raspberry Pi Pico Radar System
Modular Exploded View: The diagram showcases an Exploded Assembly, highlighting the relationship between the internal electronics (Pico, Servo, Sensor) and the mechanical housing. This layout is essential for understanding how the parts fit during the final assembly stage.
Integrated Rotation Mechanism: The base features a dedicated mounting point for the SG90 Servo Motor. The HC-SR04 sensor is mounted on a custom rotating bracket, ensuring a 180° field of view without the wires getting tangled or the sensor being obstructed by the casing.
Precision I/O Cutouts:
USB Port: A side opening is precisely placed to allow easy access for the Micro-USB/USB-C cable to power and program the Pico.
Wiring Port: A secondary opening is provided for external power or additional peripheral connections.
Thermal Management & Durability: * Ventilation Holes: Small perforated patterns are included on the lid and side walls to prevent heat buildup during continuous operation.
M2.5 Screw Bosses: The enclosure uses standard screw mounting pillars to securely fasten the lid to the base, ensuring the device remains rigid during the high-speed movements of the servo.
Ergonomics & Aesthetics: The design features rounded corners (fillets) for a modern, consumer-ready look while maintaining a compact footprint suitable for desktop prototyping or classroom demonstrations.
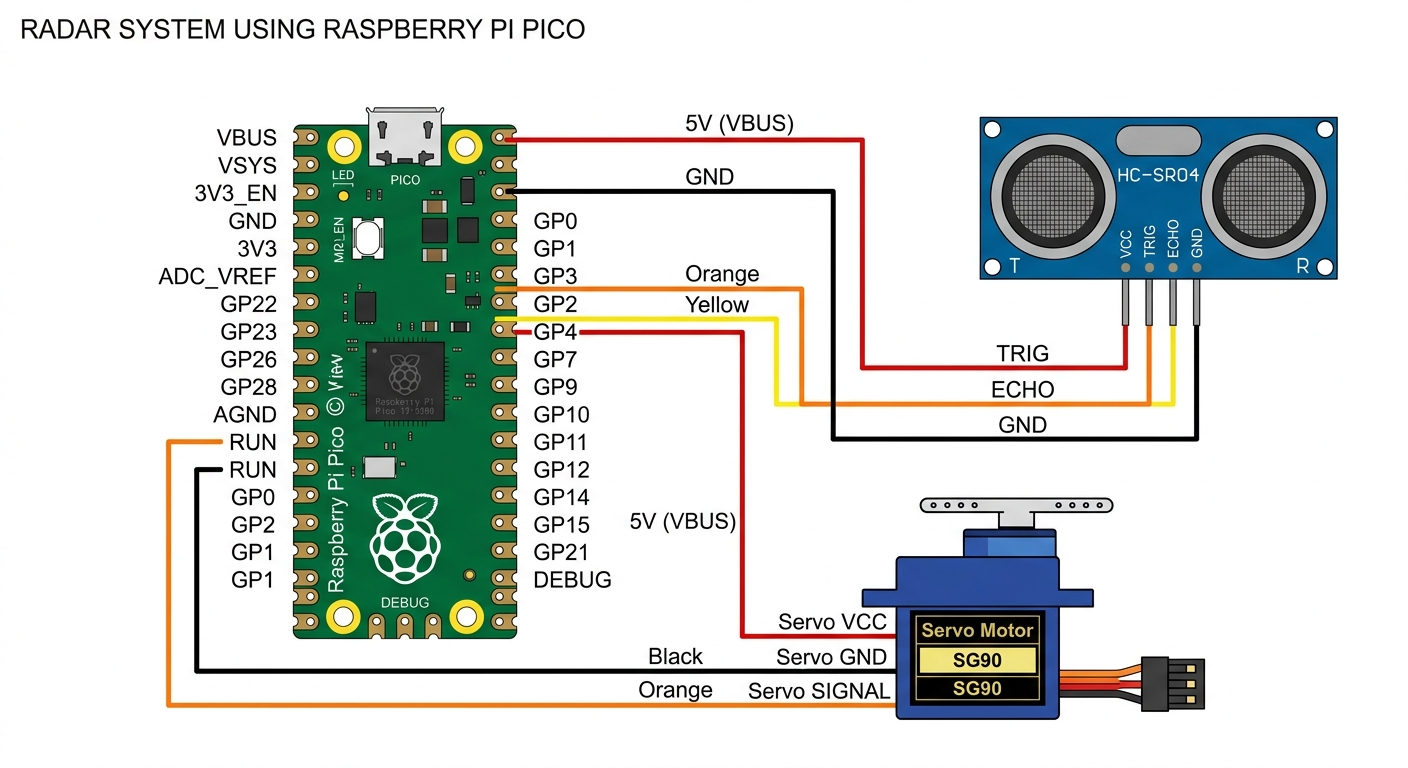
Raspberry Pi Pico Based Ultrasonic Radar System Wiring Guide
Microcontroller Architecture: The Raspberry Pi Pico acts as the central processing unit, managing the timing for the ultrasonic pulses and the Pulse Width Modulation (PWM) for the servo rotation.
Ultrasonic Sensor (HC-SR04) Interface:
TRIG (GP3): Configured as an Output. It sends a 10µs pulse to trigger the ultrasonic wave.
ECHO (GP2): Configured as an Input. It measures the duration of the returning sound wave to calculate the distance of an object.
Servo Motor (SG90) Control:
SIGNAL (GP15): Utilizes a PWM (Pulse Width Modulation) signal to precisely control the angular position of the sensor, enabling a 180-degree sweep.
Power Distribution:
VCC (5V): Both the sensor and the motor are powered via the VBUS pin (Pin 40), which provides a steady 5V from the USB input.
GND: A common ground is established between all components to ensure a stable reference voltage and signal integrity.
Visual Layout: The diagram uses a top-down logical flow, with color-coded wiring to distinguish between Power (Red), Ground (Black), and Logic signals (Orange/Yellow), making it ideal for educational prototyping.


_3u05Tpwasz.png?auto=compress%2Cformat&w=40&h=40&fit=fillmax&bg=fff&dpr=2)
Comments