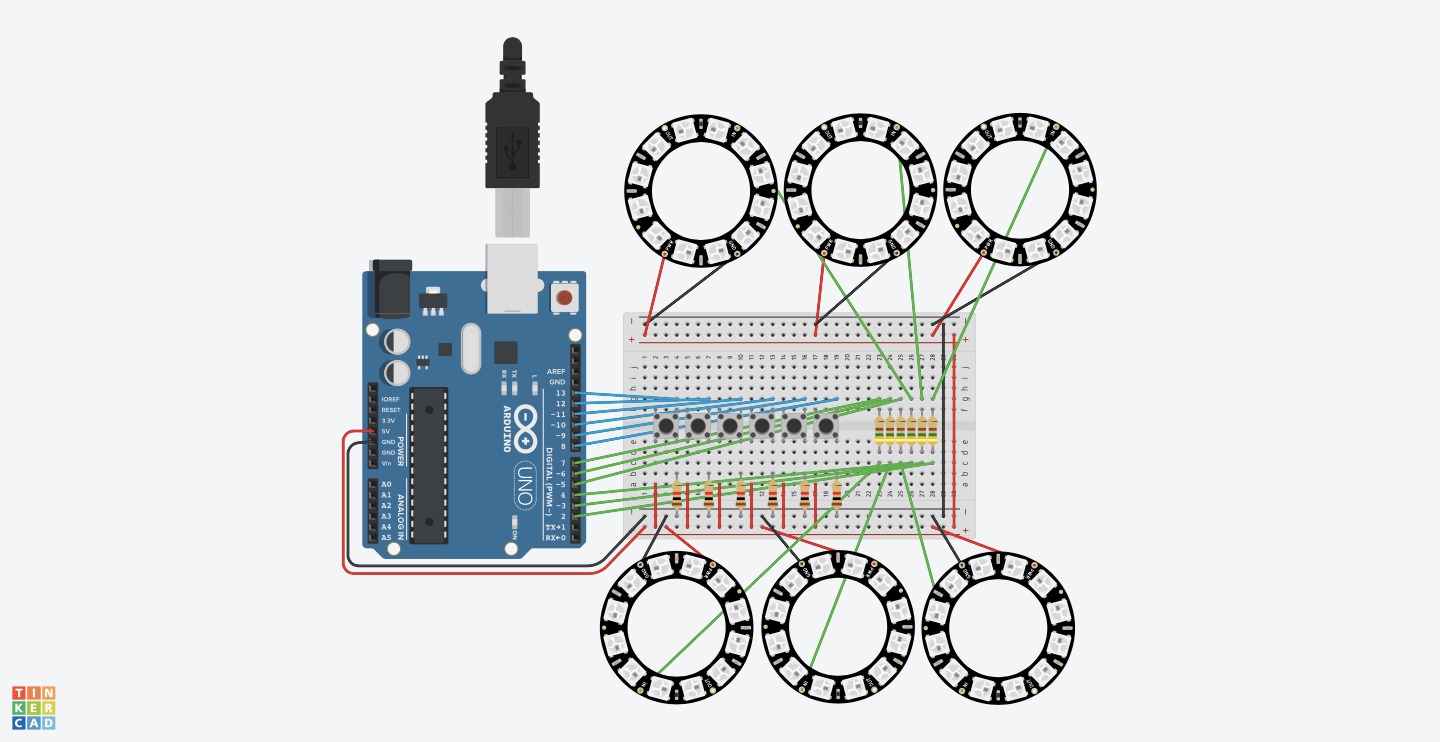
// include the library code:
#include <Adafruit_NeoPixel.h>
#include <LiquidCrystal_I2C.h>


int buttonPin = 8;     // the number of the pushbutton pin
int PIN = 2;

Adafruit_NeoPixel strip = Adafruit_NeoPixel(12, PIN, NEO_GRB + NEO_KHZ800);

// constants won't change. They're used here to set pin numbers:
// initialize the library by associating any needed LCD interface pin
// with the arduino pin number it is connected to
// The LCD constructor - address shown is 0x27 - may or may not be correct for yours
// Also based on YWRobot LCM1602 IIC V1
LiquidCrystal_I2C lcd(0x27, 2, 1, 0, 4, 5, 6, 7, 3, POSITIVE);

// variables will change:
int buttonState;         // variable for reading the pushbutton status
int historicState;
int randNumber;
int score = 0;

void setup() {
  // set up the LCD's number of columns and rows:
  lcd.begin(16, 2);
  // Print a message to the LCD.
  lcd.print("Lets play a game!");
  //lcd.display();
  delay(500);
  pinMode(buttonPin, INPUT);
  Serial.begin(9600);
  randomSeed(analogRead(0));

}

void loop() {
  // Turn off the display:
  //lcd.noDisplay();
  //delay(500);
  // Turn on the display:
  //lcd.display();
  //delay(500);
  // read the state of the pushbutton value:
  buttonState = digitalRead(buttonPin);
  // check if the pushbutton is pressed. If it is, the buttonState is HIGH:
  if (buttonState == HIGH) {
        //delay(1000);
      score++;
      lcd.clear();
      //lcd.display();
      lcd.print("Highscore: " + String (score));
      //lcd.display();
      strip = Adafruit_NeoPixel(12, PIN, NEO_GRB + NEO_KHZ800);
      strip.begin();
      for(int i = 0; i < 12; i++){
        strip.setPixelColor(i, 0, 0, 0);
        strip.show();
        }
      randNumber = random(2, 8);
      Serial.println(randNumber);
      PIN = randNumber;
      buttonPin = randNumber + 6;
      strip = Adafruit_NeoPixel(12, PIN, NEO_GRB + NEO_KHZ800);
      strip.begin();
      historicState = HIGH;
        for(int i = 0; i < 12; i++){
        strip.setPixelColor(i, 255, 0, 0);
        strip.show();

    }
    //Serial.println("buttonPin = " + String(buttonPin));
    delay(50);
  }
  delay(50);
}


_ztBMuBhMHo.jpg?auto=compress%2Cformat&w=48&h=48&fit=fill&bg=ffffff)


_3u05Tpwasz.png?auto=compress%2Cformat&w=40&h=40&fit=fillmax&bg=fff&dpr=2)
Comments