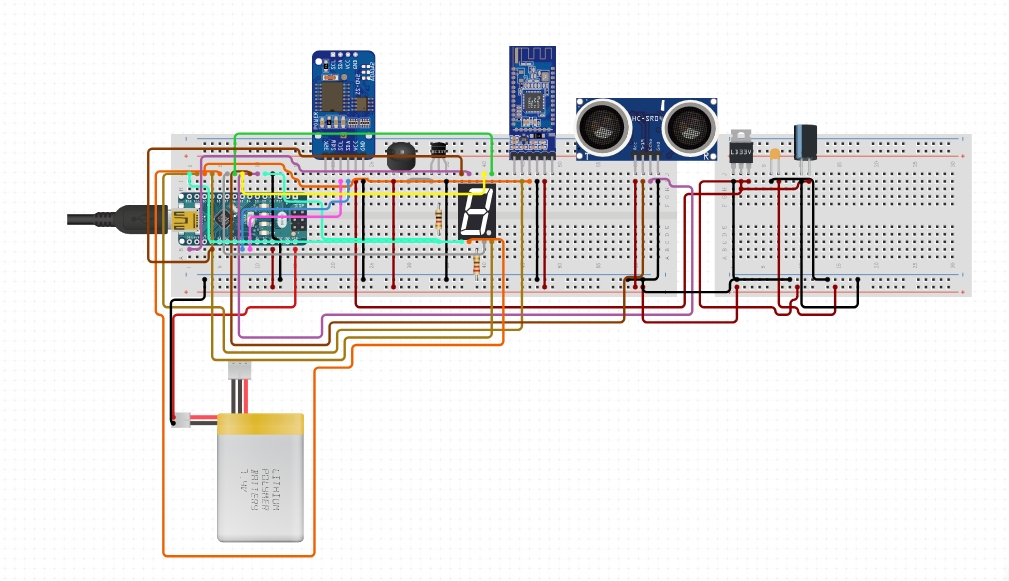
// Include Libraries
#include "Arduino.h"
#include "BLEHM10.h"
#include "Buzzer.h"
#include "NewPing.h"
#include "Wire.h"
#include "RTClib.h"


// Pin Definitions
#define BLEHM10_PIN_TXD	11
#define BLEHM10_PIN_RXD	10
#define BUZZER_PIN_SIG	2
#define HCSR04_PIN_TRIG	4
#define HCSR04_PIN_ECHO	3
#define SEVENSEGSINGLE_PIN_DP	9
#define SEVENSEGSINGLE_PIN_C	7
#define SEVENSEGSINGLE_PIN_D	8
#define SEVENSEGSINGLE_PIN_E	12
#define SEVENSEGSINGLE_PIN_B	6
#define SEVENSEGSINGLE_PIN_A	5
#define SEVENSEGSINGLE_PIN_F	13
#define SEVENSEGSINGLE_PIN_G	A0


// Global variables and defines
String blehm10Str = "";
//define an array for all the segments
int SevenSegSinglePins[] = { SEVENSEGSINGLE_PIN_DP, SEVENSEGSINGLE_PIN_C, SEVENSEGSINGLE_PIN_D, SEVENSEGSINGLE_PIN_E, SEVENSEGSINGLE_PIN_B, SEVENSEGSINGLE_PIN_A, SEVENSEGSINGLE_PIN_F, SEVENSEGSINGLE_PIN_G };
// object initialization
BLEHM10 blehm10(BLEHM10_PIN_RXD,BLEHM10_PIN_TXD);
Buzzer buzzer(BUZZER_PIN_SIG);
NewPing hcsr04(HCSR04_PIN_TRIG,HCSR04_PIN_ECHO);
RTC_DS3231 rtcDS;


// define vars for testing menu
const int timeout = 10000;       //define timeout of 10 sec
char menuOption = 0;
long time0;

// Setup the essentials for your circuit to work. It runs first every time your circuit is powered with electricity.
void setup()
{
    // Setup Serial which is useful for debugging
    // Use the Serial Monitor to view printed messages
    Serial.begin(9600);
    while (!Serial) ; // wait for serial port to connect. Needed for native USB
    Serial.println("start");

    blehm10.begin(9600);
    //This example uses HM-10 BLE to communicate with an Android or iOS device.
    //For Android download Hm BLE Terminal from google play store, or any other BLE app.
    //For iOS download LightBlue from App Store, or any other BLE app.
    //On both apps, pair and connect to your HM-10
    //You should see this message your Smartphone
    blehm10.println("BLE On....");
    if (! rtcDS.begin()) {
    Serial.println("Couldn't find RTC");
    while (1);
    }
    if (rtcDS.lostPower()) {
    Serial.println("RTC lost power, lets set the time!");
    // following line sets the RTC to the date & time this sketch was compiled
    rtcDS.adjust(DateTime(F(__DATE__), F(__TIME__)));
    // This line sets the RTC with an explicit date & time, for example to set
    // January 21, 2014 at 3am you would call:
    // rtcDS.adjust(DateTime(2014, 1, 21, 3, 0, 0));
    }
    pinMode(SEVENSEGSINGLE_PIN_DP, OUTPUT);
    pinMode(SEVENSEGSINGLE_PIN_C, OUTPUT);
    pinMode(SEVENSEGSINGLE_PIN_D, OUTPUT);
    pinMode(SEVENSEGSINGLE_PIN_E, OUTPUT);
    pinMode(SEVENSEGSINGLE_PIN_B, OUTPUT);
    pinMode(SEVENSEGSINGLE_PIN_A, OUTPUT);
    pinMode(SEVENSEGSINGLE_PIN_F, OUTPUT);
    pinMode(SEVENSEGSINGLE_PIN_G, OUTPUT);
    //turn off all segments:
    for (int i = 0; i < 8; i++) {
    digitalWrite(SevenSegSinglePins[i],HIGH);
    }
    menuOption = menu();

}

// Main logic of your circuit. It defines the interaction between the components you selected. After setup, it runs over and over again, in an eternal loop.
void loop()
{


    if(menuOption == '1') {
    // HM-10 BLE Bluetooth 4.0 - Test Code
    //Receive String from bluetooth device
    if (blehm10.available())
    {
    //Read a complete line from bluetooth terminal
    blehm10Str = blehm10.readStringUntil('\n');
    // Print raw data to serial monitor
    Serial.print("BT Raw Data: ");
    Serial.println(blehm10Str);
    }
    //Send sensor data to Bluetooth device
    blehm10.println("PUT YOUR SENSOR DATA HERE");

    }
    else if(menuOption == '2') {
    // Buzzer - Test Code
    // The buzzer will turn on and off for 500ms (0.5 sec)
    buzzer.on();       // 1. turns on
    delay(500);             // 2. waits 500 milliseconds (0.5 sec). Change the value in the brackets (500) for a longer or shorter delay in milliseconds.
    buzzer.off();      // 3. turns off.
    delay(500);             // 4. waits 500 milliseconds (0.5 sec). Change the value in the brackets (500) for a longer or shorter delay in milliseconds.
    }
    else if(menuOption == '3') {
    // Ultrasonic Sensor - HC-SR04 - Test Code
    // Read distance measurment from UltraSonic sensor
    int hcsr04Dist = hcsr04.ping_cm();
    delay(10);
    Serial.print(F("Distance: ")); Serial.print(hcsr04Dist); Serial.println(F("[cm]"));

    }
    else if(menuOption == '4') {
    // RTC - Real Time Clock - Test Code
    //This will display the time and date of the RTC. see RTC.h for more functions such as rtcDS.hour(), rtcDS.month() etc.
    DateTime now = rtcDS.now();
    Serial.print(now.month(), DEC);
    Serial.print('/');
    Serial.print(now.day(), DEC);
    Serial.print('/');
    Serial.print(now.year(), DEC);
    Serial.print("  ");
    Serial.print(now.hour(), DEC);
    Serial.print(':');
    Serial.print(now.minute(), DEC);
    Serial.print(':');
    Serial.print(now.second(), DEC);
    Serial.println();
    delay(1000);
    }
    else if(menuOption == '5') {
    // 7 - Segment Display (Single Digit) - Test Code
    //This loop will turn on and off each segment in the array for 0.5 sec
    for (int i = 0; i < 8; i++) {
    digitalWrite(SevenSegSinglePins[i],LOW);
    delay(500);
    }
    for (int i = 0; i < 8; i++) {
    digitalWrite(SevenSegSinglePins[i],HIGH);
    }

    }

    if (millis() - time0 > timeout)
    {
        menuOption = menu();
    }

}


// Menu function for selecting the components to be tested
// Follow serial monitor for instrcutions
char menu()
{

    Serial.println(F("\nWhich component would you like to test?"));
    Serial.println(F("(1) HM-10 BLE Bluetooth 4.0"));
    Serial.println(F("(2) Buzzer"));
    Serial.println(F("(3) Ultrasonic Sensor - HC-SR04"));
    Serial.println(F("(4) RTC - Real Time Clock"));
    Serial.println(F("(5) 7 - Segment Display (Single Digit)"));
    Serial.println(F("(menu) send anything else or press on board reset button\n"));
    while (!Serial.available());

    // Read data from serial monitor if received
    while (Serial.available())
    {
        char c = Serial.read();
        if (isAlphaNumeric(c))
        {

            if(c == '1')
    			Serial.println(F("Now Testing HM-10 BLE Bluetooth 4.0"));
    		else if(c == '2')
    			Serial.println(F("Now Testing Buzzer"));
    		else if(c == '3')
    			Serial.println(F("Now Testing Ultrasonic Sensor - HC-SR04"));
    		else if(c == '4')
    			Serial.println(F("Now Testing RTC - Real Time Clock"));
    		else if(c == '5')
    			Serial.println(F("Now Testing 7 - Segment Display (Single Digit)"));
            else
            {
                Serial.println(F("illegal input!"));
                return 0;
            }
            time0 = millis();
            return c;
        }
    }
}


_1x_bGT19vVAby.png?auto=compress%2Cformat&w=40&h=40&fit=fillmax&bg=fff&dpr=2)
Comments