


Hardware components | ||||||
 |
| × | 1 | |||
 |
| × | 1 | |||
 |
| × | 1 | |||
 |
| × | 1 | |||
Software apps and online services | ||||||
| ||||||
 |
| |||||
 |
| |||||
 |
| |||||
Hand tools and fabrication machines | ||||||
 |
| |||||
I have always been fascinated by the idea that technology can do more than make our lives convenient, it can make life a little easier for someone else.
One thing that stayed in my mind was how difficult a simple conversation can become when two people don't share the same way of communicating.
Imagine going to a hospital and trying to explain something important to a doctor, but the person in front of you doesn't understand sign language.
Or imagine standing at a shop counter, wanting to ask a simple question, but having to type everything on a phone.
For many deaf and hard-of-hearing people, situations like these can happen every day.
I started thinking:
"Why should communication need a third person every time?"
That question became the starting point for SignBridge Pocket.
I didn't want to build something that looked impressive only on a computer screen. I wanted to build something that a person could actually wear, carry and use in a real conversation.
That is how the idea of a small clip-on device came to life.
Meet SignBridge PocketSignBridge Pocket is a compact wearable device that works as a two-way communication bridge between sign language and spoken language.
It clips onto a shirt like a name badge.
When a deaf user signs:
Sign → AI → Text → Speech
When a hearing person speaks:
Speech → AI → Text → Display
A vibration motor quietly alerts the user whenever new text is available.
The most important part of my idea is that it is designed to work offline.
No cloud server.
No compulsory smartphone.
No internet connection.
The AI runs locally on the Arduino UNO Q.
My goal is simple:
Put it on and start communicating.
Put it on and start communicating.
When I started thinking about the project, I realized that a normal microcontroller alone wouldn't be enough.
SignBridge needs to process camera images, run AI models, process audio, control a display and respond to sensors—all while keeping the device portable.
That's where the Arduino UNO Q became particularly interesting to me.
The dual-processing architecture gives me the ability to divide the workload.
The MPU can focus on computationally intensive tasks such as:
Computer vision
- Computer vision
AI inference
- AI inference
Speech recognition
- Speech recognition
Audio processing
- Audio processing
Language processing
- Language processing
While the MCU can handle real-time hardware interaction such as:
OLED display
- OLED display
This separation made much more sense for my project than trying to force everything through a single processor.
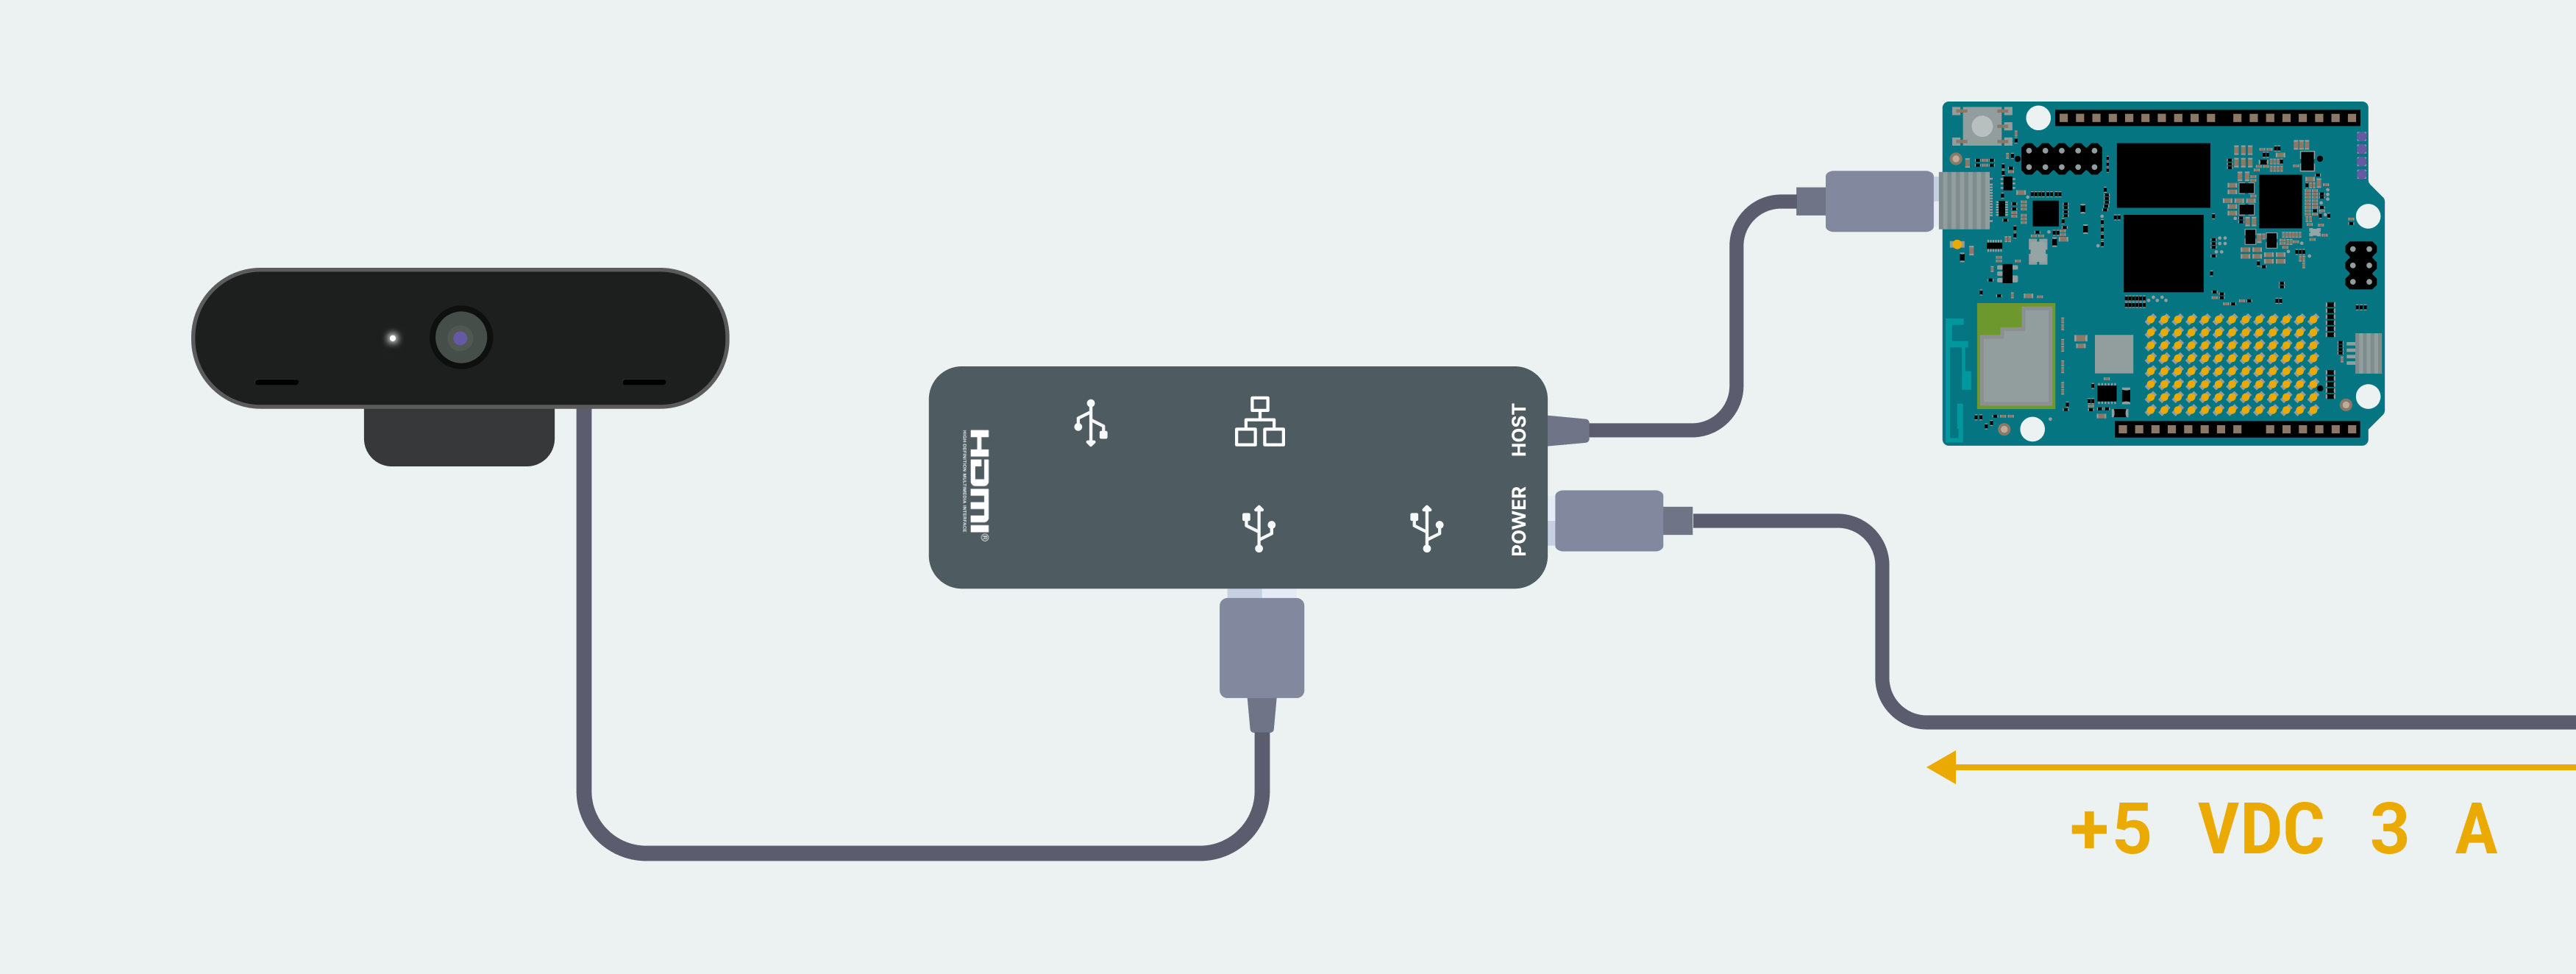
connection :battery
|
Arduino UNO Q --USB C Hub----Webcam
When I first started SignBridge Pocket, I thought the difficult part would be training the AI.
I was wrong.
The real challenge was getting the camera, AI model, Arduino UNO Q, display, microphone, speaker and vibration feedback to work together as one device.
After several experiments, I found that using Arduino App Lab + Edge Impulse + Arduino UNO Q made the development process much easier.
So in this section, I want to explain exactly how I approached the build, including the hardware connections, software setup, AI workflow, App Lab workflow, example code, and some of the problems I faced.
My goal is that someone reading this should be able to understand the process and build their own simplified version.
- Step 1 — Start With the Arduino UNO Q
The first thing I did was connect the UNO Q to my computer using a USB-C data cable.
This is important:
Use a proper USB-C data cable, not a charge-only cable.
Use a proper USB-C data cable, not a charge-only cable.
For the first PC-hosted setup, Arduino's current UNO Q documentation specifies a USB-C data connection. App Lab can also be used in Single-Board Computer mode, where the board operates independently, but I found the PC-connected workflow much easier while developing.
Once connected, I opened Arduino App Lab.
The first setup checks the board for updates and asks for the device configuration and network credentials. Arduino also provides ready-made examples directly inside App Lab, which is extremely useful for beginners.
- Step 2 — Setting Up Arduino App Lab
This was one of the parts that initially looked complicated to me.
But the workflow is actually quite simple.
My basic process was:Connect UNO Q
↓
Open Arduino App Lab
↓
Board detected
↓
Complete first-time setup
↓
Open Examples
↓
Run a simple example
↓
Check Console
↓
Start modifying the exampleArduino App Lab can create an application containing:
Python code for the Linux/MPU side
- Python code for the Linux/MPU side
Arduino code for the MCU side
- Arduino code for the MCU side
Optional Bricks
- Optional Bricks
Bridge communication between the two processors
- Bridge communication between the two processors
That is exactly what SignBridge needs.
- Step 3 — My First App Lab Test
Before connecting my AI model, I wanted to make sure the UNO Q itself was working correctly.
I started with a simple example.
Arduino's documentation recommends starting with the Blink LED example as a basic test. When you press Run, App Lab builds the Linux component, flashes the MCU sketch and starts the application.
This gave me an important rule for the whole project:
Never debug five things at the same time.
Never debug five things at the same time.
First:
Does the board work?
Then:
Does the display work?
Then:
Does the camera work?
Then:
Does the AI work?
Then:
Does Bridge communication work?
Finally:
Does everything work together?
- Step 4 — Using an Existing App Instead of Starting From Zero
One feature I found very useful in App Lab is that I don't always have to create everything from an empty project.
App Lab provides example Apps that I can open, run and modify. Arduino's current documentation explicitly supports starting from a ready-to-use example, customizing it, or creating a new App from scratch.
For SignBridge, this means I can start with the closest example and change it instead of writing the entire application architecture myself.
My workflow became:
Open Example
     ↓
Run Example
     ↓
Confirm it works
     ↓
Open Code
     ↓
Change one part
     ↓
Run Again
     ↓
Add my hardware
This is much less intimidating when you're new to the UNO Q.
- Step 5 — Understanding the App Structure
The important thing to understand is that an UNO Q App isn't necessarily just one Arduino sketch.
My SignBridge application is divided conceptually into two sides.
This is where I want to handle the heavier processing:
Camera
AI inference
Image processing
Speech recognition
Language processingThis is where I want fast hardware interaction:
OLED
Button
Vibration motor
Sensors
Then I use Bridge to communicate between them.
Arduino describes Bridge as the mechanism that exchanges data between the Linux and MCU sides.
That makes the architecture much easier to understand:
ARDUINO UNO Q
       ┌──────────────────────┐
       │                      │
       │       MPU            │
       │                      │
Camera → AI                   │
       │ Speech               │
       │ Language             │
       │                      │
       │         ↓            │
       │       BRIDGE         │
       │         ↓            │
       │                      │
       │       MCU            │
       │                      │
       │ OLED                 │
       │ Button               │
       │ Vibration            │
       │                      │
       └──────────────────────┘
This was one of the biggest things that made the UNO Q click for me.
- Step 6 — A Simple Bridge Test
Before putting the complete AI system into the project, I created a very simple test:
MPU sends a message → MCU receives it → OLED displays it.
Conceptually:
AI detects:
"HELLO"

       ↓

Bridge

       ↓

MCU receives:
"HELLO"

       ↓

OLED:
HELLO
A simplified Python-side example can look like this:
# Simplified example
# MPU / Linux side

message = "HELLO"

# Send the message to the MCU using the
# Bridge mechanism provided by the App.
bridge_message = message
And the MCU side conceptually receives the message and updates the display:
// Simplified example
// MCU side

String message = "HELLO";

void setup() {
  Serial.begin(115200);
}

void loop() {
  // Receive message through the App's Bridge
  // and update the display.
}
The exact Bridge API depends on the App Lab example/version I am starting from, so I recommend copying the Bridge pattern from the current App Lab example rather than blindly copying an old code snippet from the internet.
That was another lesson I learned:
Start from the working example, then modify it.
Start from the working example, then modify it.
It is much easier than trying to reconstruct the complete UNO Q architecture yourself.
- Step 7 — Adding the OLED
Once my communication test worked, I connected the display.
For the prototype, my display is responsible for showing:
SignBridge
------------
HELLO
or:
You said:
I WANT COFFEE
I also use the display for basic status information:
READY
LISTENING
PROCESSING
SIGN DETECTED
This made debugging much easier.
If the AI was running but nothing appeared on the screen, I immediately knew the problem was somewhere between the AI output and the display.
- Step 8 — Connecting the Camera
The camera is the most important sensor in the sign-recognition pipeline.
For the first prototype, I kept the camera connection simple.
My development setup is:
USB Camera
     ↓
UNO Q
     ↓
Linux / MPU
     ↓
Python + AI
The UNO Q supports USB peripherals such as USB cameras when used in its single-board-computer setup; Arduino also provides dedicated camera/display/audio expansion options through compatible carrier hardware.
I strongly recommend testing the camera before adding the AI.
First ask:
Can I see the camera feed?
Only after that works should you start testing the model.
- Step 9 — Creating My AI Model in Edge Impulse
This is where Edge Impulse became a major part of my project.
I created an Edge Impulse project for sign recognition.
The basic workflow is:
Collect Images
      ↓
Upload Dataset
      ↓
Label Images
      ↓
Create Impulse
      ↓
Train Model
      ↓
Test Model
      ↓
Optimize
      ↓
Deploy
      ↓
Test on UNO Q
Edge Impulse's Studio is designed around this type of edge-AI workflow: building datasets, training models and preparing models/libraries for edge devices.
- Step 10 — Uploading My Sign Images
I collected images for each sign.
For example:
HELLO
HELLO
HELLO
HELLO

FIVE
FIVE
FIVE
FIVE

YES
YES
YES
YES
I then uploaded the images to the Edge Impulse project and organized them with their corresponding labels.
The important thing I learned here was:
Don't make every training image identical.
I intentionally included variation:
Different hand positions
- Different hand positions
Slightly different distances
- Slightly different distances
Different backgrounds
- Different backgrounds
Different lighting
- Different lighting
Different orientations
- Different orientations
This makes the model more useful outside the training environment.
- Step 11 — Label Everything Carefully
A machine-learning model doesn't know that an image represents "HELLO."
I have to tell it.
For example:
image_001.jpg → HELLO
image_002.jpg → HELLO
image_003.jpg → HELLO

image_004.jpg → FIVE
image_005.jpg → FIVE
image_006.jpg → FIVE
I always check the labels before training.
One incorrectly labelled image can teach the model the wrong relationship.
- Step 12 — Train the Model
After preparing the dataset, I created the image-processing and learning pipeline in Edge Impulse and trained the classifier.
The first model wasn't perfect.
And honestly, that was useful.
Instead of seeing an imperfect result as a failure, I treated the mistakes as information.
If the model confused:
YES ↔ NOI looked at the examples.
If it worked in bright light but failed in darker conditions, I collected more dark-condition samples.
If it worked close to the camera but failed farther away, I added more distance variation.
This created a continuous loop:
Train
 ↓
Test
 ↓
Find mistakes
 ↓
Collect better data
 ↓
Train again- Step 13 — Bringing the AI Into My UNO Q Application
Once I had a model that was useful enough to test, I moved it into my embedded workflow.
This is where the compatibility between Edge Impulse + Arduino UNO Q + App Lab became especially useful.
Instead of treating AI and hardware as completely separate projects, I could work toward one application:
EDGE IMPULSE
      │
      │ AI model
      ↓
ARDUINO UNO Q
      │
      ↓
APP LAB
      │
 ┌────┴─────┐
 ↓          ↓
MPU        MCU
 ↓          ↓
AI        OLED
 ↓
Camera
Edge Impulse provides deployment options for edge devices, including downloadable libraries and SDK-based approaches; the exact deployment target should be selected according to the model and runtime being used.
- Step 14 — Using App Lab to Put Everything Together
At this point, App Lab became my main development environment.
Instead of opening multiple tools every time I changed something, I could work around the UNO Q application itself.
My development loop became:
Edit code
   ↓
Save
   ↓
Run App
   ↓
Watch Console
   ↓
Test hardware
   ↓
Find problem
   ↓
Edit again
App Lab's console is particularly helpful because it exposes startup information and output from both the Python and microcontroller sides. Arduino documents separate console views for startup, Python and MCU sketch output.
That means when something stops working, I don't have to guess blindly.
Some Problems I FacedThis project definitely didn't work perfectly on the first attempt.
Here are some of the problems that made me stop and rethink my approach.
Problem 1 — The Board Was Connected but App Lab Didn't Behave CorrectlyWhat happened?Sometimes the board appeared connected but the application didn't run as expected.
I checked the basics first:
Use a USB-C data cable.
- Use a USB-C data cable.
Check that App Lab recognizes the UNO Q.
- Check that App Lab recognizes the UNO Q.
Let the board complete its update/setup process.
- Let the board complete its update/setup process.
Run a simple example first.
- Run a simple example first.
Check the App Lab console.
- Check the App Lab console.
Arduino specifically notes that the first PC-hosted setup requires a USB data connection and that App Lab can show logs for the different parts of the application.
Problem 2 — I Tried to Build Everything at OnceThis was probably my biggest mistake.
I connected:
camera + display + AI + microphone + speaker + vibration
and expected everything to work.
It didn't.
I couldn't even tell which component was causing the problem.
My solutionI changed my method.
I built it in stages:
UNO Q
 ↓
Display
 ↓
Camera
 ↓
AI
 ↓
Button
 ↓
Vibration
 ↓
Microphone
 ↓
Speaker
This made troubleshooting dramatically easier.
Problem 3 — AI Predictions Were JumpingThe camera might produce:
HELLO
HELLO
HELP
HELLO
HELP
HELLO
even when I was making the same gesture.
Why?The model sees individual frames.
Small changes in hand position, lighting or background can change the prediction.
My solutionI added temporal smoothing and considered multiple predictions rather than immediately trusting every frame.
That made the final result much more stable.
Problem 4 — The Model Worked in Testing but Not in Real LifeThis was an important lesson.
My model could perform well on my test images but struggle when I changed the background or lighting.
I went back to Edge Impulse and improved the dataset.
I added:
More examples
- More examples
More lighting conditions
- More lighting conditions
More hand positions
- More hand positions
More backgrounds
- More backgrounds
More variation between users
- More variation between users
The lesson was simple:
Better data often solves problems that more complicated AI cannot.
Better data often solves problems that more complicated AI cannot.Problem 5 — Camera Frame Rate Was Too High
Processing every camera frame can create unnecessary load.
The camera might produce more frames than the AI needs.
My solutionI reduced the effective processing rate and avoided running inference on every possible frame.
Instead of:
Frame → AI
Frame → AI
Frame → AI
Frame → AI
I moved toward:
Frame
  ↓
Check timing
  ↓
AI inference
  ↓
Wait
  ↓
Next useful frame
This helped me balance responsiveness and processing load.
Problem 6 — Debugging the MPU and MCU Was ConfusingAt first, I sometimes didn't know whether a problem was happening on the Linux/MPU side or MCU side.
I started putting clear debug messages into both sides.
For example:
[MPU] Camera started
[MPU] Model loaded
[MPU] Sign = HELLO
[MPU] Sending Bridge message

[MCU] Message received
[MCU] Updating OLED
[MCU] Vibration ON
This made the system much easier to understand.
App Lab's console is useful here because the development environment exposes output from the Python and MCU sides.
- Step 15 — Making It Portable
Once the electronics worked on the desk, the next challenge was making it feel like SignBridge Pocket rather than a development experiment.
I organized the components into a compact layout.
The goal was:
CAMERA
          │
    ┌─────────────┐
    │ OLED        │
    │             │
    │ UNO Q       │
    │             │
    │ Battery     │
    └─────────────┘
       │       │
    Speaker  Mic
in future I designed the enclosure around the electronics.
The final idea is to clip the device onto clothing like a badge.
That portability is important because the whole purpose is to remove friction.
If someone has to carry a laptop, phone, power bank and multiple sensors, I've failed at the "Pocket" part.
- Step 16 — My Final Software Flow
After combining everything, the SignBridge application follows this logic:
START
                  ↓
             Initialize
                  ↓
        Camera + AI + Audio
                  ↓
            READY MODE
                  ↓
        ┌─────────┴─────────┐
        ↓                   ↓
      SIGN                 SPEECH
        ↓                   ↓
     CAMERA              MICROPHONE
        ↓                   ↓
    AI MODEL          SPEECH-TO-TEXT
        ↓                   ↓
      TEXT                 TEXT
        ↓                   ↓
    SPEAKER              OLED
        ↓                   ↓
    HEARING USER         DEAF USER
And App Lab provides the application environment that brings the Linux/MPU processing and MCU hardware control together.
🚀 The Easiest Way I Recommend Building ItIf you're trying to recreate my project, don't start with the complete SignBridge Pocket.
Start with this:
Level 1UNO Q + App Lab
complete
Run Blink LED.
Level 2UNO Q + OLED
complete
Display:
Hello SignBridgeUNO Q + Camera
complete
Get a live camera feed.
Level 4Edge Impulse
complete
Train a tiny model with only 2–3 signs.
Level 5AI + UNO Q
complete
Get:
Camera → AI → HELLOthis is my actual level
AI + App Lab + OLED
Get:
Camera
 ↓
AI
 ↓
Bridge
 ↓
OLEDworking on
Add:
Button + Vibration
Level 8Add:
Microphone + Speech-to-Text
Level 9Add:
Speaker + Text-to-Speech
Level 10Put everything into the wearable enclosure.
This approach is much easier than trying to build the entire system in one day.
💡 Why App Lab Made This Project Easier for MeBefore using App Lab, the idea of managing a Linux computer, microcontroller and AI model together felt intimidating.
App Lab changed that experience for me.
I can open an example, run it, inspect the code, modify it and test it on the actual UNO Q.
The fact that one App can contain the Python/Linux side, Arduino sketch and optional Bricks—and that Bridge handles communication between Linux and MCU—is exactly what I needed for SignBridge.
Instead of thinking:
"I need to program two processors."
"I need to program two processors."
I can think:
"I need to build one App."
"I need to build one App."
That difference made the project much less overwhelming.
🤝 Why Edge Impulse Became Equally ImportantApp Lab makes it easier for me to build the application.
Edge Impulse makes it easier for me to build the AI.
Together, the workflow becomes:
EDGE IMPULSE
"Teach the computer."

        ↓

ARDUINO UNO Q
"Run the intelligence."

        ↓

APP LAB
"Connect everything."

        ↓

SIGNBRIDGE
"Help two people communicate."
That's why I use both tools extensively.
Neither one replaces the other.
They solve different parts of the same problem.
Future Scope of SignBridge PocketMore Sign LanguagesExpand the system to support ASL, ISL, BSL, and other regional sign languages using separate datasets and models.
- More Sign LanguagesExpand the system to support ASL, ISL, BSL, and other regional sign languages using separate datasets and models.
Larger Sign VocabularyIncrease recognition from basic words to complete sentences, phrases, numbers, and commonly used expressions.
- Larger Sign VocabularyIncrease recognition from basic words to complete sentences, phrases, numbers, and commonly used expressions.
Better AI AccuracyTrain the model with more users, different hand sizes, backgrounds, lighting conditions, and signing styles to improve real-world reliability.
- Better AI AccuracyTrain the model with more users, different hand sizes, backgrounds, lighting conditions, and signing styles to improve real-world reliability.
Two-Way Real-Time ConversationImprove the voice-to-text and sign-to-speech pipeline so both people can communicate naturally in real time.
- Two-Way Real-Time ConversationImprove the voice-to-text and sign-to-speech pipeline so both people can communicate naturally in real time.
Personalized LearningAdd a learning mode where users can teach the system their own signs and create a custom vocabulary.
- Personalized LearningAdd a learning mode where users can teach the system their own signs and create a custom vocabulary.
Smaller & More Wearable DesignReduce the size and weight of the enclosure and improve battery life so the device can be comfortably worn throughout the day.
- Smaller & More Wearable DesignReduce the size and weight of the enclosure and improve battery life so the device can be comfortably worn throughout the day.
Offline & Privacy-Focused AIContinue improving on-device AI so conversations can be processed locally without sending personal video or audio to the cloud.
- Offline & Privacy-Focused AIContinue improving on-device AI so conversations can be processed locally without sending personal video or audio to the cloud.
Smartphone IntegrationIn the future, the device could connect to a smartphone for configuration, conversation history, language selection, and software/model updates.
- Smartphone IntegrationIn the future, the device could connect to a smartphone for configuration, conversation history, language selection, and software/model updates.
Context-Aware TranslationFuture AI models could understand sequences of signs and conversation context instead of translating each sign independently.
- Context-Aware TranslationFuture AI models could understand sequences of signs and conversation context instead of translating each sign independently.
Real-World DeploymentThe system could be tested and adapted for use in schools, hospitals, public-service counters, workplaces, and customer-service environments.
- Real-World DeploymentThe system could be tested and adapted for use in schools, hospitals, public-service counters, workplaces, and customer-service environments.
The long-term goal is to turn SignBridge Pocket from a prototype into a compact, affordable communication assistant that makes everyday conversations between signing and non-signing people easier—while keeping the system portable, private, and simple to use.
❤️ What I Learnedsorry cannot fully usable working prototype because I have not 3D PRINTER to print encloser for it but I am still trying best
The biggest lesson from SignBridge Pocket wasn't a specific neural network or a particular piece of code.
It was learning how to break a complicated problem into small problems.
At first I saw:
"Build an AI sign-language translator."
That sounded huge.
Then I broke it into:
Get the board running.
Get the camera working.
Collect data.
Train a model.
Get one sign recognized.
Show that sign on the display.
Make the processors communicate.
Add speech.
Add vibration.
Make it portable.
Suddenly, the impossible-looking project became a series of achievable steps.
And every time one small part worked, it gave me the motivation to try the next one.
Final ResultSignBridge Pocket is still a work in progress, but the development process has taught me something I didn't expect.
The most exciting part isn't seeing a neural network produce a confidence score.
It's when I perform a sign in front of the camera and see:
HELLOappear on my device.
Then the speaker says it.
Someone responds.
Their voice becomes text.
The device vibrates.
And the conversation continues.
For a moment, all the wiring, Python code, Arduino code, datasets, model training and debugging disappear.
There are simply two people communicating.
That's why I'm building SignBridge Pocket.
And that's why Arduino UNO Q + App Lab + Edge Impulse have become such an important part of my project.
I started with an idea about AI.I ended up building a tool about people.
I will try to make best further update I post sometime later I still try because this is my first hardware that is advance, So I build all functions and solve allproblems in this project and then update it.
SignBridge PocketClip it. Sign. Speak. Understand.Thank you hackster and all


Comments