



Hardware components | ||||||
| × | 1 | ||||
| × | 1 | ||||
| × | 1 | ||||
| × | 1 | ||||
| × | 1 | ||||
| × | 1 | ||||
| × | 1 | ||||
| × | 1 | ||||
| × | 1 | ||||
| × | 1 | ||||
| × | 1 | ||||
| × | 1 | ||||
 |
| × | 1 | |||
Software apps and online services | ||||||
 |
| |||||
| ||||||
STORY of the HYPER S3 ROCKET and the STEM FORGE Rockets & Engineering Challenge
As a teacher of technology and engineering, my students needed to build complex projects with robotics, solar and even rockets, so they needed sensors, data logging, parachute release and more.
So I did what any maker-educator would do (having a previous life in micro-electronics engineering). I consulted fellow engineering teachers, researched rocketry physics, telemetry, battery safety, and a whole lot more, then designed a flight-capable, battery-vaulted, development board from scratch (with future options to expand).
The result is the HYPER S3 ROCKET: a 4 gram, 20 mm × 33.5 mm ESP32-S3 board built around four ideas:
- Power: a dual-core 240 MHz ESP32-S3 and a 2 A, 3.3 V buck-boost rail that keeps the processor alive when servos and radios surge, charged from USB-C or a solar panel.
- Protect: a hardware "double safety vault" that guards the battery on both charge and discharge, even if your code crashes.
- Precise: a nano-power MEMS real-time clock, an optional 10-DoF motion and altitude sensor array, and a fast 4-bit MicroSD logger.
- Portable: small and light enough to ride inside a soda-bottle rocket nose cone, or solder flat onto your own board as a castellated module.
It was engineered for water-rocket telemetry, but it packs a serious punch for any battery and solar project my students can dream of. I want you to have this option too so I'm crowd-funding this through Crowd Supply and Mouser Electronics.
This project page is made as a structured guide for anyone who wants to learn to build with microcontrollers, batteries and solar panels, but I have focused the story here on my original project needs - the STEMFORGE Rockets & Engineering Challenge.
Contents:
1.The Problem Statement
2.ProblemElectronics (and Optional Models for different projects)
3.Mechanisms & 3D Printing
4.Simulating & Testing
5.Conclusion
6. References
1. The Problem StatementIn the STEM FORGE Rockets & Engineering Challenge, students in groups of 3 or 4 are to present a solution document and prototype using the engineering process to successfully devise, make, launch and land a water rocket with the best acceleration, altitude, and aesthetics. The rocket must also go through planned stages to separate the landing module, deploy a parachute, and land the module the right way up. Note: the pressure of the bottle for launching must not exceed 65 psi.
2. Problem Electronics (and Four Models for different projects)Knowing we'd want more out of the one board design - having other projects down the line, I designed the following circuit to suit our school's various needs with an emphasis on rockets and safety, I called it the HYPER S3 ROCKET.
For the main rocket build I made the circuit to log it all and possibly radio it back to base using the ESP-Now protocol and the WiFi antenna of the ESP32-S3 Microcontroller. I call this circuit the LOGGER (top left) with everything it could need - so we can use it on the water rockets (or roller coasters/ drones/ rovers). It can withstand up to 32G and log data at a frequency of 1000Hz, with heaps of other S3 features for other projects.
The 10 DoF sensors are everything a rocket needs, but they aren't needed for every engineering project at school, but storing and retrieving bulk data will come in handy to play back Audio using I2S output (digital) and the MicroSD card using the 4-bit parallel interface (card not supplied). It's quite good with initial tests clocking in at roughly 8MB/s in both read-from and write-to with an old Toshiba 16GB card, making it perfect for internal data transfers with SRAM and PSRAM, but still quite good for USB & WiFi also. This is the DATA model (top right).
Even then, some students will only need the 'bare basics' for their coding projects, so this model is the lowest cost without the sensors and micro SD card components, but still have the USB-C and the Solar tolerant (18v) VIN pin for selection of voltage sources (Safely switched). And this board still has the LIPO charging and a Buck/Boost Regulator for up to 2A of 3.3V system power. I call this base model the CHARGE.
With these three models, students should be able to build most of their engineering products on a budget, but LOGGER is what we're talking about here.
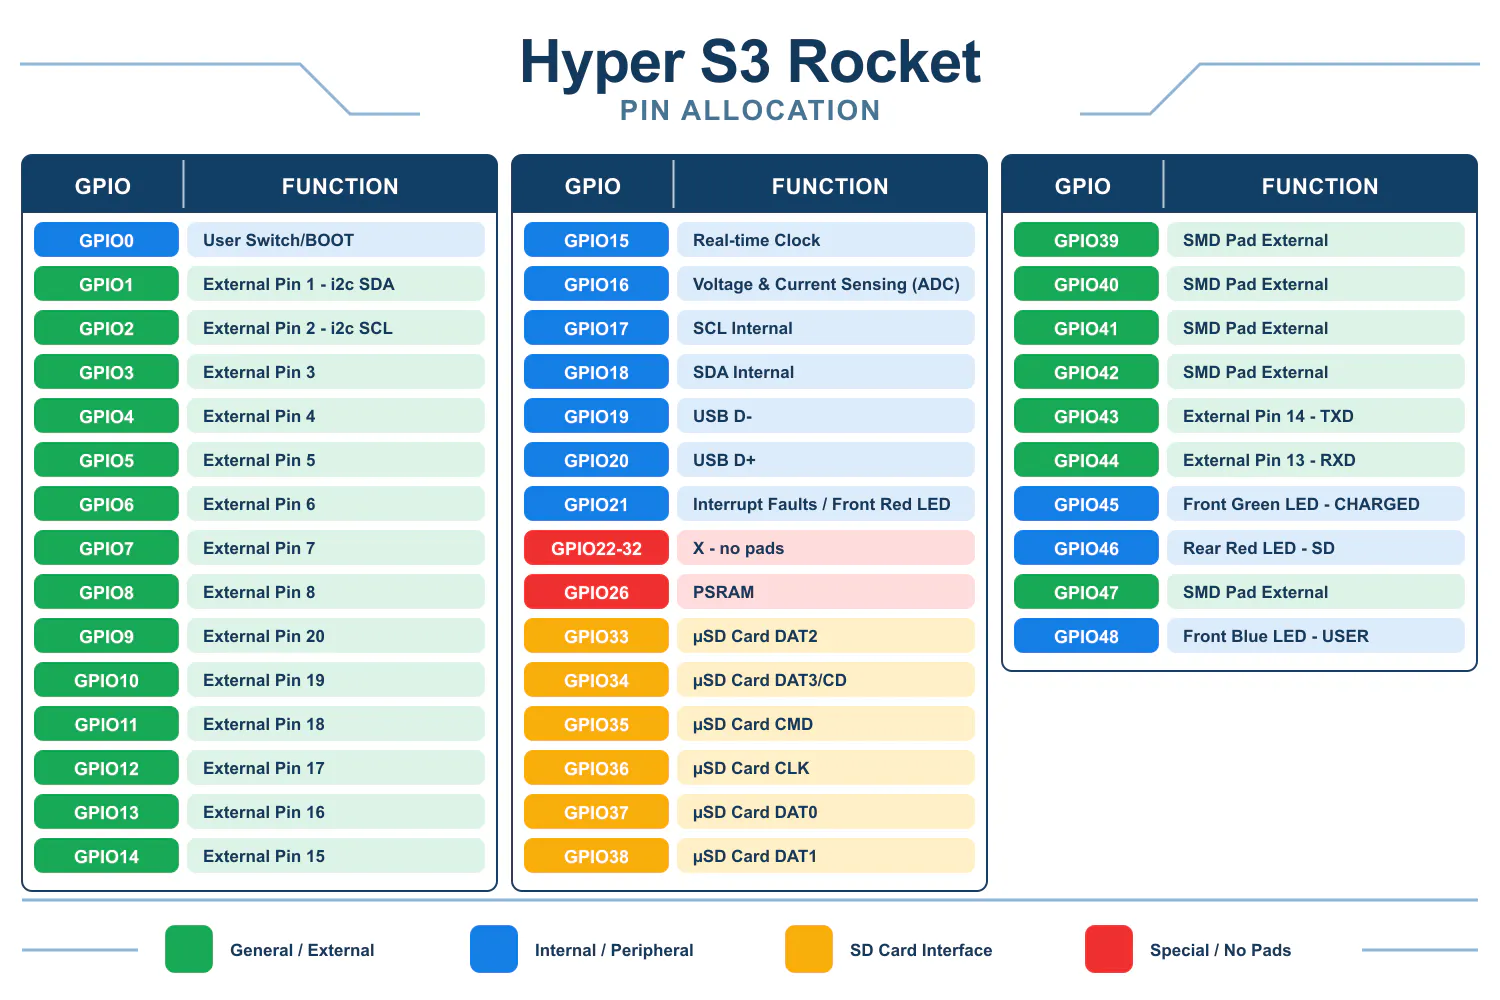
IO, Pinout and features
I developed the board with flight logging in mind but it's become something so much more, and is best understood from a distance, so here's a block diagram to show how it all fits together.
At the heart is the ESP32-S3 with a bunch of use cases and built in features. It's the centerpiece. The red block show the power, charging, and battery safety built in. Purple and Green blocks show the IO on board or via external pins and pads. But the pink blocks are the real star - combined they can recreate any journey (flight, land, or sea) even without having true positioning (that expansion board will be coming though).
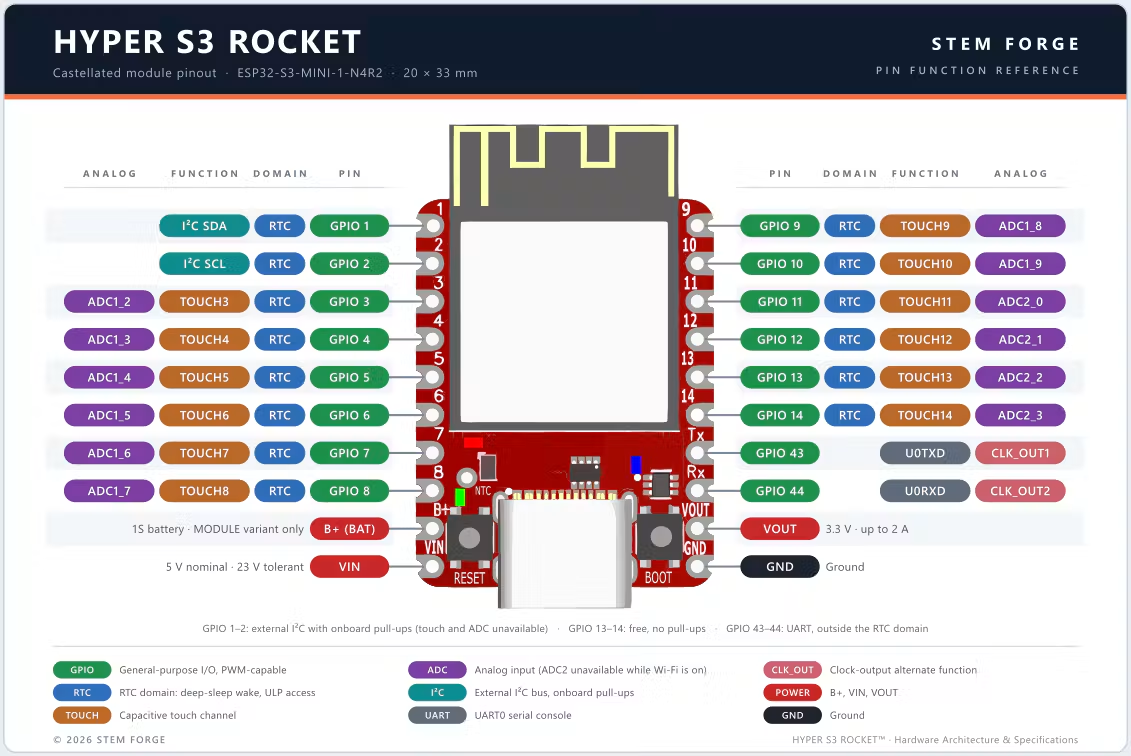
In total, there are 16 GPIO using the external pins with another 5-11 GPIO using SMD pads depending on the option we need at the time. I also included pull-up resistors for external I2c for other modules, 4 LEDs (3 on top, 1 near the SD card holder), and the BOOT button doubles as a user Button setting different modes. Practically every available GPIO is used or made external (except GPIO 22-32 as they are either not available or used internally for the PSRAM).
The ESP32-S3-Mini-1-N4R2 from Espressif is the controller of choice. I've worked with a bunch of these, and the S3 seemed to have the best bang for buck with a great form factor. It has a myriad of features for other projects too such as the 12 capacitive touch sensing pins, ADC and PWM (14 total but 2 were used for external I2C modules and have dedicated pull-up resistors). All these pins will definitely come in handy. UART is there too. For low power projects, students can use all the RTC pins, and of course, I made it breadboard compatible for prototyping too.
One thing I always disliked about other Espressif boards was disorganised layout of GPIO on dev boards that seemed all over the place without reason. You'll see I've worked to get the GPIO quite orderly on the HYPER S3 ROCKET to make it easy for kids to understand. I also chose the PSRAM option with the Mini-1 module as in other projects we'll be using it for the added benefit of fast MP3 decoding or maybe even a future AI projects.
Edits to final version:
At the last minute, I've made some changes so it has a Real-Time Clock for future accurate real-time calendar, clock projects using an OLED or an LCD. I also thought it best to move the µSD Card holder a bit lower to clear the antennae. A Voltage sensing ADC GPIO 16 can measure the current battery cell. And it seemed that maybe castellated pins will come in handy too for modular approach using smd soldering.
Future Directions
I'll be developing a bunch of custom shields for this. First and foremost I'll be looking at a LoRa and LoRawan module for better comms and uBlox GPS for worldwide positional accuracy, but the Seeedstudio can also be attached over i2c for now. Software Update: I've now developed the the flight replay software. Hardware update: it now has the additional Battery Vault circuitry to protect the board from student abuse ;)
Servo Motors at 3.3V
Lastly, a SG90 servo was considered for this project, but Servo motors mainly run on 4.8-6.0V and this wasn't going to be an option without fitting in another boost regulator. But it seems the 2 gram microservos naturally run at lower voltages and I'll be making a rack and pinion style pin release for the parachute. This servo can connect easily with a simple 3-pin header to the pcb. The signal/control for the servo is GPIO44 as it's using the RX pin of the ESP32-S3. I'm also considering other options for quick release.
3. Mechanisms & 3D PrintingRocket Components
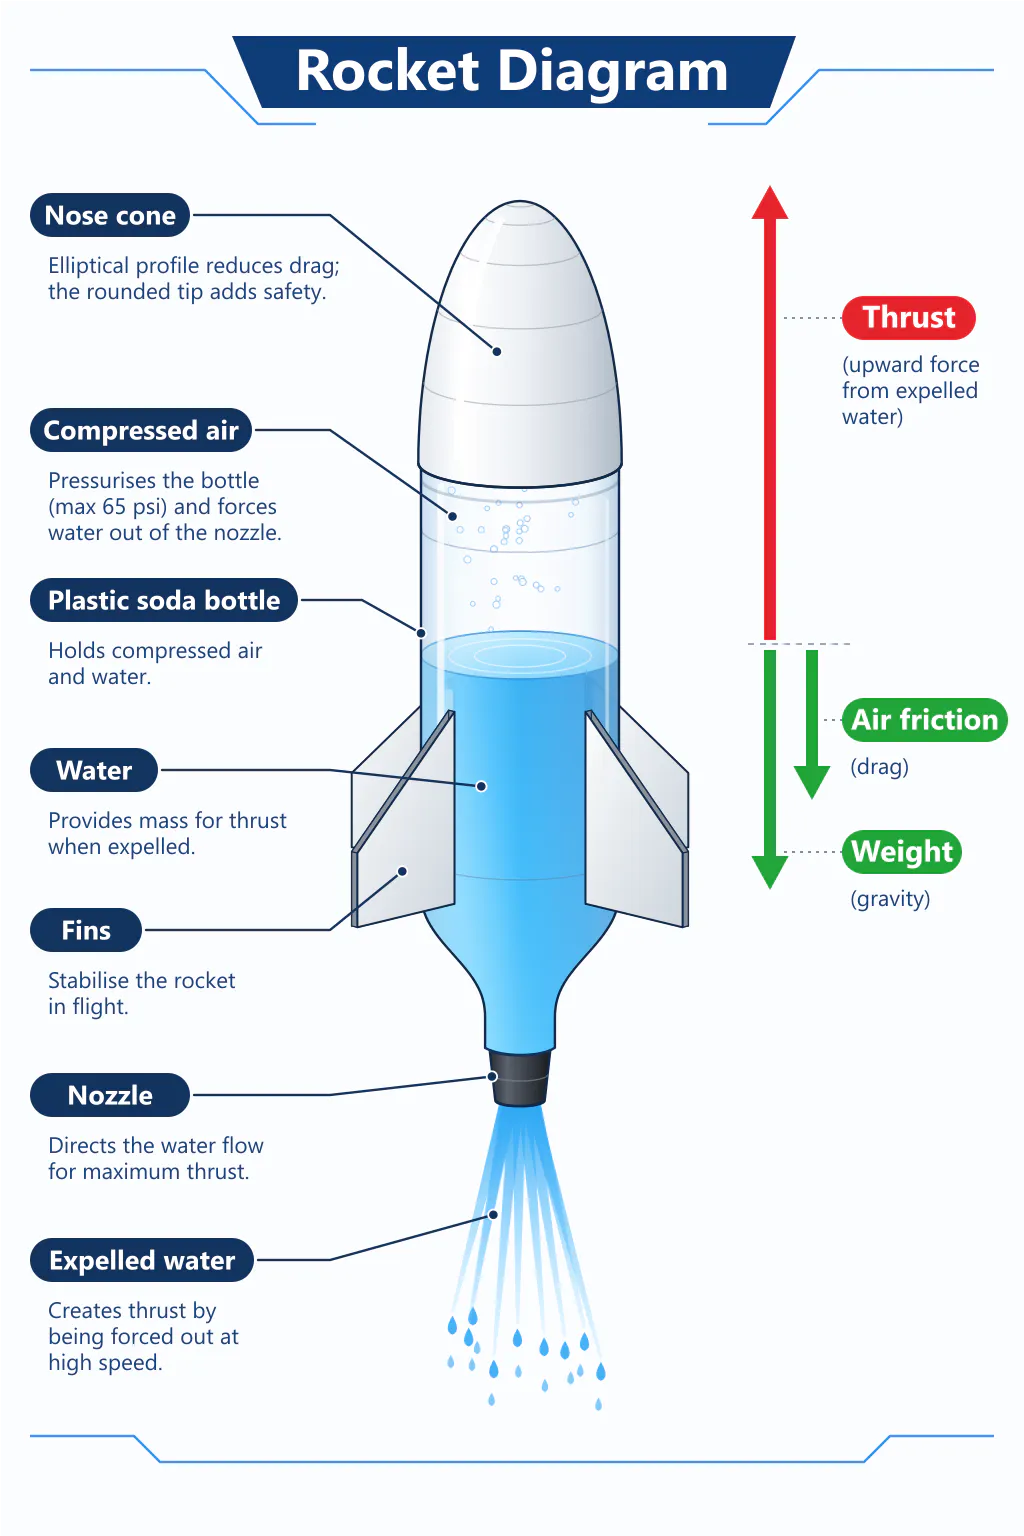
Researching the components of a rocket or water rocket is vital to understand the complex nature of the problem and a potential solution. Rockets have many parts, and each part affects the result dramatically. Guessing is not an option.
Here's an example rocket diagram to help understand and inspire research into the form and function of every component.
3D Printed Parts& Gluing
If you want to try this project at your own school, I've attached the 3D parts for the nose cone and the fin location jig for 3 or 4 fins. The cone shape is standardised as it forms the landing modules outer design, but the inner workings are for the students to engineer. The fin jig helps to stabilise the fins while gluing as these need to be very accurate to help the rocket maintain direction and to reduce radial (turning) motion. Commericial Rockets use active stabilisation through engine steering, but that's a bit outside the scope of this project. Super Glue works really well on the PET softdrink/soda bottles - just use some 120 to 220 grit sand paper first to rough it up for even more reliability. Note, scale the fin jig for whichever sized bottle is being used.
Pin Release Mechanism - Landing Modules and Parachutes
To separate the landing module and deploy a parachute, there are a number of different mechanisms that could be used (there is no one size fits all). This is a part of the challenge for students to devise a 3D model with an SG90 servo motor to release a pin and separate the cone shaped landing module from the rocket. Of course, two parachutes, one for each would be even better.
Shown below is a faulty prototype - How can it be improved?
Making the Parachute
There are many free parachute designs on the internet. I like an Octagonal parachute, but this is the fun of engineering. There are different reasons for different shapes. Don't just guess, use a source with data to back it up. Also, make sure you learn how to roll a parachute and avoid the tangles. There are many good videos online about this. Use research and AI to help discover a solution for the parachute.
The following video has some interesting engineering mechanics that can get students thinking.
4. Simulating & TestingUsing a Rocket Simulator
I use a rocket simulator with my class which helps students understand the engineering that governs the success of a rocket. It's easy to guess, but unless the students know rocket technology such as the difference behind centre of pressure and centre of gravity, they have a real problem. I ask questions such as, "Why does a ballast matter?" and "When should the parachute deploy?" or "What does the term apogee mean?". I could try to show you everything here, but rocket science is a challenge to be grasped, not fed at a trough. Engineering requires informed, valid, and mechanically proven choices - then test, analyse, revise and repeat. https://openrocket.info/ is a good start.
The Launch Pad
There don't seem to be many good launch pads available to purchase in Australia at the moment, but I bought one a few years ago from Pitsco called the Aquaport II. Unfortunately it's no longer available. Still, this project is not about the launch-pad and there are good plans available online such as the one below from NASA.
Data & Graphing
Getting the graphs from the HYPER S3 ROCKET is fairly simple. I've developed the code to log the data on the SD card and this gets read and transferred once plugged in via USB-C to the Arduino or Thonny Python software using serial coms and live plotting. However, playing around with the websocket layer, I think hosting a website from the ESP32 will be even easier to just display the results through a webpage over WiFi. I'd also like to get real-time flight data coms from the rocket to a base station and once I start using EPS-NOW for peer to peer communications, I'll post the code here and but also have a github where you can find all the code.
Update: Flight data being captured by 5 sensors at once might seen a lot, but I've got the software for the competition to recreate the flight from the data and score it all via the ESP32-S3 WiFi.
Note, for fast calculations, Arduino is far superior at run time, yet MicroPython is a real-time interpreter which is super easy to use and kids don't need to spend extra time compiling the code - it just works.
Make slight adjustments and Compare runs
It's important students make small adjustments to discover optimisations. They can use a DATA SHEET template to compare runs and work out whether changes are positive or negative.
Flight Number _______
Body:
Payload Height (cm): _________ Nozzle Radius (cm): _________
Fairing: Yes_____ or No _____ Fairing radius (cm): _____
Nose Cone Shape: ___________ Material: ___________
Propulsion:
Water (liters): _____ Pressure (KPa): _____
Fin Design:
Fin Height: _____ Fin Shape: _____ Number of Fins: _____
Fin Dimensions: _______________
Launch Stats:
Max Altitude (m): _____ Max Acceleration (m/s2): _____ Time Acceleration (s) ___
Eject & Deploy Parachute Height (m) _____
5. ConclusionThe STEM FORGE Rockets & Engineering Challenge is a great project for avid engineers. It will challenge the best of the best to new heights (literally), and with the new Australian Space Industry, there are bound to be future careers for Aerospace Engineers, Robotics Engineers, Electrical and Avionics Technicians and CAD Designers.
Engage Bright Minds with STEM FORGE.
6. ReferencesBottle Rocket Pre-Alpha Prototype Page. (2026). Archive.Org. https://web.archive.org/web/20250322014709/https://www.grc.nasa.gov/WWW/K-12/rocket/BottleRocket/WRSimApplet/data_sheet.html
Making NASA’s Water Rocket Launcher! (n.d.). Www.Youtube.Com. Retrieved August 24, 2026, from https://www.youtube.com/watch?v=B5ZxTDH0364
OpenRocket. (n.d.). OpenRocket Simulator. Openrocket.Info. Retrieved August 24, 2026, from https://openrocket.info/
RC Servo Release / Drop mechanism - Free 3D Print Model - MakerWorld. (2026). Makerworld.Com. https://makerworld.com/en/models/494143-rc-servo-release-drop-mechanism#profileId-891381
US Navy Research. (2021). Engineering Design for Parachutes with Mitch Jorgensen [Video]. YouTube. https://www.youtube.com/watch?v=i2xZ-2hLXFI
Water Rocket Analysis (Page 3) - Updated 6/21/09. (2025). Ohio.Edu. https://people.ohio.edu/urieli/thermo/property_tables/gas/adiabatic/rocket/analysis3.html
ESP32-S3 GPIO Allocation and Usage


Comments