

Hardware components | ||||||
 |
| × | 1 | |||
 |
| × | 1 | |||
| × | 3 | ||||
 |
| × | 1 | |||
 |
| × | 1 | |||
Software apps and online services | ||||||
 |
| |||||
| ||||||
Imagine a world where you effortlessly monitor temperature conditions critical to your business, ensuring product quality and safety 24/7.
Temperature plays a major role in today's world, even a minute change in temperature at industries may cause explosions which leads to disasters and loss of precious life of humans. To protect people from these disasters we have designed this project which alerts the people by sending emails, messages and tweets when temperature crosses threshold value or if any anomaly is detected.
Through these tweets the person can remind the workers about the temperature crossing threshold value, then there is a chance of taking preventive measures to stop disasters at various industries like pharmaceutical companies, etc...
In pharmaceutical companies certain temperature must be maintained, if temperature exceeds then the medicine created at that time can't become product used for medication because they may be harmful if used for medication as temperature was not consistent, leading to a great loss for the company. Our product will also be helpful to reduce these type of losses.
The Temperature Monitoring System using Bolt IoT is an Internet of Things (IoT) project designed to monitor and track temperature levels in real-time. It utilizes the Bolt IoT platform, a Bolt WiFi module, and a DS18B20 temperature sensor to collect temperature data and send it to the cloud for analysis and monitoring. This project is valuable in various applications, such as home automation, industrial processes, and environmental monitoring.
So now lets get started...
STEPS TO BUILD THE PROJECT
Step 1. Hardware ComponentsWe need the following components to build the whole project:
i. Bolt WiFi module:
ii. LM35 Temperature sensor:
iii. 3 Jumper wires ( Male to Male):
iv. Micro-USB cable ( mobile charger can also be used )
v. Power Source ( power bank can also be used )
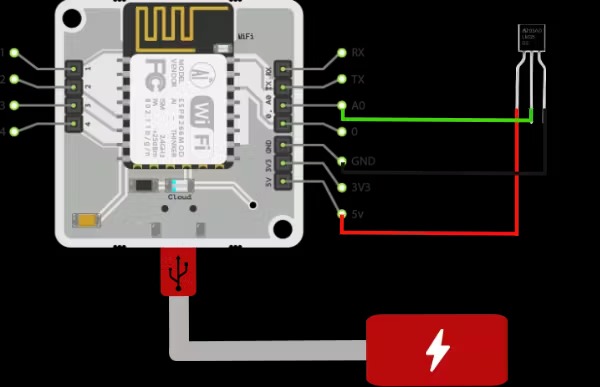
- Bolt Wifi module is connected to LM35 temperature sensor through jumper wires.
- Using male to male wire we will connect the 3 pins of the LM35 to the Bolt Wifi Module as follows:
- Connect VCC pin of the LM35 to 5v of the Bolt Wifi module.
- connect Output pin of the LM35 to A0 (Analog input pin) of the Bolt Wifi module.
- connect GND pin of the LM35 to the GND
After Opening the Bolt Cloud, Select Products.
Now Select Add Products, and click Create New Products
Now Enter your Product Name and Product Icon and Select Done
Now Select Configure the Product and In Hardware Select A0 Pin Analog and Enter the Variable Name as temrip
In code part, Put the Filename as your wish and Select the code Format as JavaScript(js)
Now enter the given code below and save all the changes that you have made
Now Select Link The Device to Your Product and Select your Bolt Iot Wifi Module and Pair it with the Product that you have created
Note Turn on the Power Source for above Procedure and sure you have given all the necessary connection properly
Now Deploy the Configuration that you have done before to the Product
Now Select view the device and push the data to the cloud based on your necessity
Below You Can view Download The Data
By clicking on that you can download all the pushed data in a Comma Seperated Value Format(csv)
With help of Microsoft Excel you can open that downloaded file and View your Results
I have attached my Dowloaded Data below for your Reference
This is the complete project. Thanks everyone!


Comments