

Hardware components | ||||||
 |
| × | 1 | |||
 |
| × | 1 | |||
 |
| × | 1 | |||
| × | 1 | ||||
Software apps and online services | ||||||
 |
| |||||
Hand tools and fabrication machines | ||||||
 |
| |||||
| ||||||
 |
| |||||
 |
| |||||
Stage managers and lighting technicians need to be able to locate performers to understand cues about when to turn on lights, move equipment, and in some instances, control effects like pyrotechnics.They currently rely on timing, intuition, and looking for movement in a dark theater.
Using this project, any user can look at a webpage to see where performers are.First, multiple sensors identify whether a person is nearby. Next, the sensors broadcast their status to a central server. Finally, the central server creates a webpage showing the status of each individual sensor. White circles indicate there is no performer present; yellow circles indicate there is a performer present.
BenefitsThis project is designed to help stage managers and lighting technicians locate performers. I sought to satisfy three objectives. First, I kept costs low by using inexpensive technology communicating with a central server. Second, the project's interface is designed to be easy to set up and share with multiple people. Third, the device improves safety by interfacing with other devices.
Low-Cost
While other similar solutions exist, they are generally custom-made with a high price tag. This solution is fully scalable and inexpensive. Parts for an individual sensor cost less than $40. The durable enclosure is 3D printable and makes use of the KEMET Pyroelectric Infrared Sensors. The sensor is solid-state, durable, and can detect performers at up to two meters across a 120 sensing area.
Shareable and configurable
The web-based interface makes the project easy to configure and share. Users make and share scenes using sessions. Any user can create as many sessions as needed to suit their purpose. For example, you can create multiple sessions for different scenes that you want to monitor. The sessions remain all remain active at the same time. Once a session is created, the user can share a session link. Anyone with a session link can view the status of the entire stage.
The server can be hosted independently or accessed via the cloud. The code is designed to be easily adapted for this purpose.
Interfacing with other devices
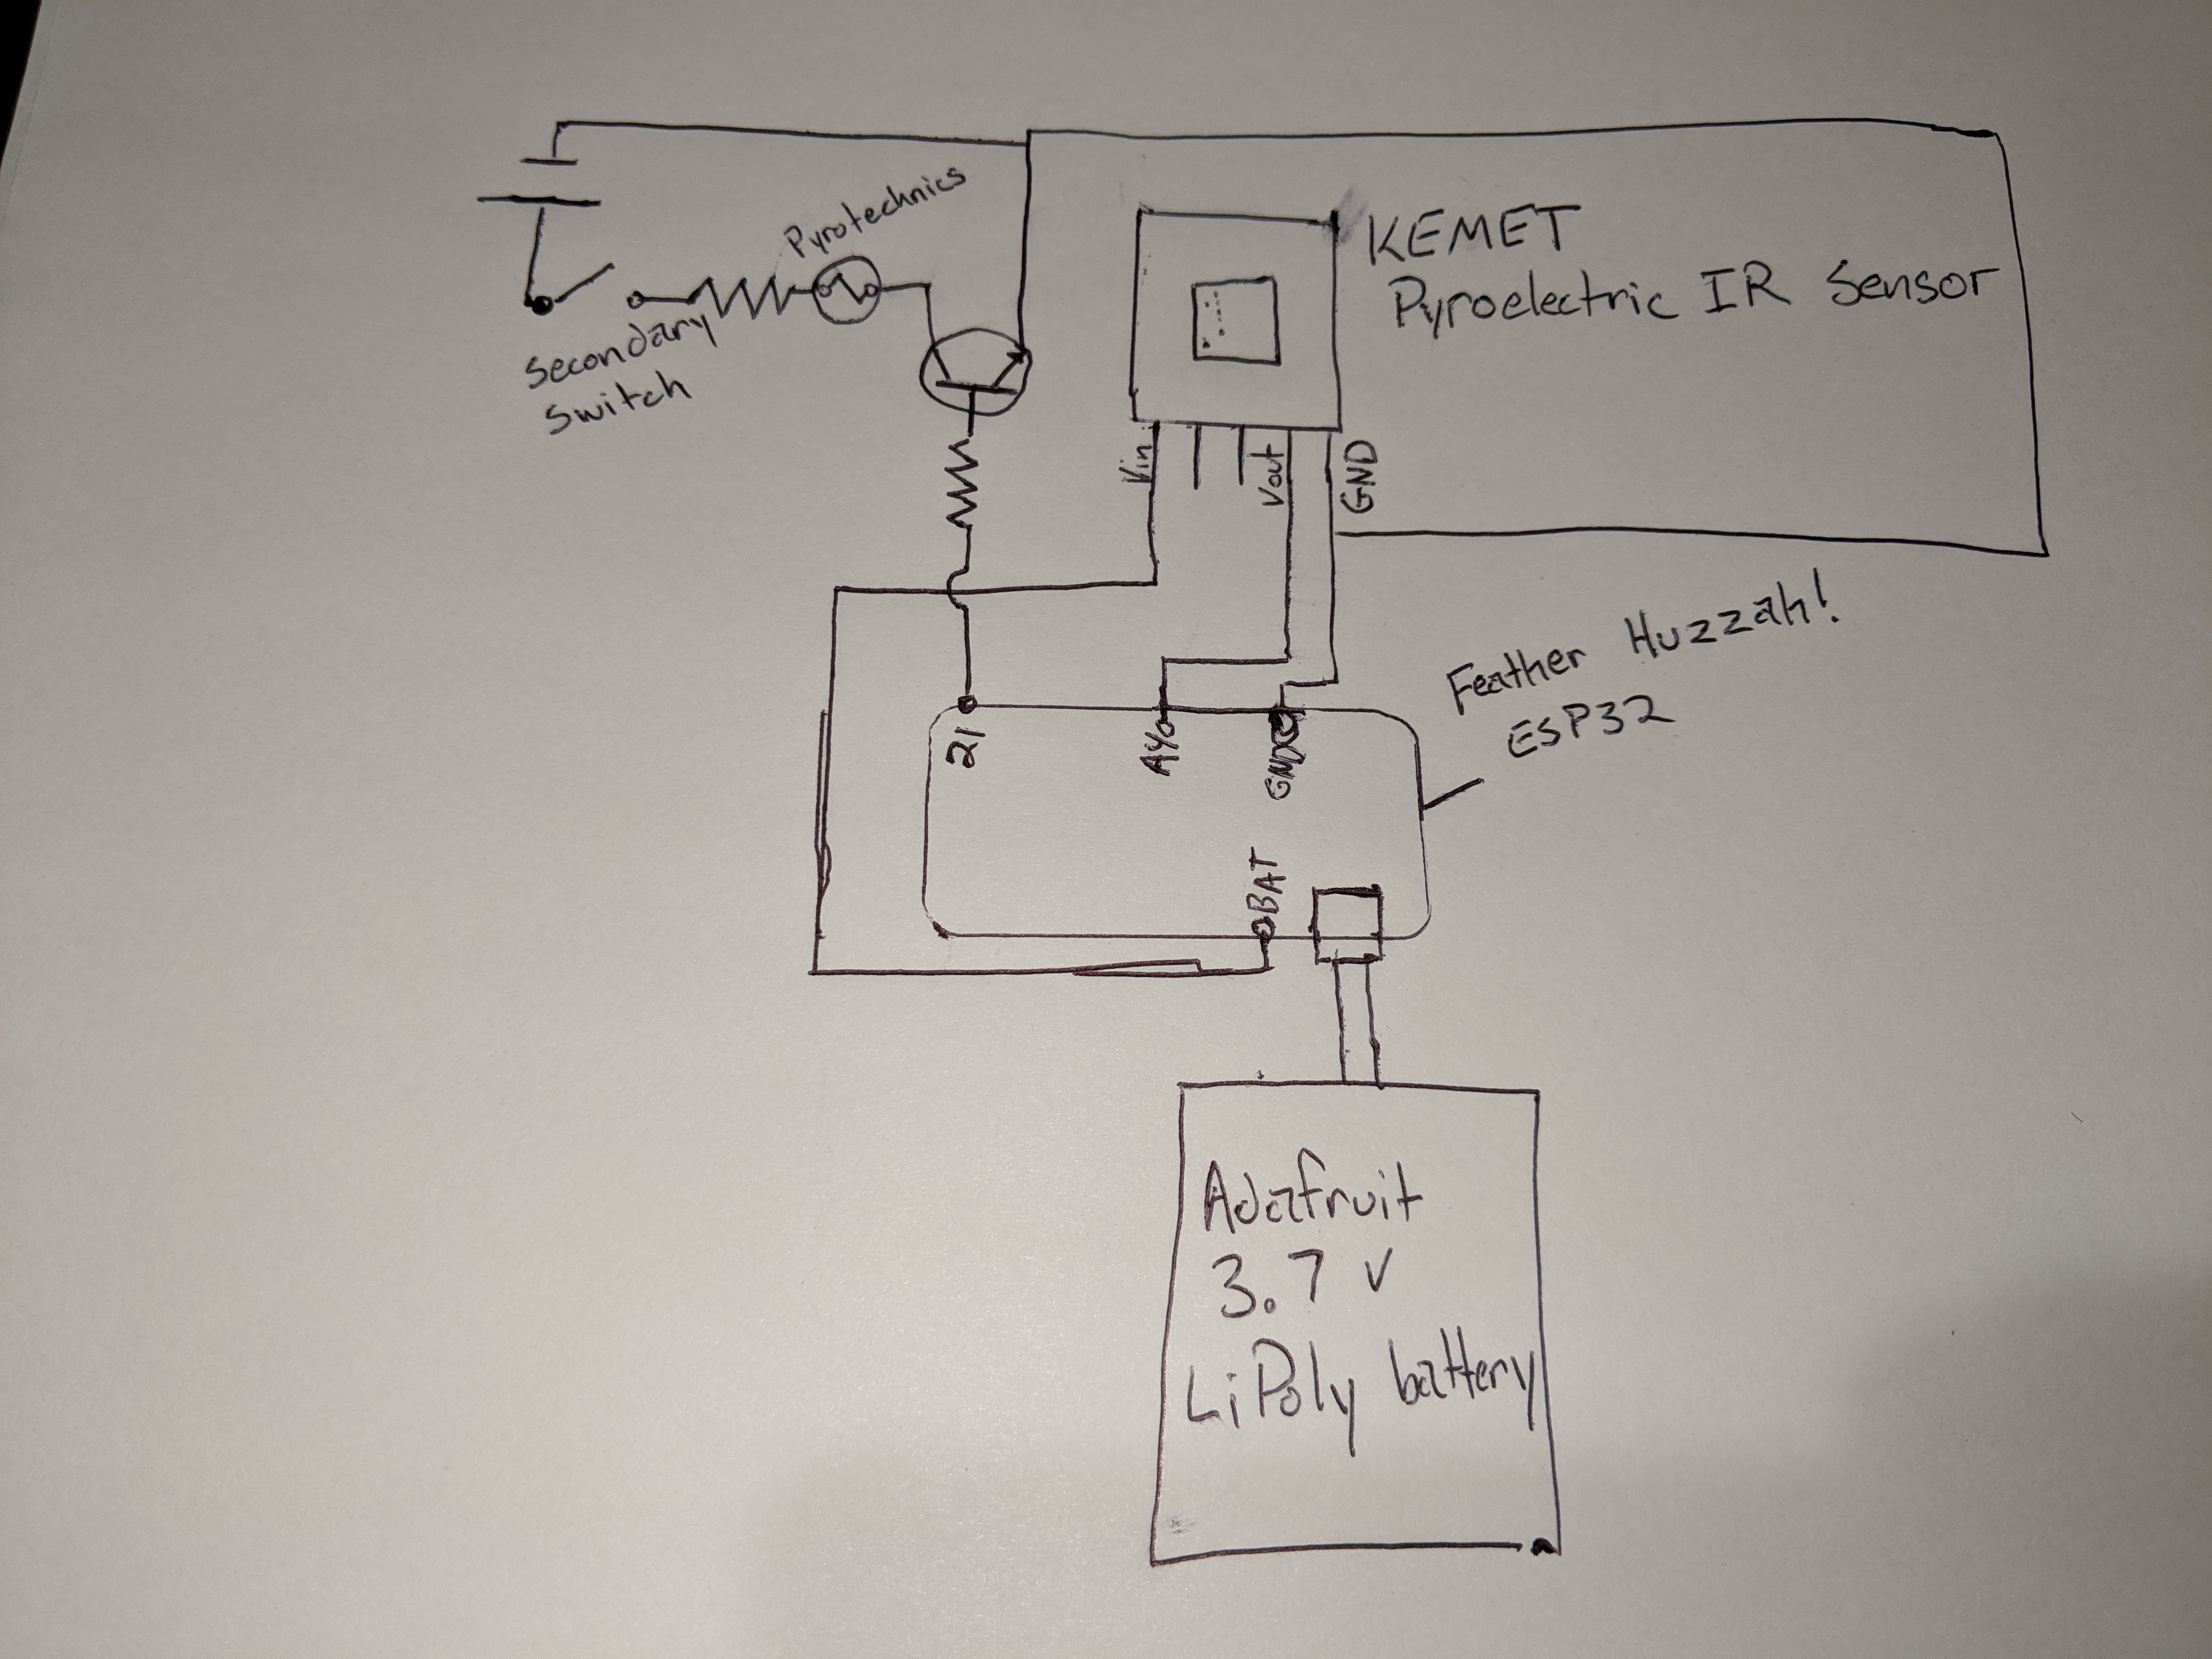
This project helps address safety concerns by interfacing with other devices. Stage managers need to know the location of performers for safety reasons. Moving equipment, pyrotechnics, and lifts can all pose risks if the performers are not in the right spot. This sensor outputs a signal designed to be read by this equipment. If configured with an AND gate, pyrotechnics only detonate if there is no performer present (see Schematic 2 for information on how to configure).
The mechanism to allow or prevent a dangerous event does not need to be connected to the server to function properly. This functions as a fail-safe even if the network is completely down.
Using the device
Users set up the device using a web-based interface. Using the device ID for each sensor, they add it to a session. Once they begin their session, they can reposition the sensors by clicking and dragging to match their individual setup.
Once the setup is complete, users will see a page that shows the status of all of the sensors. The status will automatically update in real time. Users can share the page and anyone with the link can see the status of the sensors.
SetupThis contains all the code required to implement the Performer Locator project for tracking performers. An example of a working implementation of this code is included at https://persichitte.com/locator_demo/.
There are two steps to the setup — the sensor and the server.
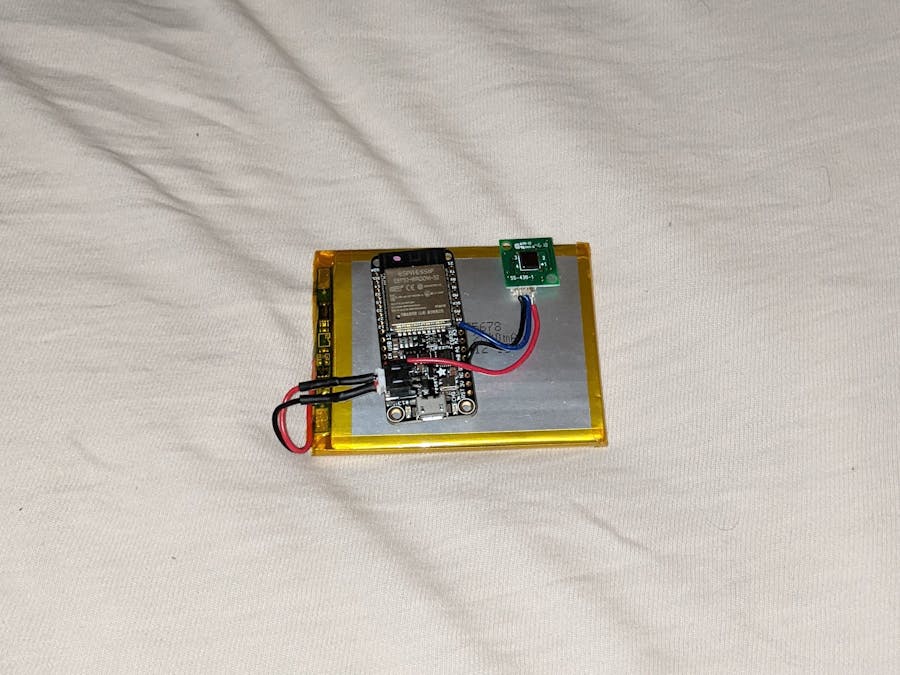
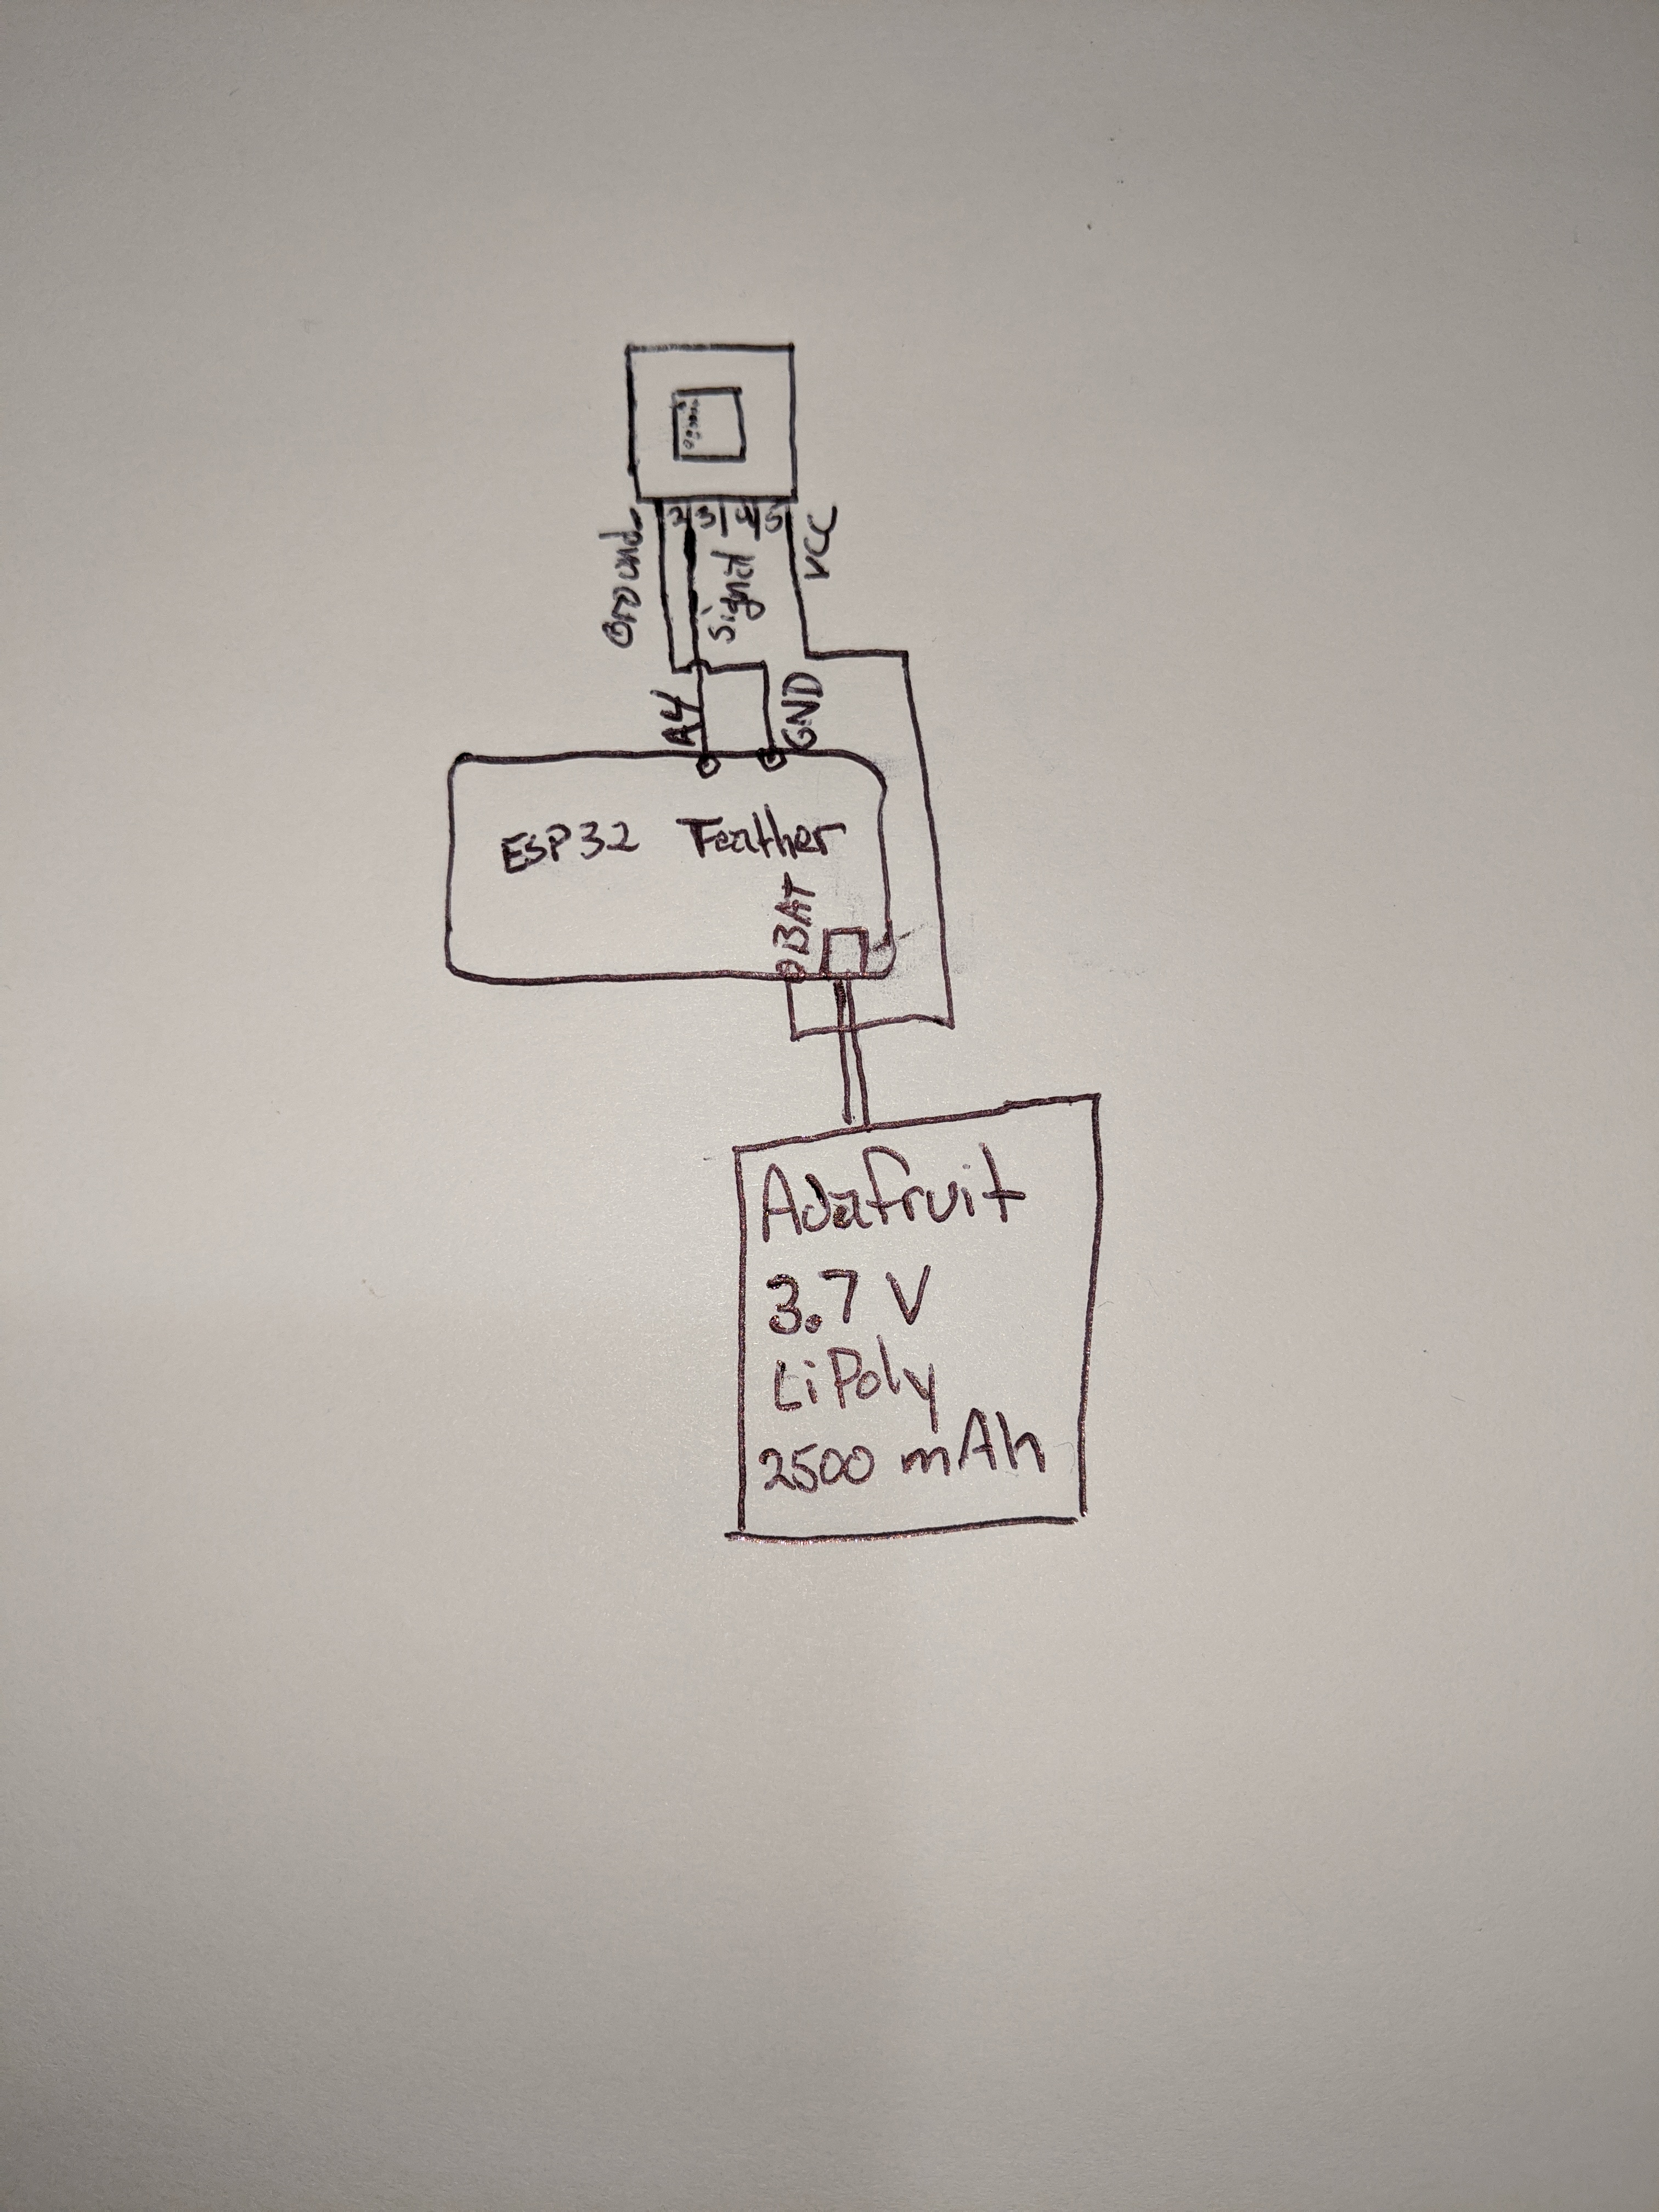
The sensor:Use the directions here to wire the hardware components together. You should consider your exact implementation before wiring. For example, some implementations may allow you to keep the battery and controller apart from the sensor, such as the outside a set piece. That specific implementation will require using longer wires to connect the sensor to the controller.
Users should use Arduino IDE to upload the following code to the controller. If you are using the feather as recommended, you will need to install the ESP drivers in Arduino IDE. Directions for drivers can be found on Adafruit's website..
You will have to customize certain elements of your code. Specifically you must specify:
- WiFi SSID - Specific to your WiFi network
- WiFi Password - Specific to your WiFi network
- Device ID - No two devices can share a Device ID. This should be unique for each device you use. To prevent accidental duplication, you should record which Device IDs are in use.
- Even though my example uses 1001 for a server number, I recommend using an arbitrarily long string such as `zQbNvLvJuogY`. This will reduce the risk of multiple sensors sharing the same Device ID.
- HOST - This should be set up to your server. See below for instructions to set up your server. This can be either a URL like persichitte.com or an IP address such as 160.153.77.160.
- By default, sensors look for my server, but there are three reasons to set up your own. First, I cannot guarantee the reliability of my server, and high traffic may cause it to crash. Second, I cannot guarantee the security of my server. Because there is no user authentication, anyone can spoof signals to the server either accidentally or maliciously. Third, my server could change at any time. I use it for testing, so I might upgrade it without notifying you. This would cause your devices to stop working.
- URL - This is the URL on the page where your write.php file is hosted. If you included it in the root folder of your server, this value should be `write.php`. As a different example, my `write.php` file is in a folder called location_demo. Therefore, my URL path is `/location_demo/write.php`. Hint: You should NOT include your HOST name in the URL.
Optionally, you can adjust the following custom elements to improve your implementation:
- N_reads (default: 3) - This is used to reduce false positives. Higher numbers will provide more accurate but slower readings. Conversely, lower numbers provide faster, but more accurate readings.
- Sensor_threshold (default: 1,000) - This is sensor values that determines if a human is present. You can customize this based on experimentation. For example, if you want the sensor to find humans, but ignore smaller signatures such as cats, you can set this threshold to a higher number like 8,000. The default is set intentionally low because your environment can change how the sensor works. For example, bright lighting heating sets may cause the sensor to be less sensitive.
- HTTPS (default: false) - If your server is configured to forward HTTP connections to port 443, you must allow your sensor to use that port by changing this value to true. Despite using HTTPS, the sensor is NOT sensing encrypted data. Hint: You should try this if you are getting 301, 302, 307, or 308 error codes.
When you have updated the custom elements, upload the code to the controller and attach the battery. If configured correctly, the sensor will automatically turn on and start sending signals.
If you have problems, you troubleshoot by connecting the 115200 serial baud. The device will first print information about its WiFi connection, then it will print its response from the server. Here are some possible problems:
- IP address 127.0.0.1: Check your WiFi configuration. Your sensor is not getting a valid IP address.
- Server code 404: There is a problem with your URL. The file cannot be found on the server.
- Server code 301, 302, 307, or 308: Check your HTTPS configuration. The sensor HTTPS flag must match the server. This setting should be `true` if using HTTPS and `false` if using HTTP.
- Server code 500: Check your server configuration. Most commonly, this error is caused by a problem with the MySQL database.
These steps will show you how to configure your server. You will need to configure a server with HTTP, PHP, and MySQL.
I used a paid hosting service, GoDaddy.com cPanel hosting. You can also set up your own server using a Raspberry Pi and this excellent tutorial.
- I used a paid hosting service, GoDaddy.com cPanel hosting. You can also set up your own server using a Raspberry Pi and this excellent tutorial.
- Upload the configuration files in the code section. It is included as a single zip file.
- Customize your server password and authentication in the `connection.php` file.
- Test your interface. Use a web browser to navigate to http://<<YOUR SERVER>>/add_session.php. Set up a session using sensors 1001-1005.
- Test your ability to receive command. Using https://<<YOUR SERVER>>/test_unit.html, press the buttons to simulate signals from a sensor. If working properly, you should see your status change in the session you created in step 4.
- Configure your sensors to point to your server. See The Sensor section for details on how to configure the connection to your server.
In my opinion, this project works better if it's just hidden behind a wall or attached to a set piece. I created an enclosure to test mine and included both the instructions and the 3D sketch file.
1) Print the lid to the enclosure.
2) Mark your cuts:
2a) Mark a 1"x6" board with the dimensions of the lid. I like to use a chisel or knife to mark my cuts.
2b) Inside the mark for the lid mark the outline of your battery. For me, this was the widest footprint.
3) Use a Forsner bit to start a hole in the middle of the wood.
4) Use a jigsaw to cut out the middle.
4) Double check that your battery will fit in the hole in the center.
5) Now cut the edges of the wood base out
6) I used hot glue to attached the 3D printed lid with the wooden enclosure.
7) Next, I used Plastidip to coat everything. It tends to cover evenly and hold up to being stepped on.
8) Finally, I used hot glue to hold the sensor in place. Note that I left a hole for PIR sensor, but based on other people's experience that was not necessary.
9) I ended up gluing the components to the inside of the enclosure with hot glue.
Special thanks to Rocco and Isolde Persichitte (my kids) for helping with the demo and Tim Hoover for helping write my story.

Comments