Hardware components | ||||||
![]() |
| × | 1 | |||
![]() |
| × | 1 | |||
![]() |
| × | 1 | |||
![]() |
| × | 2 | |||
![]() |
| × | 1 | |||
![]() |
| × | 1 | |||
![]() |
| × | 1 | |||
Software apps and online services | ||||||
![]() |
| |||||
Hand tools and fabrication machines | ||||||
![]() |
| |||||
![]() |
| |||||
The story:
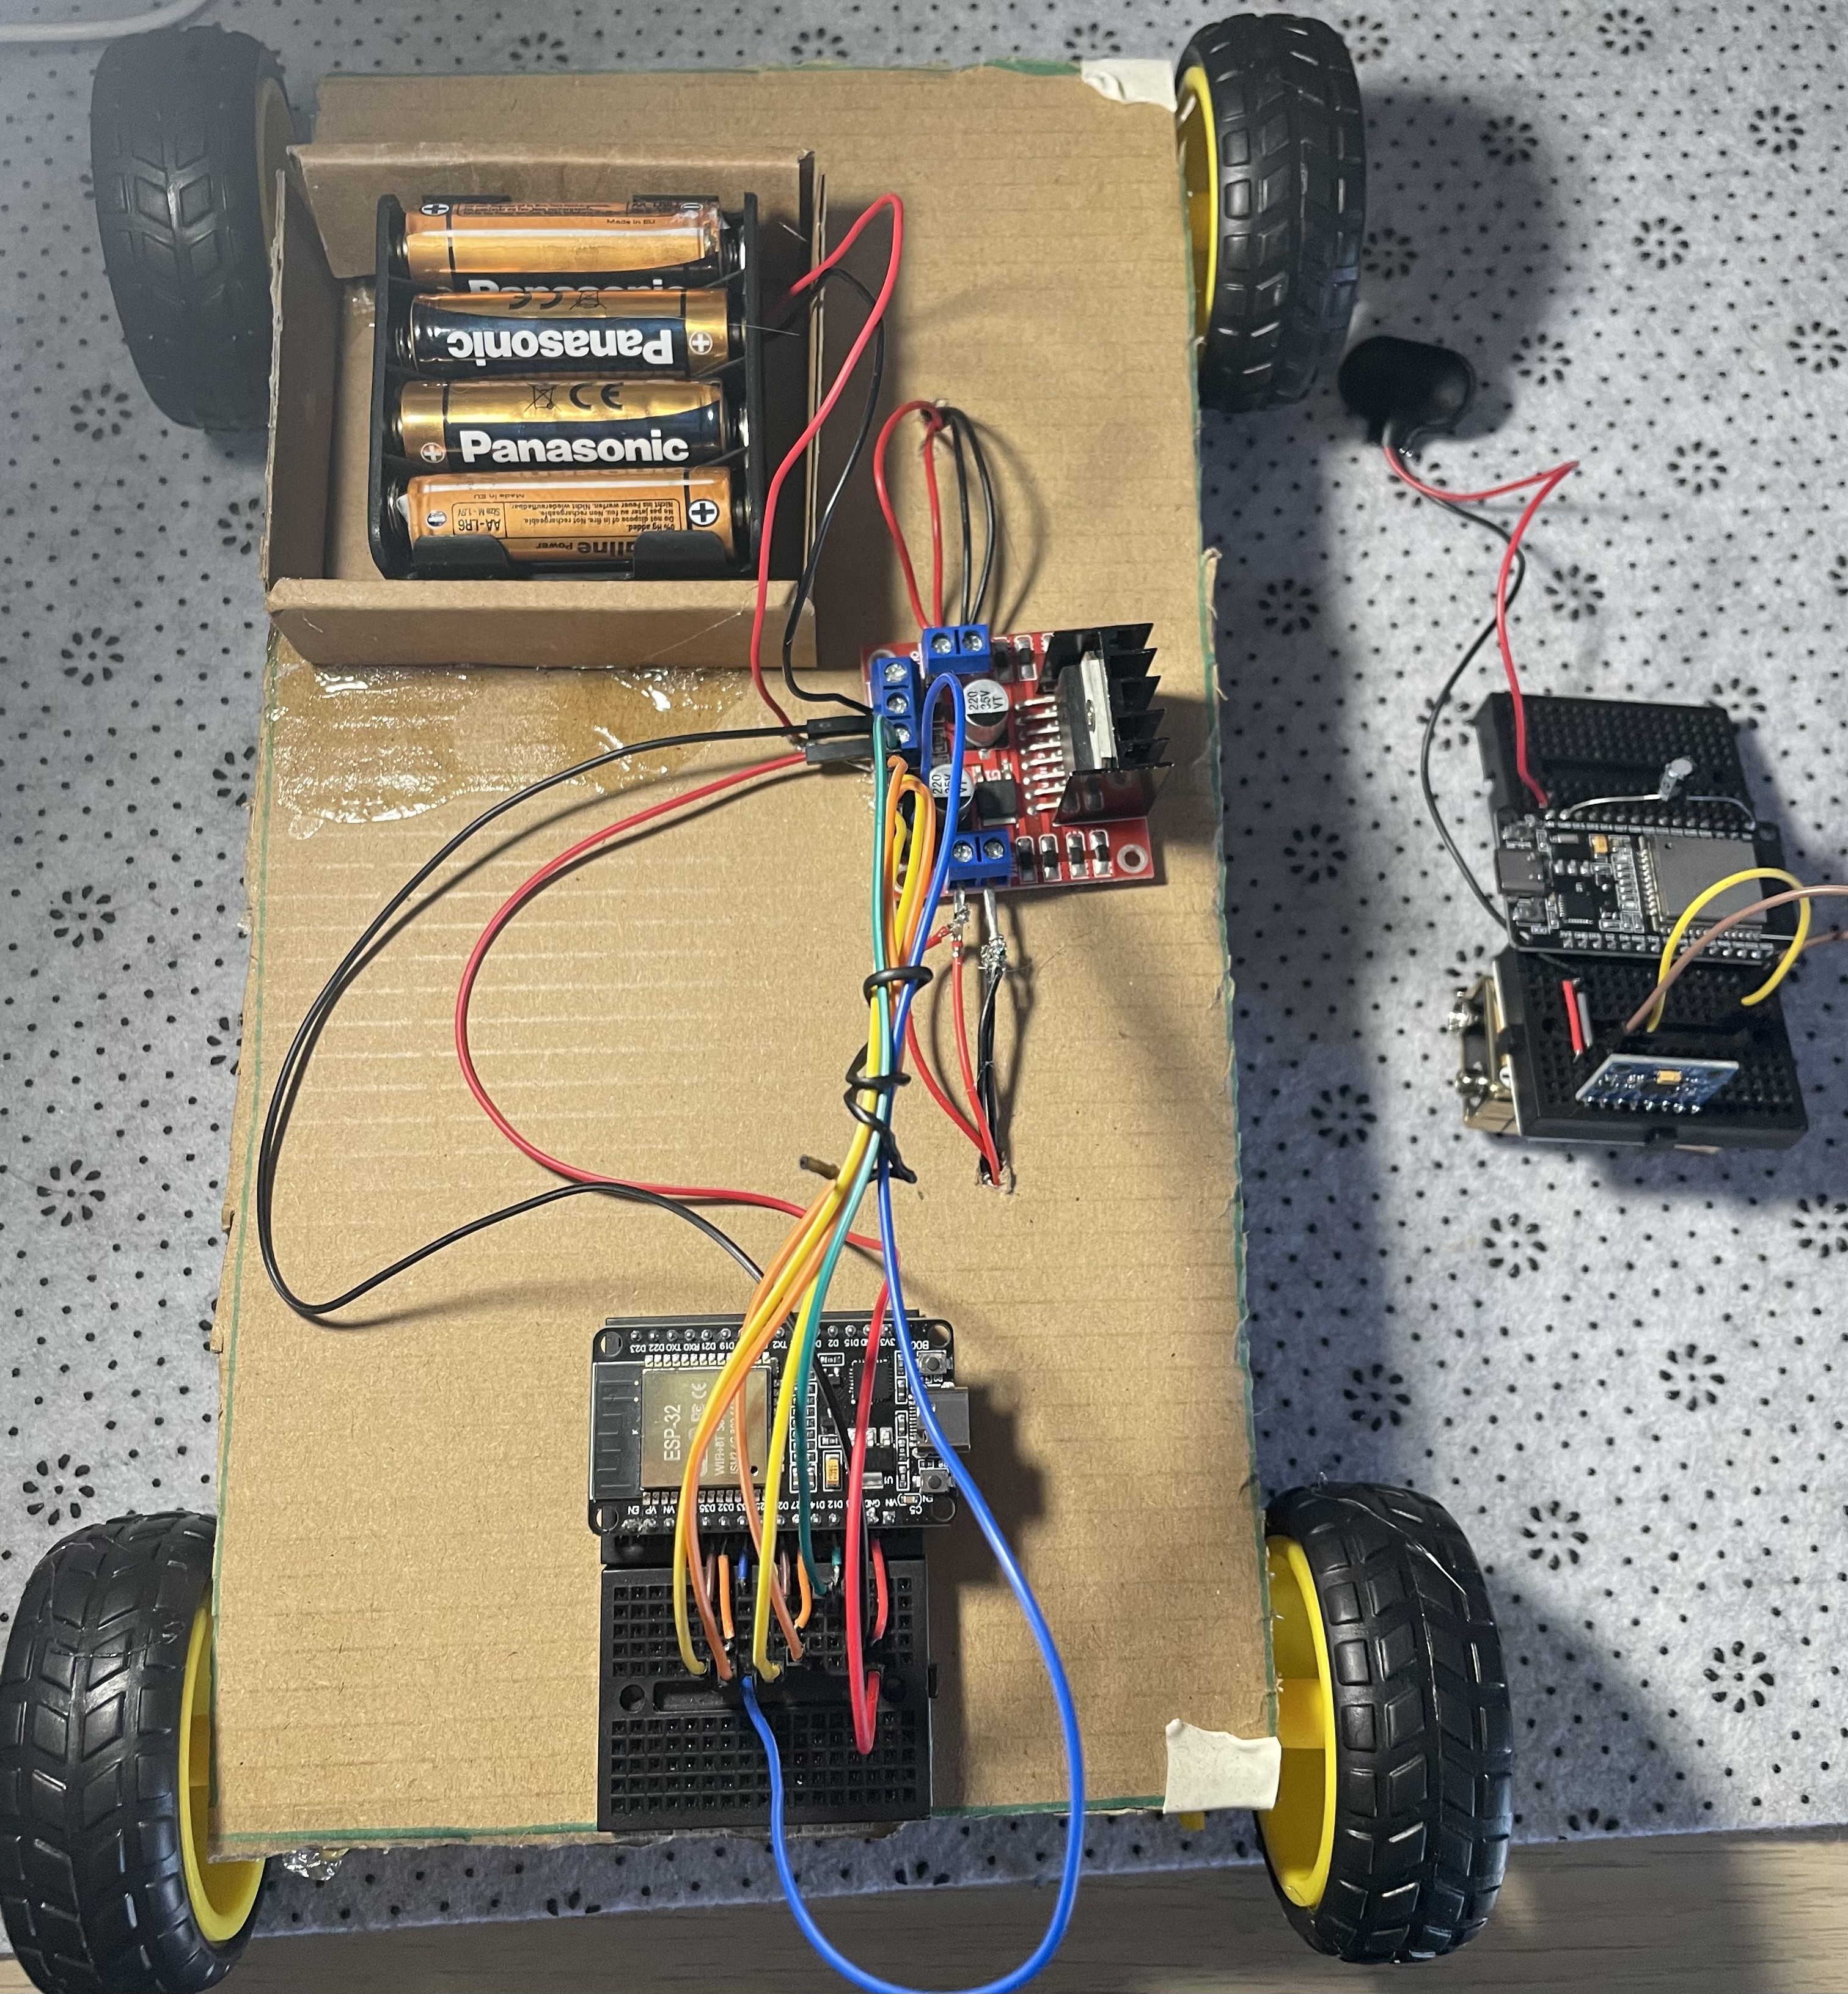
I wanted to make a project about a robotic car since its a good way to get your self used to robotics but I also wanted it to be a bit unique not the standard robotic car that everyone builds so I decided to make it hand controlled.Now to how it works. I used cardboard as the base and put all the materials on it, I used two esp 32s so they can communicate with each other the communication was basically my hand moving (using an mpu 6500) and the robot recieving a message to move. The communication was made using esp now a protocol that allows two esp to "talk" to each other.
Controller and robot schematics
Connections
the controller has to have the following connections as shown by the photo above:
ESP // MPU
3V->VCC
GND -> GND
D21->SDA
D22->SCL
ESP // Battery
VN<-9v+
GND<-9v-
ESP//L298N
VIN->5V
GND->GND(you make this connection only once your code has been uploaded and you have disconected the usb port from the esp 32 )
ENA->D13
IN1->D14
IN2->D27
ENB->D25
IN3->D33
IN4->D32
Motor connections:
Motor//H-bridge
front wheels red wires -> OUT3
front wheels black wires->OUT4
(it doesnt matter how we put the you could do the opposite if you wish)
rear wheels red wires -> OUT2
rear wheels black wires -> OUT1
Battery//L298N
12V+ -> 12V
GND -> GND

// After you do the programming using the following code :
#include <WiFi.h>
#include <esp_now.h>
#include <esp_wifi.h> // Required for channel locking
#include <Wire.h>
// --- Settings ---
const int MPU_ADDR = 0x68;
uint8_t broadcastAddress[] = {0xFF, 0xFF, 0xFF, 0xFF, 0xFF, 0xFF}; // Broadcast to everyone
// --- Data Structure ---
typedef struct struct_message {
int pitch;
int roll;
} struct_message;
struct_message myData;
void setup() {
Serial.begin(115200);
// 1. Initialize MPU6050 (Pins 21/22)
Wire.begin(21, 22);
Wire.beginTransmission(MPU_ADDR);
Wire.write(0x6B);
Wire.write(0);
Wire.endTransmission(true);
// 2. Set Wi-Fi Mode and LOCK CHANNEL 1
WiFi.mode(WIFI_STA);
esp_wifi_set_promiscuous(true);
esp_wifi_set_channel(1, WIFI_SECOND_CHAN_NONE); // This must be inside setup()!
esp_wifi_set_promiscuous(false);
// 3. Initialize ESP-NOW
if (esp_now_init() != ESP_OK) {
Serial.println("Error initializing ESP-NOW");
return;
}
// 4. Register Peer
esp_now_peer_info_t peerInfo = {};
memcpy(peerInfo.peer_addr, broadcastAddress, 6);
peerInfo.channel = 1;
peerInfo.encrypt = false;
esp_now_add_peer(&peerInfo);
Serial.println("Master Ready. Channel Locked to 1.");
}
void loop() {
// 5. Read MPU6050 Sensor
Wire.beginTransmission(MPU_ADDR);
Wire.write(0x3B);
Wire.endTransmission(false);
Wire.requestFrom(MPU_ADDR, 6, true);
int16_t acc_x = Wire.read()<<8 | Wire.read();
int16_t acc_y = Wire.read()<<8 | Wire.read();
int16_t acc_z = Wire.read()<<8 | Wire.read();
// 6. Calculate Tilt (Pitch)
float ay = acc_y / 16384.0;
float az = acc_z / 16384.0;
myData.pitch = (int)(atan2(ay, az) * 180.0 / PI);
myData.roll = 0;
// 7. Print to Serial Monitor
Serial.print("Master Pitch: ");
Serial.println(myData.pitch);
// 8. Send wirelessly to Slave
esp_now_send(broadcastAddress, (uint8_t *) &myData, sizeof(myData));
delay(100);
}
//Robot Programming :
#include <WiFi.h>
#include <esp_now.h>
#include <esp_wifi.h> // Required for channel locking
// --- Motor Pins ---
#define M_LEFT_IN1 14
#define M_LEFT_IN2 27
#define M_RIGHT_IN1 26
#define M_RIGHT_IN2 25
// --- Enable Pins (Speed Control) ---
#define M_LEFT_ENA 13
#define M_RIGHT_ENB 32
#define LED_PIN 2
typedef struct struct_message {
int pitch;
int roll;
} struct_message;
struct_message incomingData;
void driveRobot(int p) {
// Set Enable pins HIGH to give power to motors
digitalWrite(M_LEFT_ENA, HIGH);
digitalWrite(M_RIGHT_ENB, HIGH);
if (p > 50) { // Forward
digitalWrite(M_LEFT_IN1, HIGH); digitalWrite(M_LEFT_IN2, LOW);
digitalWrite(M_RIGHT_IN1, HIGH); digitalWrite(M_RIGHT_IN2, LOW);
Serial.println("Moving: FORWARD");
} else if (p < -50) { // Backward
digitalWrite(M_LEFT_IN1, LOW); digitalWrite(M_LEFT_IN2, HIGH);
digitalWrite(M_RIGHT_IN1, LOW); digitalWrite(M_RIGHT_IN2, HIGH);
Serial.println("Moving: BACKWARD");
} else { // Stop
digitalWrite(M_LEFT_IN1, LOW); digitalWrite(M_LEFT_IN2, LOW);
digitalWrite(M_RIGHT_IN1, LOW); digitalWrite(M_RIGHT_IN2, LOW);
digitalWrite(M_LEFT_ENA, LOW); digitalWrite(M_RIGHT_ENB, LOW);
Serial.println("Status: STOPPED");
}
}
void OnDataRecv(const esp_now_recv_info_t *info, const uint8_t *data, int len) {
memcpy(&incomingData, data, sizeof(incomingData));
digitalWrite(LED_PIN, !digitalRead(LED_PIN)); // Flicker blue light
driveRobot(incomingData.pitch);
}
void setup() {
Serial.begin(115200);
pinMode(LED_PIN, OUTPUT);
pinMode(M_LEFT_IN1, OUTPUT); pinMode(M_LEFT_IN2, OUTPUT);
pinMode(M_RIGHT_IN1, OUTPUT); pinMode(M_RIGHT_IN2, OUTPUT);
pinMode(M_LEFT_ENA, OUTPUT); pinMode(M_RIGHT_ENB, OUTPUT);
WiFi.mode(WIFI_STA);
// --- LOCK CHANNEL 1 ---
esp_wifi_set_promiscuous(true);
esp_wifi_set_channel(1, WIFI_SECOND_CHAN_NONE);
esp_wifi_set_promiscuous(false);
if (esp_now_init() != ESP_OK) {
Serial.println("Error initializing ESP-NOW");
return;
}
esp_now_register_recv_cb(OnDataRecv);
Serial.println("Slave Ready. Channel Locked to 1.");
}
void loop() {}


_3u05Tpwasz.png?auto=compress%2Cformat&w=40&h=40&fit=fillmax&bg=fff&dpr=2)

Comments