


Hardware components | ||||||
 |
| × | 1 | |||
 |
| × | 1 | |||
| × | 1 | ||||
 |
| × | 1 | |||
Software apps and online services | ||||||
 |
| |||||
Hand tools and fabrication machines | ||||||
| ||||||
This project arose out of lack of creativity and a small desire to maintain potted house plants without them dying too often. The “moisture level of potted plants” project has been done numerous times before but here we aimed to improve on it in certain ways and add our own style to it. Mainly, the point of this is to notify the user when the plant needs to be watered again through auditory and visual notifications. However, we don’t want to bother the user at inconvenient times (at night) so we designed it such that the “notifications” don’t go off at night. We paid special attention to edge cases that may arise such that the final project doesn't get stuck in a certain state of the notification algorithm if unusual circumstances arrive, thus delivering reliable performance of the stated goal.
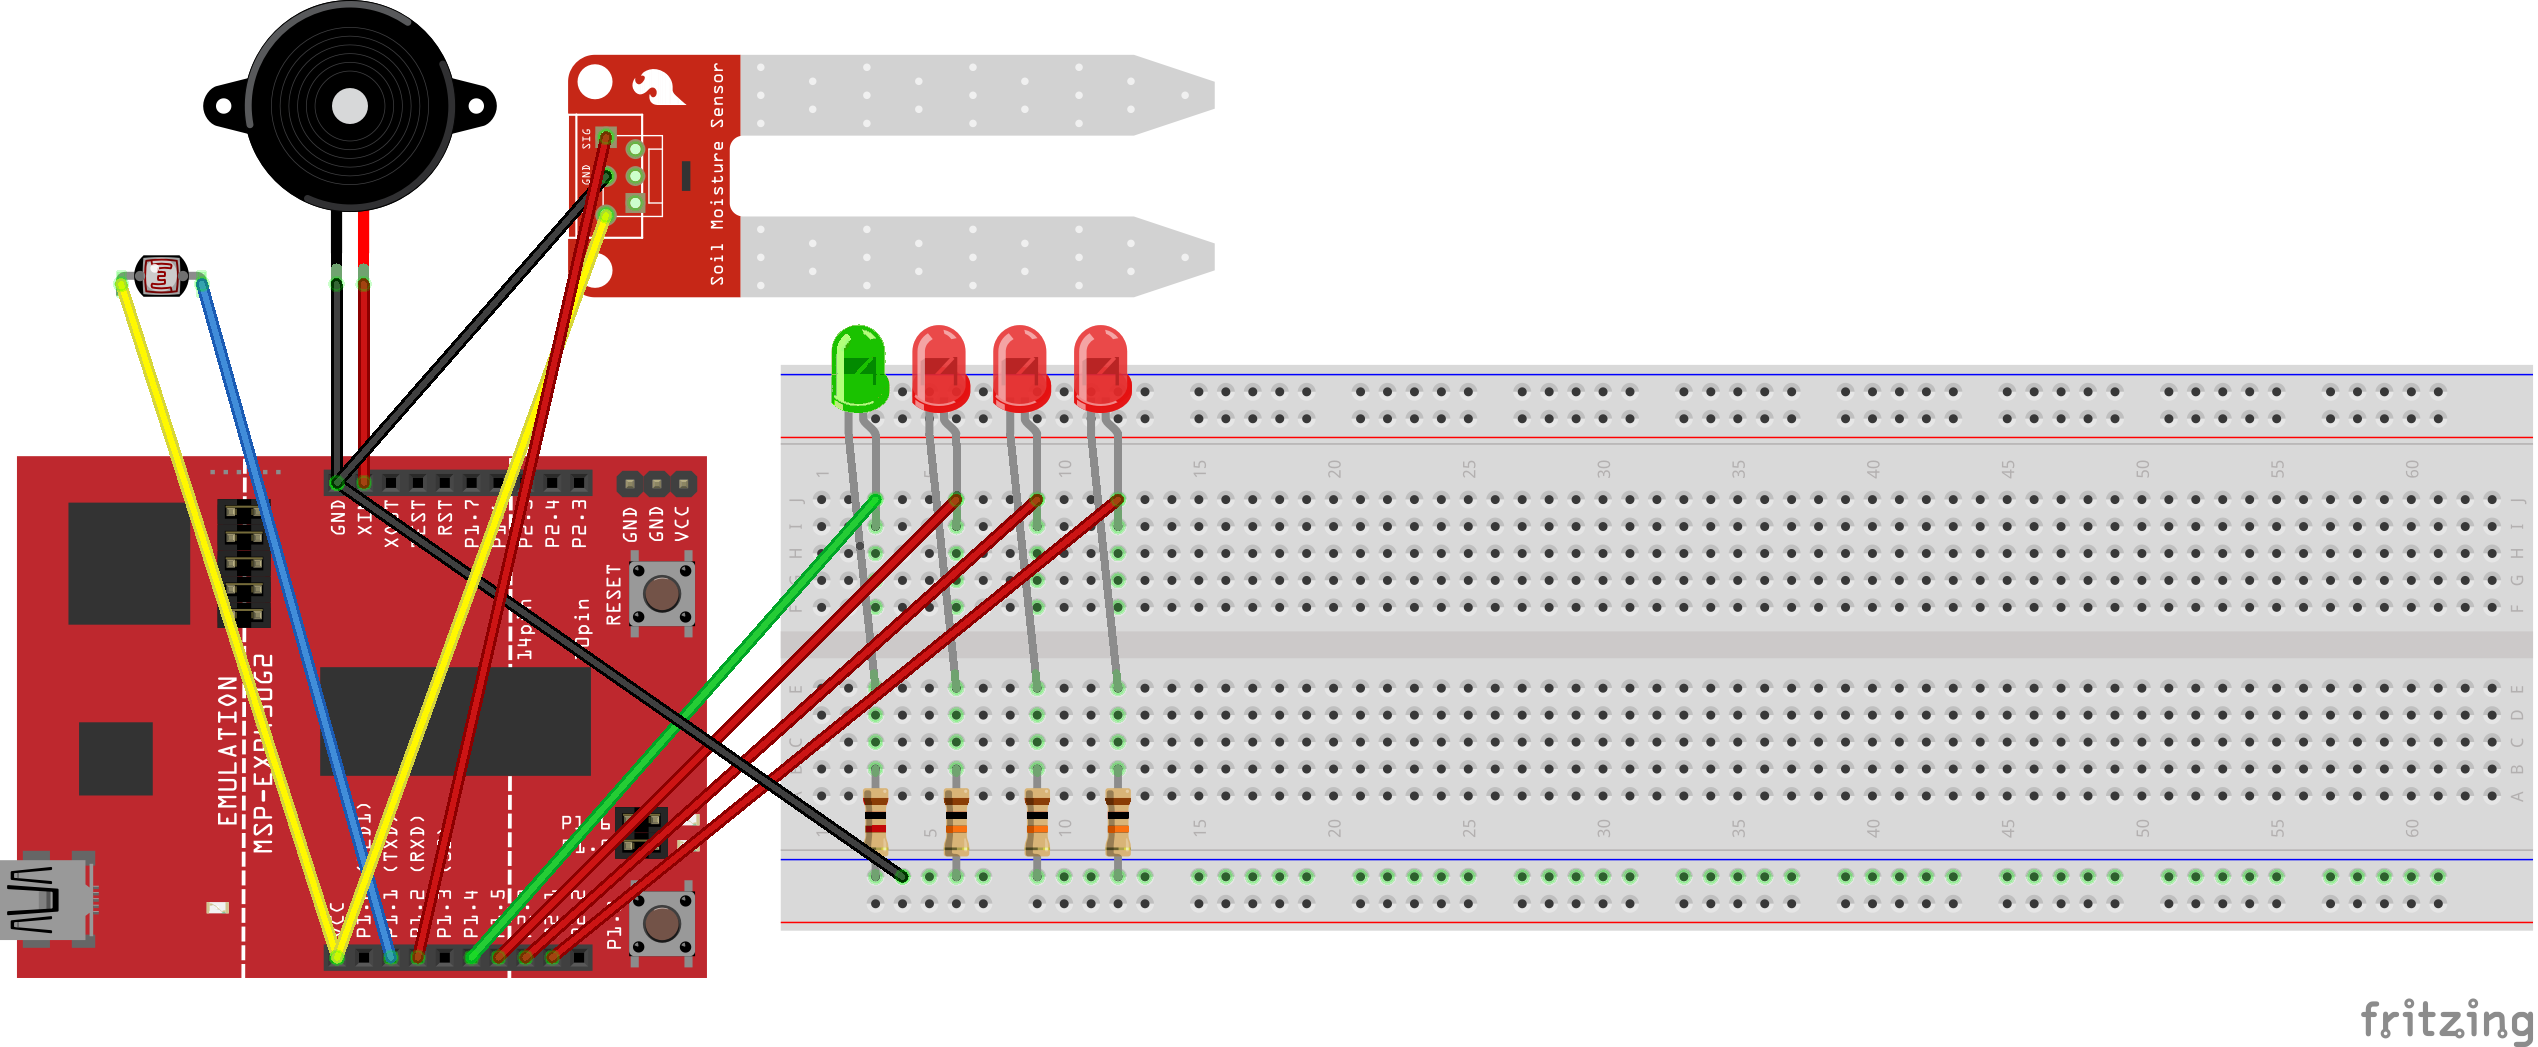
Build Instructions:1. Turn on your laptop and connect your Launchpad to your laptop with the USB cable. It might be a good idea to open up Energia as well and make sure the laptop recognizes the Launchpad and that its connected to the correct port.
2. Connect the Grove Base BoosterPack on top of the Launchpad. You’ll know that the connection and orientation of these two components is correct if a small red LED in the BoosterPack lights up (this is assuming that the Launchpad is already connected via USB to some computer and turned on).
3. Connect the light sensor module to pin 23 (otherwise labeled J5(A) on the Grove Base BoosterPack) using the wiring provided by the BoosterPack.
4. Connect the moisture sensor module to pin 24 (otherwise labeled J6(A) on the Grove Base BoosterPack) using the wiring provided by the BoosterPack.
5. Connect the piezo buzzer module to pin 39 (otherwise labeled J14(D) on the Grove Base BoosterPack) using the wiring provided by the BoosterPack.
6. For the following I’ll be referring to numbers and orientations on the Breadboard provided by the Sidekick Basic Kit. Also, for the following use the similarly provided Breadboard Jumper Wires: Connect a wire from the GND pin on the BoosterPack to the top most position of the “negative” column of the left-hand side of the Breadboard.
7. Connect another wire from the bottom most position of the “negative” column of the left-hand side of the breadboard to the bottom most position of the “negative” column on the right-hand side of the Breadboard.
8. Connect a wire from pin J1(6) on the BoosterPack to position a, 1 on the Breadboard.
9. Connect a wire from pin J1(7) on the BoosterPack to position b, 3 on the Breadboard.
10. Connect a wire from pin J1(8) on the BoosterPack to position c, 5 on the Breadboard.
11. Connect a wire from pin J1(9) on the BoosterPack to position d, 7 on the Breadboard.
12. Connect the green LED with the negative end at position e, 1 and the positive end at position f, 1 on the Breadboard.
13. Connect a red LED with the negative end at position e, 2 and the positive end at position f, 2 on the Breadboard.
14. Connect a red LED with the negative end at position e, 3 and the positive end at position f, 3 on the Breadboard.
15. Connect a red LED with the negative end at position e, 4 and the positive end at position f, 4 on the Breadboard.
16. Connect a 10kΩ resistor (any orientation is fine) with one end at position f, 1 and the other end on the same row but on the “negative” column at the right-hand side of the Breadboard.
17. Connect a 10kΩ resistor (any orientation is fine) with one end at position f, 3 and the other end on the same row but on the “negative” column at the right-hand side of the Breadboard.
18. Connect a 10kΩ resistor (any orientation is fine) with one end at position f, 5 and the other end on the same row but on the “negative” column at the right-hand side of the Breadboard.
19. Connect a 10kΩ resistor (any orientation is fine) with one end at position f, 7 and the other end on the same row but on the “negative” column at the right-hand side of the Breadboard.
Once everything is set up, using the product itself is very straightforward.
1. Insert the moisture sensor into the soil of the potted plant of your choice.
2. Place the light sensor somewhere in the vicinity of the plant such that it is not obscured by any of its leaves or any other physical obstructions. The setup is completely done at this point.
3. If the moisture of the soil is too low, the piezo buzzer will sound and the LED on the launchpad will light up, so just grab water and water your plant.
4. As you water the plant, the LED lights on the breadboard setup will light up one by one. Continue watering until the top LED light (the green one) has been lit up. Once that’s happened you can stop watering the plant.
5. You’re good to go! You can forget about your plant until it starts buzzing again (which as you know, won’t happen at night or when it's dark so you don’t have to worry about that).
Schematic/Block Diagram For Plant Gang


Comments