

Hardware components | ||||||
 |
| × | 1 | |||
| × | 1 | ||||
| × | 1 | ||||
| × | 1 | ||||
| × | 1 | ||||
| × | 1 | ||||
Software apps and online services | ||||||
 |
| |||||
Hand tools and fabrication machines | ||||||
| ||||||
Update: Public release of Windows 10 IoT Core
This project has been tested with the public release and upon first use of a fresh install it may ask you to select a language, and you may find you have vertical scrolling issues on the touch screen - If your default language is not one of the top few, you can easily attach a usb mouse with a middle scroll button to vertically scroll. Otherwise everything appears to work just fine.
Original Project
I have somewhat of a passion of powershell for many reasons, but for now I would like to link the concept of an up and running raspberry PI 2 device that you would like to use powershell to quickly add to your project the Adafruit LCD Panel which was perfectly outlined in Jan Tielens project (please take a look at it if you haven't already).
Evidently, it was Jan's project that inspired me to acquire the Adafruit LCD Panel to tinker with and while updating the config.txt file on a new image build or removing the SDHC card and mounting it to update the config.txt file is perfectly fine, I feel that powershell can and should do the heavy lifting and will use it to achieve the same task and allow me to delve deeper into using the screen when time permits. hopefully. after all it is all fun learning.
Before we start please keep in mind that authoring an article is not my strong point and my photo and video work may be sub-optimal. I hope it helps someone learn as Jan's project helped myself.
Part 1. Ensuring you environment is set-up correctly
For this to work as smoothly as possible, you will have a Windows 10 (or Windows 8.1 with Powershell v5) PC connected to a network switch either by wired or wireless means or directly to your Raspberry PI 2 device by means of cross-over cable.
You will also have your Raspberry PI 2 device with Windows 10 IoT Core already running and connected by wired means to the same network switch or connected to your Window PC by cross-over cable.
In this example my devices have the following IP addresses:
- Windows 10 PC has the IP address 172.16.47.20
- Windows 10 IoT Raspberry PI 2 has the IP address 172.16.47.23
Part 2. Ensuring you can connect to the Windows 10 IoT Raspberry PI Device
The Microsoft Windows 10 IoT Team did a great job with there article which you can find here (worth a read), but I feel there may of been some confusion so I will list my steps to achieving remote connectivity for completeness.
Step 1. Open Powershell in Administrative mode
On my Windows 10 PC I have the powershell items and a few others on the 8.1 Tile based start screen. You can also find Powershell within the start menu.
Step 2. Set-up Powershell - Start Windows Remote Management
First you will need to ensure that the Windows Remote Management (WS-Management) service is running on your Windows 10 PC.
You can use the following powershell command to get this status:
Get-Service | Where-Object {$.Name -eq "WinRM"}
If you the WinRm (Windows Remote Management) Service is not "Running" then you can type the command:
Start-Service WinRM
However this comes with very little feedback, so today we will use:
Net Start WinRM
If the service is already started it will just tell you it cannot start the service because it is already running.
Please see the three screenshots below for further detail.
Step 3. Set-up Powershell - House Keeping
It is recommend to remove the psreadline module as it causes a StackOverflowException issues with this current version, you can read more about it in the above Windows 10 IoT Powershell project.
Remove-Module psreadline -force
Step 4. Set-up Power Shell - Trust your Raspberry PI 2 Windows IoT Device
So that you are able to issue Remote Powershell commands and allow Visual Studio 2015 RC (for the future) to be able to talk to your device in the most simplistic way possible you should trust your Windows IoT device.
In the same powershell window type the following:
set-item WSMan:\localhost\Client\TrustedHosts -value 172.16.47.23
Next you will need to confirm your action and type "Y" and then press enter - Please see the screenshot for the expected output.
Step 5. Connect to your Raspberry PI 2 Windows 10 IoT Device
Type the following in your same powershell window to start a remote powershell connection:
Enter-PSSession -ComputerName 172.16.47.23 -Credential Administrator
After you press enter, you should receive the password box, go ahead and enter your password. If your password is accepted it can take up to 30 seconds to give you the remote powershell prompt.
The default password on a new install is: p@ssw0rd
Once logged into your remote powershell prompt it will look something like this:
[172.16.47.23]: PS C:\Users\Administrator\Documents>
You will want to move your remote powershell prompt to the correct EFIESP containing the config.txt file folder below by doing one of the following:
[172.16.47.23]: PS C:\Users\Administrator\Documents> CD C:\EFIESP
or
[172.16.47.23]: PS C:\Users\Administrator\Documents> CD \
[172.16.47.23]: PS C:\> CD EFIESP
Now that we are in the EFIESP folder your remote powershell prompt will look like this:
[172.16.47.23]: PS C:\EFIESP>
See the screenshots for more detail
Part 3. Connect the LCD Panel and make the changes
Step 1. Connect up the LCD Panel / View the current config.txt
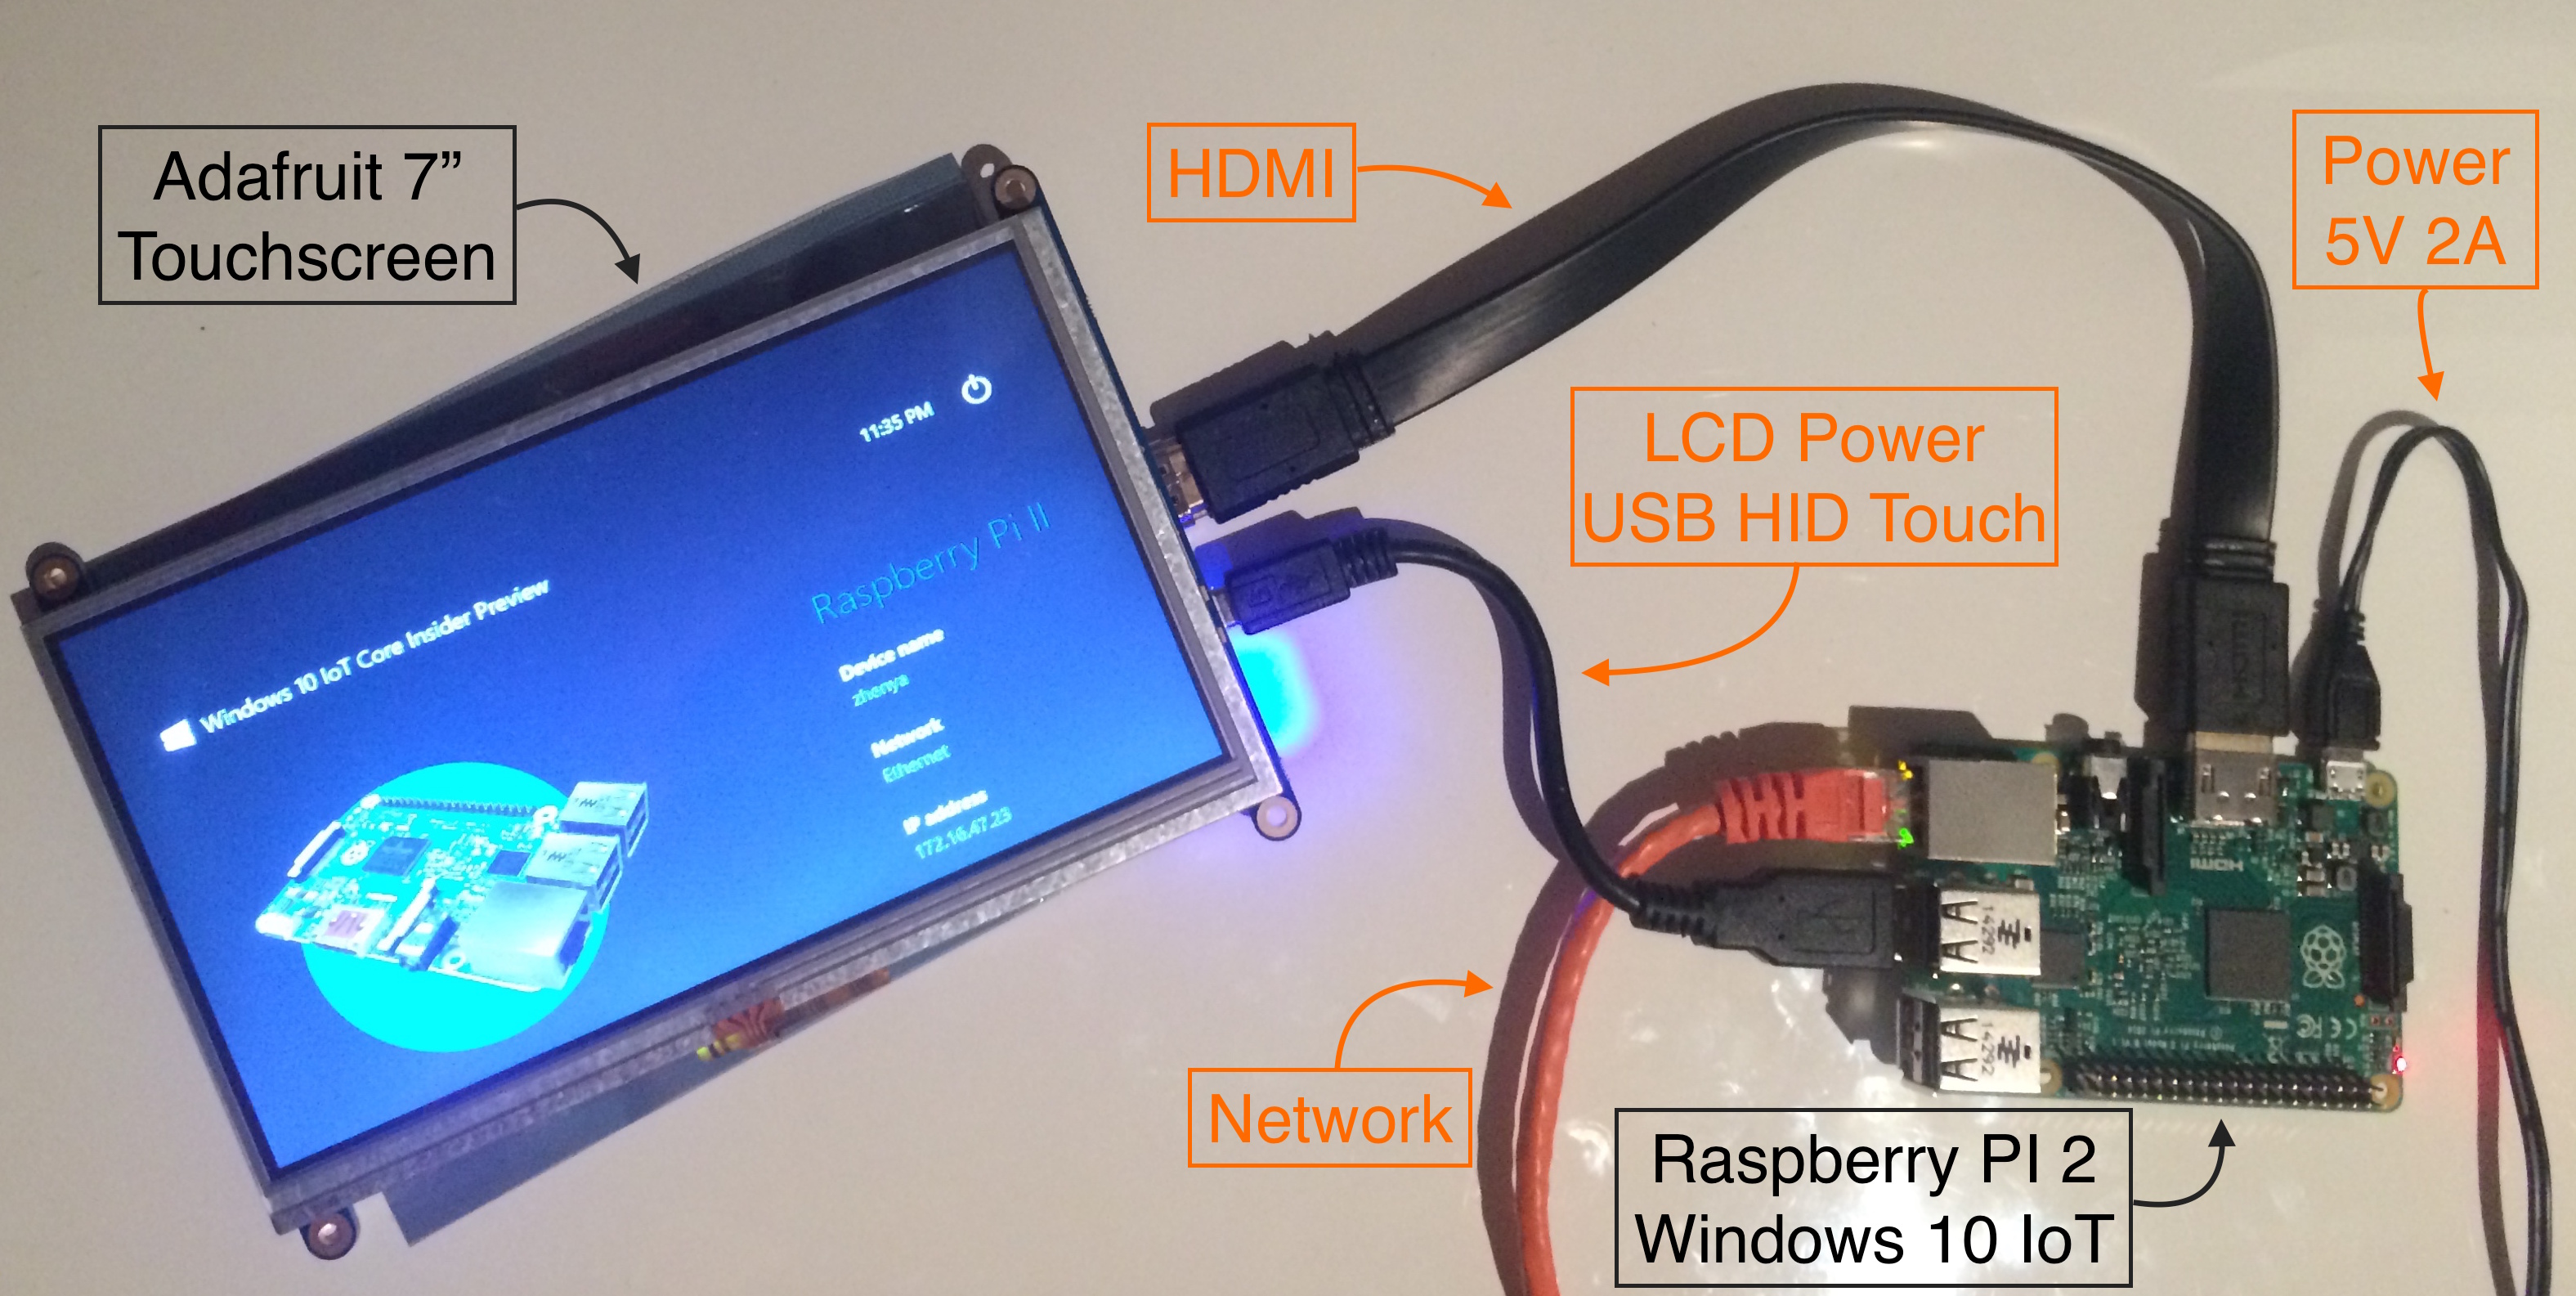
Now that we are all set-up and connected to our device let connect up the Adafruit LCD Panel.
a. plug in the HDMI lead between the LCD Panel and the Raspberry PI 2 board
b. next plug in the Micro USB lead to the panel and then connect the full sized USB end into the Raspberry PI 2 board.
(You can view the cable wiring schematic at the bottom of the page.)
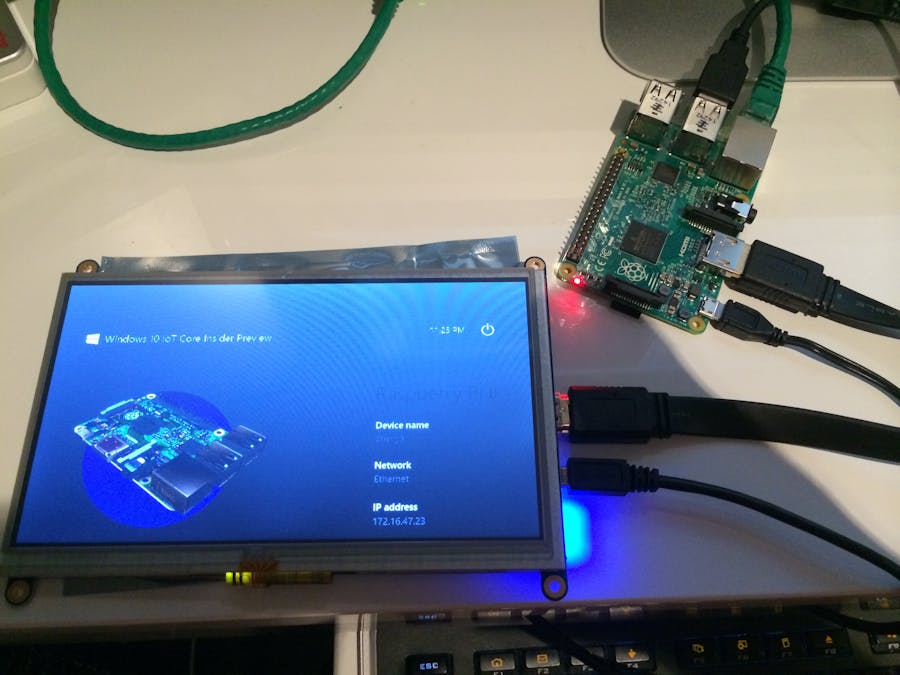
The screen should start-up and show you the Windows 10 IoT Core information screen that does not quite fit properly.
My LCD Panel is below in the screenshots and shows the original issue of how it looks without the adjustments.
Step 2. View the current config.txt file
View the contents of the config.txt file with-in your powershell window.
You'll remember above that in your powershell window you connected to the remote powershell prompt and moved into the folder location C:\EFIESP> which contains the file config.txt
Issue the following powershell command to view the contents of the config.txt file:
Get-Contents config.txtYour config.txt file should look like this:
gpu_mem=32
framebuffer_ignore_alpha=1
framebuffer_swap=1
disable_overscan=1
init_uart_clock=16000000
Step 3. Change the settings in config.txt as recommended to make the LCD panel display correctly.
I have placed the essential powershell command in the code section, in which you are able to copy and paste if required.
Now we will write the changes to the config.txt file using the following command which can be pasted in, or manually written and all going well you will get expected outcomes in the screenshots.
note: "hdmi_mode=1" in the screenshots is a typo on my part and not required - sorry :(
Set-Content config.txt "gpu_mem=32
framebuffer_ignore_alpha=1
framebuffer_swap=1
disable_overscan=1
init_uart_clock=16000000
hdmi_group=2
hdmi_mode=87
hdmi_cvt 800 480 60 6 0 0 0"
In the above config.txt file the following has been added:
hdmi_group=2 - This sets the HDMI output format to DMT (Display monitor timings used mostly by Computer Monitors) and requires an hdmi_mode setting. The other options are 0 for auto-detect via EDID (Extended Display Identification Data) or 1 for CEA (Consumer Electronics Association used mostly by for the PAL/NTSC TV display devices).
hdmi_mode=87 - This sets the HDMI mode under DMT to custom. There are 86 standard modes, the closest standard mode to the Adafruit 7" lcd panel is Mode 14, however it is just 48 pixels too wide for the 800x480 LCD panel.
hdmi_cvt 800 480 60 6 0 0 0 - This sets up the custom resolution and frequency known at CVT (Coordinated Video Timings) and sets the following:
800 [width] 480 [height] 60 [frame-rate in Hz (Hertz)] 6 [aspect ratio of 15:9]
0 [margins disabled 0/enabled 1]
0 [interlace mode 0 progressive/1 interlace]
You will most likely want to stick with progressive mode which is used by all LCD based screens.
0 [rb - reduced blanking 0 normal/1 reduced blanking]
Reduced blanking essentially will reduce the total video/signal bandwidth required (which can help with HDMI audio issues) - LCD screens in general do not require the pauses in picture data known as blanking intervals which allow CRT screens to re-position their electron beam at the end of each scan line amongst other tasks.
I have tried both 0 and 1, 0 is the default option so will leave this as be, but when using 1 it appeared to be rendering slightly faster, however I could be just imagining that as I am unable to find any existing 60Hz option which supports reduced blanking - so will leave it for you to decide and try if you are keen.
Audio Issues: If for any reason your Audio (if required) is traversing the HDMI cable (hdmi_drive=2), you can set hdmi_drive=1 to force audio output to the 3.5mm audio jack and effectively enable DVI mode as the LCD panel by rights appears to have no audio capability.
Once done we should review the changes to the config.txt that we have made with the powershell command:
Get-Content config.txt
If it worked for you, it will look like the screenshot below:
Of note: you can also useAdd-Contentto add to new lines of text to an existing file orClear-Contentto remove the entire contents of the file but keep the file intact. However for the purposes of this article, it is easier and more clear to useSet-Content.
Step 4. Active the changes
To make the changes you have made to the config.txt file active and correct the display, you will need to reboot the Raspberry PI 2 Windows 10 IoT device.
You can simply issue this powershell command to do so:
Shutdown /r /t 0
See the screenshot for the expected outcome, your device will reboot and once back up it should look and fit perfectly.
Part 4. The new HDMI settings
Now your device is back up, your screen should now look much like the one in the screen shot.
While I was at it - I decided that I would make the world's shortest video of the USB HID Touchscreen functionality in preparation for the next project.
Part 5. All the powershell commands
Below is the entire steps in four screenshots to make it a little easier to follow and all of the powershell commands are below in the code section at the bottom.
Part 6. Thanks
Thank you for reading this powershell related project and hopefully you have learnt something, Thanks to Jan for his original project, and It was quite cool, sometimes a little frustrating writing and doing my first project post.


Comments