
Hardware components | ||||||
 |
| × | 1 | |||
 |
| × | 1 | |||
| × | 1 | ||||
 |
| × | 6 | |||
A Person Sensor gives you the location of any faces it sees, but what can you do with that information? One of my favorite applications is making sure something is pointing right at me, whether it's a fan, phone, or mirror. If you only need something to be facing you horizontally then you can use my carousel project guide, which only uses a single servo. For something that needs to tilt as well, you will need to control two motors, and use the Y as well as the X location of the nearest face. That makes the project a little more complicated, but thankfully Adafruit have a pre-assembled pan/tilt stand that comes complete with motors, which helps a lot.
If you're experienced with mechatronics, you can use the same code to drive any pair of pan/tilt servos, which will be useful if you want to move something that's not light, since the servos used in the Adafruit stand are micros.
The kit comes pre-assembled, so all you should need to do is attach the servo cables to the Pico. The cables end in a solid block of female jumper sockets, so you'll need to plug three male/female jumper wires into each so they can be attached to non-adjacent pins on the Pico. Once those extension leads are on, wire each to the following pins:
Pan (lower motor):
- Black (GND) should go to pin 3.
- Red (5V) should go to pin 40.
- Yellow (DATA) should go to pin 1.
Tilt (upper motor):
- Black (GND) should go to pin 33.
- Red (5V) should go to pin 39.
- Yellow (DATA) should go to pin 2.
Pin 39 on the Pico is actually 3.3V, not 5V, but still seems to work as long as the tilt servo isn't heavily loaded.
A full wiring diagram is included below.
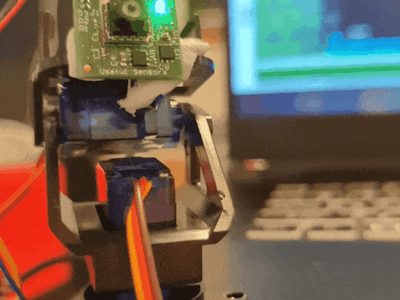
Person SensorWiring up the sensor requires 4 jumpers, to connect VDD, GND, SDA and SCL. We're using I2C port 0, which on the Pico is assigned to GPIO4 (SDA, pin 6) and GPIO5 (SCL, pin 7) in software. Power is supplied from 3V3(OUT) (pin 36), with ground attached to GND (pin 38). If you're using Qwiic connectors, the colors will be black for GND, red for 3.3V, blue for SDA, and yellow for SDC. It's the same setup as the introductory CircuitPython sample code.
The Person Sensor needs to be mounted on the top plate of the stand, facing in the same direction as the wires coming out of the pan servo. If you're actually skilled you can probably do something fancy like 3D printing a part, but since I'm just a simple CEO I resorted to Blu Tack. The code will always try to keep the sensor pointing directly at the nearest face, so you can tilt the mounting of the sensor to control angling of the platform.
You should read the official guide to setting up CircuitPython on a Pico for the latest information, but here is a summary:
- Download CircuitPython for your board from circuitpython.org. The Pico version is available at circuitpython.org/board/raspberry_pi_pico/. This project has been tested using the
8.0.0-beta.2version. - Hold down the
bootselbutton on the Pico and plug it into a USB port. - Drag the CircuitPython uf2 file onto the
RPI-RP2drive that appears.
Once you've followed those steps, you should see a new CIRCUITPY drive appear.
You can now drag code.py files onto that drive and the Pico should run them.
We need the adafruit_motor library to control the servos for the stand, so the first step is to download a big bundle of all the CircuitPython libraries from circuitpython.org/libraries. You'll need to find the right bundle for your CircuitPython version.
Once you have that downloaded, unpack the bundle on your local machine. In the file viewer, go to the lib folder within the unpacked bundle and copy the adafruit_motor directory into the lib folder on the CIRCUITPYTHON drive. This should install the library we need to drive the servos.
Now your carousel is set up, copy the code.py file from this repository into the CIRCUITPYTHON drive. You should notice that the green LED on the Person Sensor lights up when it sees your face, and the stand pans and tilts until it is facing towards you.
The algorithm that controls the servos and moves them towards the nearest face is quite simple, and could be improved if you want smoother animation. Right now it only updates the position about five times a second, the same rate as the sensor updates, but you could use much smaller timesteps for the movement to get less jerky rotation. You could also add in some smoothing to give ease in and out to make it less robotic.
If you're trying this out with a stand you've built yourself, and you see it panning or tilting away from you rather than towards you, try changing the sign of the PAN_SPEED or TILT_SPEED variables in the code.
You can also find out more about the Person Sensor from our full developer guide. I'm looking forward to seeing what the creative minds of the maker community come up with, so please let me know how you get on!


Comments