Hardware components | ||||||
 |
| × | 1 | |||
 |
| × | 1 | |||
 |
| × | 8 | |||
 |
| × | 1 | |||
Software apps and online services | ||||||
 |
| |||||
We know our basic connections are good but we need better software to develop our circuit.
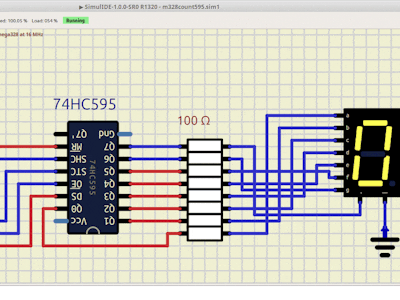
What are we doing?We have an ATmega processor connected to a 7 segment LED through a LS74HC595 shift register. Our assembly demo program cycles a bit through the chip and we see bars in our display module light.
Turn on the right LED segments and we get a visible number on the display. In another project we used this table. The least significant bit according to our software is the decimal point segment.
In Assembler we saw code that was like pushing buttons by hand. Moving bits like beads on an abacus. We want something like this.
Think of display(input variables) as a mathematical function. Our clock lead is now a computer variable called SCLK and it is equal to the number 11. Latch is RCLK or the number 12. Our data input strobe is DIO or 9. Neat, eh?
Whether to pulse or not is the answer to the display.set( ) math problem. We let the computer look after the anode vs. cathode and select the number of LED modules, too.
Arduino ShiftDisplay LibraryC and C++ are high-level languages that look like algebra. Arduino IDE programs in the C++ language and accepts code written in C. Let's explore one of many software libraries written for shift registers and displays.
Update your Arduino libraries and install ShiftDisplay. This will add new functions to your programs, new commands you can use.
Use this code. The pins can be any of the IO on ATmega or Arduino. #include<ShiftDisplay.h> adds detailed code from the library. Think of display( ) as math equation with answers like display.set( ). Our processor will calculate what voltages to put on each pin and when.
/*
 *  count m = 0 to 9 on seven segment display Arduino and LS74HC595 shift register
*/
#include <ShiftDisplay.h>
#define SCLK  11  // SCLK STC portb.3 pin11 clock
#define RCLK  12  // RCLK SHC portb.4 pin12 latch
#define DIO   9   // Data input to shift register
ShiftDisplay display(SCLK, RCLK, DIO, COMMON_CATHODE, 1);
void setup() {}
void loop() {
	static int m = 0;
	display.set(m, ALIGN_LEFT);
		int pos = m < 10 ? 0 : 1;
		display.setDot(pos, true);
		display.show(200);
		display.setDot(pos, false);
		display.show(200);
	m++;
}
The display function uses the clock, latch and data pin numbers. 1 single LED module and we can add more. We also tell it the display uses common cathode electrical type.
UploadUpload the Arduino hex file to your ATmega chip. Export by menuSketch->Export compiled Binary and look in the sketch folder. You can do this project with an Arduino Uno board and upload normally. More info on this simulator.
With the simulation right-click on the processor and look for load firmware. Folder explorer to the demo hex file.
On the simulator you see how this software uses the control leads of the shift register. This adds functions to blank the display and clear memory on command. Our sketch even toggles the dot pin separately.
The ATmega processor chip a has metal pins named B1, B2, B3, B4, B5. In C/C++ we call these PORTB1 etc. like assembly. Arduino Corp uses 9, 10, 11, 12, 13. for the same pins. Arduino IDE understands both ways of naming.
Our processor connects an LS74HC595 shift register. Just like the hands-on in Shift Register Project: Data Strobe, Output Enable, Clock, Latch and Reset are connected. But the names are slightly different. > is a clocking symbol and we connect to STC.
OE output enable is connected on pin10 stays off because we do not turn off the display module output. SHC latch pin on pin12 pulses every 8bits. MR reset on pin13 is also kept on.
We will use this connection table. Notice how the names keep changing?
What is a header file? What does it mean #include<ShiftDisplay.h> in our programs?
We organize big programs around many small, well organized files of code. Header files summarize collections by including more files that are source code. Extensions .h are for headers .c, .cpp are for C/C++.
When we see #include"file.h" it is in the same directory #include<file.h> our software will look for a file in a collection. Notepad opens them and we see a public class named ShiftDisplay. Hardware leads are abstracted to be integers.
Our sketch creates a data object named display(variables). We could use whatever name we want as long as we tell the compiler it is from the ShiftDisplay class. You see the public constructors with different input values? Just tell it screen type, size, etc.
Explore your Arduino libraries and be careful about any changes. Read the comments and try to see more functions you can program. Source files with .cpp extension are in the C++ programming language.
Next StepsAdd more display modules. Explore the Arduino examples provided by the library. There's an interesting serial port example to display numbers typed into the PC keyboard.


Comments