
Hardware components | ||||||
| × | 1 | ||||
 |
| × | 1 | |||
 |
| × | 1 | |||
 |
| × | 16 | |||
| × | 1 | ||||
 |
| × | 1 | |||
 |
| × | 1 | |||
 |
| × | 1 | |||
_ztBMuBhMHo.jpg?auto=compress%2Cformat&w=48&h=48&fit=fill&bg=ffffff) |
| × | 1 | |||
Software apps and online services | ||||||
 |
| |||||
 |
| |||||
Hand tools and fabrication machines | ||||||
 |
| |||||
 |
| |||||
 |
| |||||
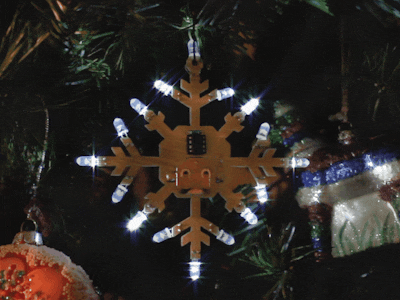
This Snowflake Ornament PCB Kit is the perfect holiday project to spice up your tree, with 16 LEDs that shimmer in the dark, controlled by an ATtiny85 and powered by a coin cell battery. This is a great kit for all ages designed with through hole components and one large surface mount battery clip. Follow along as we assemble your PCB snowflake!
Before we begin, purchase your kit from Etsy here: https://www.etsy.com/PatchrPCBKits/listing/745992382/shimmering-snowflake-pcb-ornament-kit
Once your kit has arrived, be sure to lay out all your components to double check that you have everything you need.
Let’s begin our assembly by soldering the battery clip. First apply solder to one of the pads.
Pro Tip: Use blue painter’s tape to help secure the PCB to the work surface.
Place the battery clip on top making sure that the orientation is correct and lines up with the silkscreen indicator. Heat the solder through the battery clip to secure it in place.
Once this is secure, move to the other pad and apply solder to properly connect the clip. Finally move back to the first pad and apply solder to ensure a more secure connection.
Let’s solder the ATtiny85. If you want the ability to reprogram the PCB in the future, we suggest using the socket provided. Otherwise, you can solder the ATtiny85 directly to the PCB.
Be sure the orientation of the chip is correct before securing the component into place.Whenin doubt, use the socket. See image below for chip orientation.
ATtiny85 orientation:
Finally, solder the resistor above the ATtiny85. This ensures that the microcontroller won’t reset itself while your snowflake is shimmering.
Place the switch on the opposite side of the PCB where the silkscreen indicates. Solder the legs on the backside of the PCB to secure the switch in place.
Now it’s time for the fun part. Double double double double double check the polarity using the diagram below. The long leg is always positive and the short leg is always negative. Make sure these align with the markings on the silkscreen of the PCB.
This can take some time. Insert the LEDs through the holes, bending the legs to hold the LED in place while soldering. Be sure to leave enough room to bend the LED back so it hangs off the end of the PCB. Trim the legs after you solder the LED
Add in the battery, ground side down, positive side up, and flip the switch! If you did everything correctly, the LEDs should begin brightening your home with joyous holiday shimmering.
And there you have it! A festive holiday snowflake to hang on your tree. We hope you enjoyed building this kit with us. If you have any questions or comments, don’t hesitate to reach out.
Tag your finished PCB on social media with #PoweredByPatchr. We will choose our favorite and award you a free year of Patchr Premium!
If you enjoyed this project and want to design your own custom-shaped PCBs, visit www.Patchr.io.
From our workbench to yours… happy building.
Troubleshooting:1. An LED won't turn on:
- Double check the polarity of the LED.
2. The PCB won't light up:
- Double check that the battery is positive side up and ground side down.
3. The battery and LED polarity are correct, but still nothing is turning on.
- Make sure the ATtiny85 is soldered with the correct orientation
- Make sure the battery clip is in the correct orientation


Comments