

Hardware components | ||||||
| × | 2 | ||||
| × | 1 | ||||
| × | 1 | ||||
 |
| × | 1 | |||
| × | 1 | ||||
 |
| × | 1 | |||
 |
| × | 6 | |||
 |
| × | 2 | |||
| × | 1 | ||||
| × | 1 | ||||
Software apps and online services | ||||||
| ||||||
 |
| |||||
| ||||||
| ||||||
Hand tools and fabrication machines | ||||||
 |
| |||||
 |
| |||||
 |
| |||||
Everyone has found themselves staring at the sky at least once in their lives, as if completely alienated. Since I was a child, I loved observing the summer sky, especially at night. As I grew older, my interest embraced the scientific world, and at the "WOW" a child exclaims, I moved on to asking questions, but my love for the sky and space remained the same.
SkySense was born from this love. A small laboratory connected to a hot air balloon to answer some of those questions.
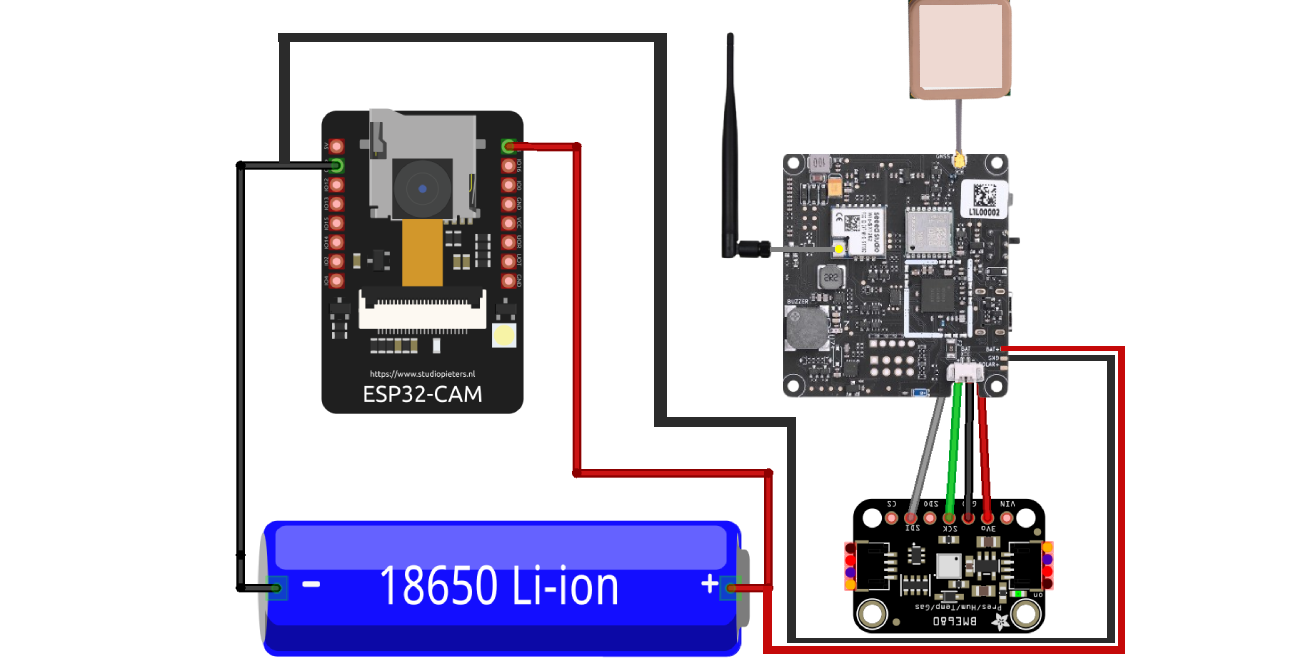
To build SkySense, I used simple components. An ESP32 CAM to take photos at different altitudes and save them to an SD card, a BME680 module that allows me to obtain temperature, humidity, and pressure data, and finally a Wio Tracker L1 Series, which, thanks to its LoRa connectivity, allows me to send the recorded data to the ground station along with the capsule's position via GPS. Finally, SkySense will be powered by a 3.7V 1860 Lipo battery that provides about 4 hours of battery life.
- ESP32 CAM: It's a small card from the ESP family equipped with a small camera and an SD card reader. It allows you to take photos at regular intervals and save them directly to the SD card.
- BME680: It's a simple sensor that allows you to obtain temperature, humidity, and atmospheric pressure data. I chose this sensor for connectivity with the Seed board thanks to the Grove connector that allows for a quick and secure connection.
- WIO TRACKER L1 SERIES: This board is the true brain of SkySense. Thanks to the Grove connector, it receives data from the BME sensor and sends it to the ground via LoRa connectivity. It also features a GPS module to receive the Capsule's real-time position during ascent. The board also has a solar power connector, which could be used in future versions of SkySense.
- BATTERY: To power everything I used a 3.7V 1860 LiPo battery which allows for about 4 hours of autonomy on a full charge.
I connected all the components together according to this diagram.
Here are some photos of how I built and connected all the SkySense electronics. Note that near the lithium battery I placed a master switch and a small two-port jack for charging the battery.
To design the SkySense structure, I used Autodesk Fusion 360. The structure features a screw-on lid that houses the specially organized electronics. To connect everything I used several M2 and M3 screws.
The capsule has two holes, one for the ESP camera and the other for the downward-facing LoRa antenna. At the top and bottom, there are four connectors for attaching the balloon in various ways, or for tethering the capsule to the ground using a tether in initial tests.
You can download all the 3D models from the attachments below.
Using an Anycubic Mega S, the print time for all models was around 20 hours, considering a 15% infill and a fairly slow print speed. To facilitate printing the main component, the 3D model was cut in two and then joined together using superglue. I highly recommend cutting the 3D models and joining them post-printing for a perfect result. Also, as in my case, I recommend sanding the models to remove any printing residue and other supports.
Here are some photos of the printed models.
To receive the data sent by Skysense, I used a twin board, without a GPS module but connected via USB-C to my laptop. The base station received the data sent by Skysense every 15 minutes (BME sensor data, GPS coordinates, and board information such as battery percentage). Each time the base station received a packet, it forwarded it to my PC's serial port, and using software written in Python, which we'll explore later, it allowed me to view all the SkySense information in real time.
To complete the Base it was encapsulated in a small 3D printed case
The Programming
To program the two boards, I followed the official guide. This allowed me to get the boards up and running in no time. The Skysense board was set as a Tracker, while the Base station board was set as a Client. Once the boards were configured, I simply connected the GPS module and the BME sensor to immediately obtain the first data and share it on the channel.
Please note that once connected to the Skysense board it is necessary to activate telemetry from the node settings. This will immediately allow you to record the values obtained from the sensor.
For the ESP32, I used the software you'll find in the attachments. It's a very simple code that takes a photo every second (you can increase this interval to save battery life). I also added a small flash that blinks as soon as the ESP starts up, so you have visual feedback.
As mentioned in previous chapters, to better visualize the data received from Skysense, I developed a simple Python interface with a Map to display GPS coordinates and three labels used to display telemetry data and battery status.
Thanks to the simplicity of the meshtastic library, I was able to decode the incoming packets and display them graphically in just a few simple steps. You can download the Python program below.
For the final test, I connected the Skysense module to a series of helium balloons so it would rise into the air. I also attached a rope to a weight so it wouldn't be blown away by the wind. The result was amazing. Only four balloons, with a total of about 5 liters of helium, were needed to allow Skysense to take flight. The base station immediately received the packets even when it was at a suitable distance (about 500 meters) thanks to LoRa connectivity.
Here are some photos taken directly from SkySense.
It was a fantastic project, and this is only the first version. Thanks to Meshtastic technology, it was incredibly easy to get everything up and running, and the results are amazing. In future versions, I'll definitely add solar panels and a camera pointing to the sky so I can conduct star-focused experiments. Skysense has great potential, especially since it's so cheap (about €90). I can't wait to see where this project takes me.


_t9PF3orMPd.png?auto=compress%2Cformat&w=40&h=40&fit=fillmax&bg=fff&dpr=2)


Comments