

Hardware components | ||||||
 |
| × | 1 | |||
 |
| × | 5 | |||
 |
| × | 5 | |||
 |
| × | 10 | |||
 |
| × | 1 | |||
 |
| × | 1 | |||
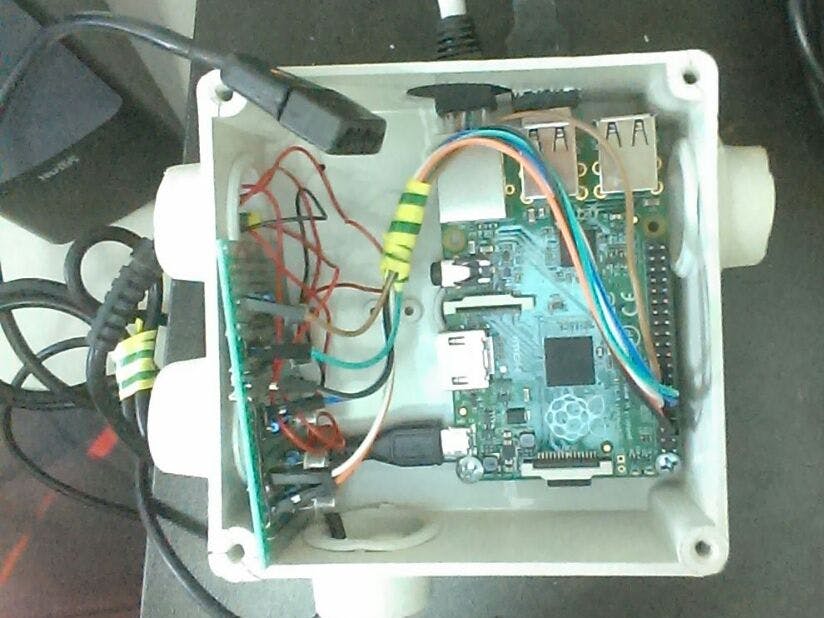
I love Amiga games and I love playing them on a real Amiga instead of relying on pc emulation. It happens that I still have my old Amiga 600 in working conditions but I don't have a fully working 9 pin Joystick to play my games.
Amiga joysticks are not sold in stores, if you want one your only option is to search on Ebay for a old used (and hopefully perfectly working) one at a relatively high price. In order to attempt to repair an old joystick I realized that the internal microswitches could be replaced by a very inexpensive NPN transistor driven by Raspberry's GPIOs. In this way the Raspberry could be in the middle between my regular laptop and the Amiga's 9 pin joystick interface.
Having a Raspberry Pi in the middle means you can drive the Amiga 9 pin interface with standard, modern, low cost regular hardware like USB devices (keyboards, joypads, xBox controllers).
The goal of this project is to control the Amiga 9 pin interface with my laptop keyboard connecting to the raspberry over HTTP but I am planning to write additional documentation for other application cases.
I know It could sounds like a sacrilege to real hard core retro-gamers but this project can be useful for anyone who wants to play games on a real Amiga very quickly without a real joystick.
This project should work with every Amiga, C64s, and Atari ST but it has been tested only on my Amiga 600 so far.
Instructions:- Reproduce the schematic on a breadboard, or better a soldering board
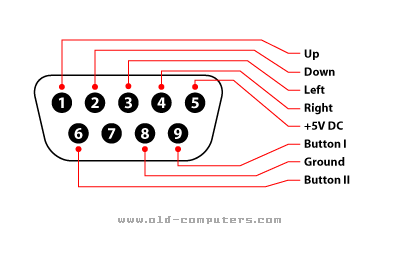
- Connect the Amiga pins from the board to the 9 pin Joystick interface using male to female jumper wires according to the Amiga joystick pinout
- Connect the GPIO pins from the board to the Raspberry Gpio's pins using male to female jumper wires
- Install the PiAmigaJoystick webserver in your raspberrypi and run it.
- Note that the webserver is a simple python flask application that translates an HTTP call to the RaspberryPi's GPIOS.Of course you can launch the web server manually typing 'python app_outputs.py' from your remote terminal but I recommend using an apache HTTP server because it can handle cuncurrent calls very fast. This results in a much better performance if you play games where time performance is crucial.If you want to use Apache webserver install it with mod-wsgi:
apt-get install libapache2-mod-wsgi
- Remember that Apache webserver usually runs as 'www-data' user, so you must grant permission to this user to use gpiomem: to do this run this commands as root:
rpi-update
apt-get update
apt-get upgrade
chown root.gpio /dev/gpiomem
sudo chmod g+rw /dev/gpiomem
adduser www-data gpio
Next step is to create an amigawebserver.wsgi file under /var/www
import sys
sys.path.append('/var/www')
from amigawebserver import app as application
Now download the https://raw.githubusercontent.com/Ozzyboshi/PiAmigaJoystickWebserver/master/ app_outputs.py file, place it under /var/www and rename it in amigawebserver.py
Configure the apache virtualhost as follow (file /etc/apache2/sites-enabled/000-default).
<VirtualHost *:80>
	ServerName #your server name here#
	ServerAdmin #your email here#
       WSGIDaemonProcess yourapplication user=pi group=gpio threads=30
       WSGIScriptAlias / /var/www/amigawebserver.wsgi
	<Directory /var/www/amigawebserver.wsgi>
       	WSGIProcessGroup yourapplication
       	WSGIApplicationGroup %{GLOBAL}
       	Order deny,allow
       	Allow from all
       </Directory>
	ErrorLog ${APACHE_LOG_DIR}/error.log
	# Possible values include: debug, info, notice, warn, error, crit,
	# alert, emerg.
	LogLevel warn
	CustomLog ${APACHE_LOG_DIR}/access.log combined
</VirtualHost>
Restart your Apache webserver with:
/etc/init.d/apache2start restart
I know this is a lot of extra works but it really worth it because performance increases dramatically.
- Go to http://amiga.ozzyboshi.com or open the AmigaPiJoystick pages to run the web application on your local PC. Enter the Raspberry IP address in the textbox and push the 'Connect to raspberry pi' button, if everything is ok, an alert box should pop-up with the message 'Connection succeeded'. Now you can link your GPIO's to the keyboard buttons and play.
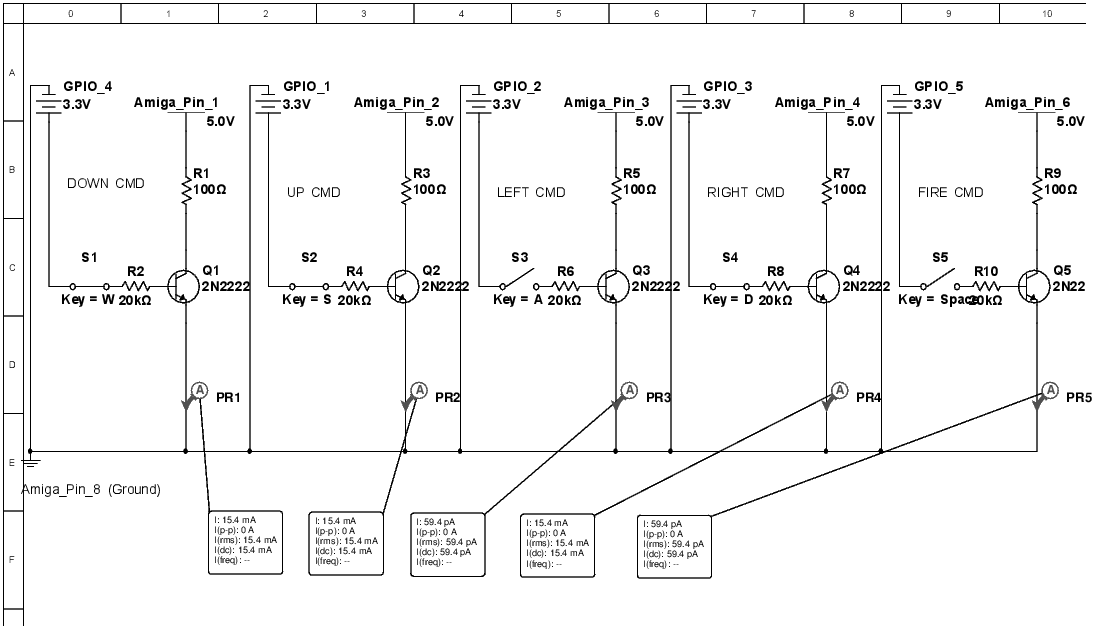
Raspberry 2 Amiga port board schematics
Every Amiga pin is connected to the collector's transistor with a 100 Ohm resistor between them,.
The Raspberry PI pin instead is connected to the base.
When the corresponding Gpio is turned on (in the schematics this behaviour is represented by a mechanical switch), the transistor goes in saturation mode allowing the current to flow between the collector and the emitter therefore closing the circuit and turning the Amiga pin on as it happens on a regular Joystick.


Comments