


Hardware components | ||||||
 |
| × | 1 | |||
 |
| × | 2 | |||
 |
| × | 1 | |||
| × | 1 | ||||
 |
| × | 1 | |||
| × | 1 | ||||
| × | 1 | ||||
| × | 1 | ||||
 |
| × | 1 | |||
 |
| × | 1 | |||
 |
| × | 1 | |||
 |
| × | 1 | |||
| × | 1 | ||||
Software apps and online services | ||||||
_4YUDWziWQ8.png?auto=compress%2Cformat&w=48&h=48&fit=fill&bg=ffffff) |
| |||||
 |
| |||||
| ||||||
 |
| |||||
 |
| |||||
Hand tools and fabrication machines | ||||||
 |
| |||||
 |
| |||||
 |
| |||||
 |
| |||||
 |
| |||||
 |
| |||||
 |
| |||||
 |
| |||||
| ||||||
 |
| |||||
Beekeepers worldwide face a silent crisis: colonies vanish without warning, weights drop mysteriously, ad hives fall victim to theft or extreme weather. Traditional inspections are labor-intensive and reactive. We imagined a future where every hive reports its own health, day and night, powered solely by sun and battery. Open Hive is a self-powered, LoRaWAN-enabled sensor node that monitors hive temperature, humidity, weight and ambient light every ten minutes, then pushes the data to The Things Network. Users visualize real-time dashboards on Ubidots STEM and BEEP Monitor, and receive instant alerts via SMS or e-mail if—for example—the hive weight drops dramatically, temperature soars, or solar battery falls below safe thresholds.
II. Specifications 🐝Target sensor accuracies :
- Temperature ± 0.5 °C (internal/external)
- Humidity ± 2 %
- Weight ± 100 g
- Light resolution for solar yield
To transform the Open Hive concept into a working device, we followed a three-stage prototype workflow—breadboard validation, custom PCB design, and final enclosure assembly.
1.Breadboard Validation & Sensor TestsWe began by mounting the Arduino MKR WAN 1310 on a solderless breadboard alongside each sensor:
- DS18B20 probes for internal temperature
- DHT22 for external temperature & humidity
- HX711 amplifier paired with a load cell under the hive base
- SEN0562 for ambient light
Each sensor was powered from the MKR’s 3.3 V rail and wired to unique GPIO pins. We wrote standalone sketches to verify:
- Temperature accuracy against a lab thermometer
- Humidity consistency versus a calibrated hygrometer
- Load-cell readings on a precision scale
- Lux values compared to a handheld lux meter
This step caught early issues—loose breadboard jumpers, noisy DHT22 readings before PCB design.
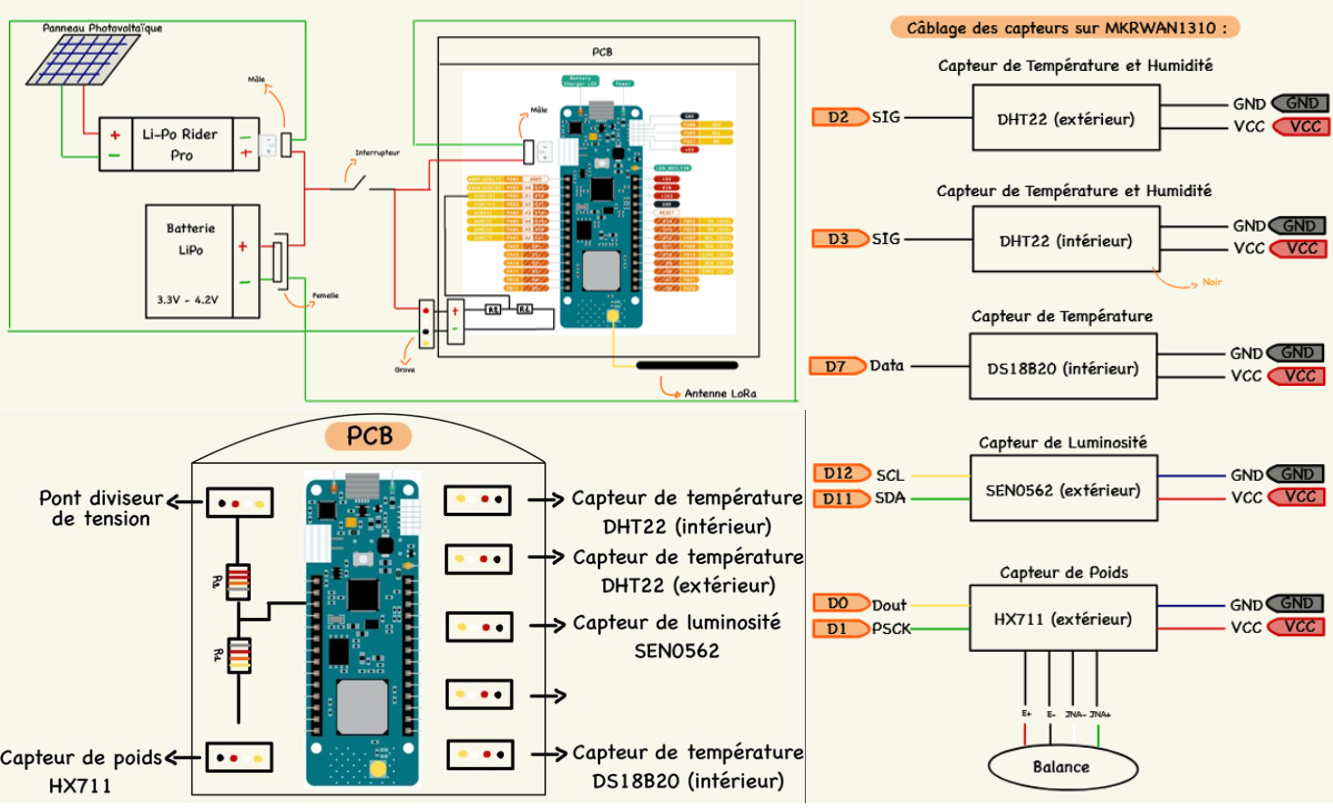
- Electrical schematic: overview of sensor interconnections (MKR WAN 1310, DHT22, DS18B20, HX711, SEN0562 )
2.Schematic & PCB LayoutOnce each sensor sketch passed validation, we translated our breadboard into a formal KiCad schematic:
- Power management: LiPo Rider Pro charger, voltage regulator, and divider for battery monitoring
- Sensor connectors: DS18B20, DHT22, HX711 cell, and SEN0562 module
- Microcontroller: MKR WAN 1310 with LoRa antenna connector
The PCB layout tightly packs all components. Ground pours and star-point placement keep analog load-cell measurements clean. After Gerber export, we etched and soldered the board by hand, then inspected all joints under magnification to eliminate cold-solder defects.
- PCB design: KiCad layout, Gerber export, component placement
3.Enclosure & Final AssemblyFor rugged outdoor use, the PCB and battery rider sit inside a box:
- Cable glands seal each sensor lead from moisture
- The solar panel attaches via exterior mounting holes
During the testing and validation phase, we pinpointed two critical sensor issues that required root‐cause analysis and remediation. First, the HX711 load‐cell amplifier exhibited erratic zero-drift readings: under static loads, output values would randomly fluctuate by several hundred grams. Trace inspection revealed a handful of cold solder joints on the amplifier’s gain resistors. After reflowing these joints with fresh solder and adding flux, the drift vanished and the amplifier delivered stable, repeatable measurements within the ± 100 g tolerance.
Second, our batch of DHT22 modules showed up to ± 5 % humidity variance at high RH levels, exceeding its ± 2 % specification. By cross-referencing each sensor against a calibrated reference hygrometer, we established unique calibration curves for each DHT22 in software. A small subset of units remained outliers even after calibration; these were deemed defective and replaced. Post-calibration testing confirmed that all retained DHT22 sensors now report humidity within ± 2 % of the reference, ensuring consistent environmental readings across deployments.
- Mechanical enclosure: Box, cable glands, solar panel mount
LoRaWAN & TTN Encoding and Transmission
- Each sensor reading (float) is multiplied by 100, cast to a 16-bit integer, and packed into a 16-byte buffer
- The payload is transmitted via OTAA to The Things Network, after which the module goes to sleep.
The Things Network receives and decrypts the incoming frame.
- Ubidots: real-time visualization via graphical widgets (thermometers, gauges, graphics).
- BEEPMonitor: receives the same payload to trriger alerts when critical thresholds are reached (swarming, weight loss, low battery).
Alerts :
1. To maximize autonomy to over 30 days on a LiPo battery, we focused on software optimization:
- DeepSleep Mode: After each LoRa transmission, the Arduino MKR WAN 1310 enters DeepSleep mode for 10 minutes.
- Disabling Unused Peripherals : The I²C interface (Wire.end()) and the HX711 converter (scale.power_down()) are shut down before entering Deepsleep Mode.
Result :
Before power optimization: 1.7 days of battery life
After power optimization: 30.3 days of battery life
The success of the Connected Beehive project relied on structured organization, extensive use of collaborative tools, and the early establishment of clear team-wide working principles. In a multidisciplinary context combining electronics, embedded systems, and wireless communication, effective task coordination and a fair distribution of responsibilities were crucial.
Working Framework and Foundational Principles
From the outset, the team agreed on a set of operating principles designed to ensure a healthy, productive, and coherent working dynamic throughout the semester. These principles included:
- Encouraging constant and transparent communication, regardless of topic;
- Trusting in each member’s individual competencies, allowing for autonomy in specific areas of expertise;
- Openly sharing technical difficulties, enabling fast, collective problem-solving;
- Defining a clear division of roles, while maintaining flexibility in response to workload variations or unforeseen issues.
- This collaborative framework created a climate of trust that fostered individual accountability while promoting collective responsibility.
Development Methodology and Organizational Approach
Rather than following a rigid project management model (e.g., Scrum, Waterfall), the team adopted an agile approach based on short, iterative phases. Each member was assigned specific modules (sensors, communication interface, power supply, embedded software) aligned with their skills and interests.
Development proceeded incrementally, through prototyping, individual testing, and final system integration. This modular organization enabled early detection of issues and streamlined the final assembly.
Advanced Use of GitHub for Collaborative Project Management
GitHub was the cornerstone of our collaborative infrastructure. Beyond code versioning, we leveraged its full project management capabilities:
- GitHub Projects: A customizable Kanban board structured all project tasks. Each card corresponded to a feature, bug, test, or documentation item, facilitating visual tracking of progress.
- Roadmap: This view helped plan critical milestones (e.g., sensor integration, LoRa validation, field testing, final deliverables) and ensured alignment with deadlines.
- Assignees and Labels: Every task (issue) was assigned to a team member, categorized (feature, bug, test, documentation), and prioritized (high, medium, low).
- Milestones: Key development phases were defined and tracked to support structured planning and time management.
- Team Capacity: This feature allowed workload estimation based on availability and expertise, enabling a more balanced task distribution.
- My Items: Each member had a personalized dashboard displaying only their assigned tasks, enhancing individual focus while maintaining collective visibility.
The systematic use of pull requests, combined with peer reviews, ensured high code quality and smooth integration.
https://github.com/OUMERTAmine/Ruche
Communication and Team Coordination
Effective collaboration relied on a mix of synchronous and asynchronous communication tools:
- WhatsApp for daily updates and quick decisions;
- Google Meet for weekly technical meetings and milestone reviews;
- In-person sessions for hardware-related tasks such as soldering, system assembly, and debugging.
This hybrid communication model supported flexibility while ensuring consistent coordination across the team.
Feedback and Lessons Learned
At the conclusion of the project, several key takeaways emerged:
- Setting a clear collaborative framework from the start was instrumental in avoiding misunderstandings and balancing team efforts;
- A work culture based on mutual trust and skills recognition significantly enhanced efficiency and engagement;
- Fully exploiting GitHub as a project management platform, not just a code repository, provided real-time visibility, improved traceability, and facilitated structured collaboration;
- The project offered valuable technical learning opportunities: PCB design using KiCad, wireless communication via LoRaWAN, precision soldering, embedded debugging, and development of reliable standalone systems.
Ultimately, this project served as a practical immersion into real-world collaborative engineering. It demonstrated the importance of a flexible yet disciplined organizational approach, and enabled each team member to grow both technically and methodologically.
VII. Conclusion 🐝In conclusion, thanks to rigorous organization, effective collaboration, and a strategic distribution of tasks, the team successfully designed a functional, modular, and scalable system that met both technical and educational expectations.
Beyond its functional achievements, this project served as a valuable learning opportunity. Each member was able to consolidate and expand their skills in various areas such as electronics, wireless communication, embedded development, system integration, as well as project management and teamwork in a distributed environment.
Several areas for improvement have been identified for future development:
- Correction of persistent anomalies in the light measurement module;
- Integration of new sensors such as a microphone for sound detection or a camera for visual monitoring inside the beehive;
- Improvement of the system’s ergonomics and autonomy.
All in all, this project stands as a formative and enriching experience—both technically and personally—paving the way for concrete future developments in more advanced and field-ready IoT applications.
You can find our entire project on our github ! : https://github.com/OUMERTAmine/Ruche
Open Hive Hardware Architecture & Sensor Integration Overview


_Ujn5WoVOOu.png?auto=compress%2Cformat&w=40&h=40&fit=fillmax&bg=fff&dpr=2)


Comments