

Hardware components | ||||||
| × | 1 | ||||
| × | 1 | ||||
| × | 1 | ||||
| × | 1 | ||||
| × | 1 | ||||
 |
| × | 2 | |||
 |
| × | 2 | |||
| × | 1 | ||||
 |
| × | 3 | |||
| × | 1 | ||||
Software apps and online services | ||||||
 |
| |||||
 |
| |||||
In today’s world, many useful and sometimes even essential services are offered online. And while it might be convenient to use these services, remembering the login credentials and credit card information to actually use these services might turn out to be challenging. Using the same email and password for all your accounts, using one credit card to pay for every service, or writing down login credentials in a notebook may seem like a quick fix, but these are not the best solutions. In my opinion, the best way to manage your login credentials and credit card information is to store them in a dedicated vault, such as Midbar.
The Midbar (STM32F407VET6 Version) is equipped with a sophisticated encryption algorithm and a well-functioning integrity verification feature.
Besides that, the Midbar (STM32F407VET6 Version) has a new “Dual RNG” feature, and this is the first version of Midbar that can simultaneously handle the PS2 Keyboard and the Nintendo 64 Controller.
As for why this project is called Midbar — Midbar (מדבר) is a Hebrew word that means “pasture, ” “uninhabited land, ” “wilderness, ” “large tracts of wilderness (around cities), ” and “desert.” I had two reasons for choosing the word Midbar as the name of this project. First — while working on my previous projects, I noticed that the so-called “device that keeps your personal data secure in an encrypted form” market is pretty much a “desert around the oasis of the password manager market.” Second — I couldn’t find a better word to describe this project. At first, I wanted to call it a “Password Vault, ” but it’s more than that. So, I decided to call it Midbar.
You can also read this tutorial on Instructables and Medium.
*Attention! It’s not a beginner project. I assume you’re already familiar with the STM32F407VET6 microcontroller and know how to flash it. You can find a more beginner-friendly version of Midbar here.
3DES + AES + Blowfish + Serpent Encryption Algorithm In CBC ModeThe “3DES + AES + Blowfish + Serpent” encryption algorithm in cipher block chaining mode first appeared in the Midbar V2.5. And since then has been utilized by the Midbar (Raspberry Pi Pico Version),Midbar V3.0,Midbar V4.0,KhadashPay V2.0,Midbar (Raspberry Pi Pico Version) V2.0,KhadashPay V2.0 (Raspberry Pi Pico Version),Midbar V5.0,Midbar (STM32F401CCU6 Version),KhadashPay V3.0 (STM32F401CCU6 Version),KhadashPay V3.0,Midbar (STM32F401CCU6 + Arduino Uno Version),KhadashPay V3.5,Black Swan V2.0,Midbar (Teensy 4.1 Version),Hash Latch,Midbar (Teensy 4.1 Version) V2.0, and Midbar (ESP8266 Version) V2.0.
Although the “3DES + AES + Blowfish + Serpent” encryption algorithm ain’t exactly what I would call “a cryptographically weak encryption algorithm, ” operating it in a weird derivation of the ECB mode, the way it was done by the Midbar V2.0 wasn’t the best idea that I had. Even though that wouldn’t’ve allowed the attacker to produce the legitimate ciphertext by swapping the blocks within the ciphertext, an attacker could still make a legitimate ciphertext by replacing the nth block of the ciphertext N1 with the nth block of the ciphertext N2. To fix that vulnerability (instead of just notifying the user that the decrypted ciphertext might’ve been forged), I made the “3DES + AES + Blowfish + Serpent” encryption algorithm work in CBC mode. So, if an attacker replaces a block of ciphertext, they spoil not just that block but also the subsequent one.
I’ll be honest with you, the bit-flipping attack “kinda works, ” but I doubt that it would ever go unnoticed because of the “HMAC-SHA256”-based integrity verification feature
And let’s not forget that this encryption algorithm performs the operation called superencryption.
As defined by NIST, superencryption is an encryption operation for which the plaintext input to be transformed is the ciphertext output of a previous encryption operation.
Such organization of the encryption algorithms makes a combined encryption algorithm that is at least as strong as the strongest one in the cascade, has a longer key, might be more resistant to some attacks, and might produce a ciphertext with higher entropy. Anyway. It won’t hurt to have an additional layer of security (or several of them).
Integrity VerificationThe Midbar (STM32F407VET6 Version) is the thirteenth version of Midbar that verifies the integrity of the whole record. So, the legitimate ciphertexts moved between the cells aren’t much of a threat to it.
The “HMAC-SHA256”-based integrity verification feature functions in the following way:
When you add a record to Midbar, it consolidates all the data you have entered into one string, computes a tag for that string, and then saves the newly computed tag in the encrypted form.
When Midbar decrypts your data, it also decrypts the previously saved tag and computes a new one for the decrypted data. It then compares both tags. If they don’t match — Midbar notifies you that the integrity verification failed.
Dual RNGI realized since I’m adding Arduino to this project to handle the Nintendo 64 Controller, why not make use of the other capabilities of Arduino, like, for example, the capability to generate random numbers?
And so I did. The Midbar (STM32F407VET6 Version) uses two random number generators to generate the random number. To generate the random number that would be used in the encryption process, the Midbar XORs the random number generated by the STM32F407VET6 with the one generated by the Arduino.
*The code for the RNG was taken from the following sources:
- https://www.instructables.com/Arduino-Truly-Random-Number-Generator/
- https://www.stm32duino.com/viewtopic.php?t=2108
You can download the firmware for Midbar from one of these sources.
SourceForge: https://sourceforge.net/projects/midbar/
GitHub: https://github.com/Northstrix/Midbar
If you just need the firmware for the device alongside the RNG, then I would advise you to download the archive that weighs less than 2 Mb from SourceForge.
But if you need the firmware for all versions of Midbar alongside the extra code, photos, and diagrams, in that case, I would advise you to download the 266 MB archive from GitHub.
Download And Install The LibrariesAdafruit_ILI9341: https://github.com/adafruit/Adafruit_ILI9341
Adafruit-GFX-Library: https://github.com/adafruit/Adafruit-GFX-Library
Adafruit_BusIO: https://github.com/adafruit/Adafruit_BusIO
PS2KeyAdvanced: https://github.com/techpaul/PS2KeyAdvanced
PS2KeyMap: https://github.com/techpaul/PS2KeyMap
arduino-n64-controller-library: https://github.com/pothos/arduino-n64-controller-library
The process of unpacking libraries is typical. You can unpack the content of the archive into the folder: …\Arduino\libraries. Or open the Arduino IDE, click to the Sketch -> Include Library -> Add.ZIP Library… and select every archive with libraries.
Other required libraries are already present in one way or another.
Choose The Firmware For STM32F407VET6Okay, pay attention to that one.
Upon going to the “STM32F407VET6 Version\V1.0” folder, you encounter three folders with the firmware for the STM32F407VET6.
Let me explain the differences between them:
“Firmware_for_STM32F407VET6” is the firmware that contains all the features of this version of Midbar, such as Dual RNG, PS2 keyboard support, and Nintendo 64 Controller support;
“Firmware_for_STM32F407VET6_N64_Controller_only” is the firmware that includes all the features of this version of Midbar except for the PS2 keyboard support.;
“Firmware_for_STM32F407VET6_only_no_Arduino” is the firmware that lacks the Dual RNG feature and the support for the Nintendo 64 Controller. However, it still utilizes the STM32F407VET6’s built-in RNG and incorporates all other features. The main pro of this firmware is that it doesn’t require pairing the STM32F407VET6 with Arduino.
In this tutorial, I will be using the firmware from the “Firmware_for_STM32F407VET6” folder.
Generate KeysTo make the unauthorized deciphering of your data computationally infeasible — It is crucial to generate your own keys and never reuse them
It’s entirely up to you how to generate the keys. I can only offer you an option to do so.
I’ve modified one of my previous projects to work as a random number generator, the generated output seems “random enough” for me, but I haven’t run any tests. So, I can’t guarantee that it’s random.
Use it at your own risk!
To generate the keys — launch gen.exe from the “STM32F407VET6 Version\V1.0\Untested RNG” folder and click the “Generate keys for Midbar” button. The background turns from dark gray to light gray when you press that button.
Modify The Chosen FirmwareOpen the “.ino” file from the folder with the chosen firmware, and then replace my keys with those you’ve generated.
You can also change the number of available slots for your data by modifying the value in the “#define MAX_NUM_OF_RECS 999” line, as well as the background color of the inactive elements by modifying the value of the “current_inact_clr” variable.
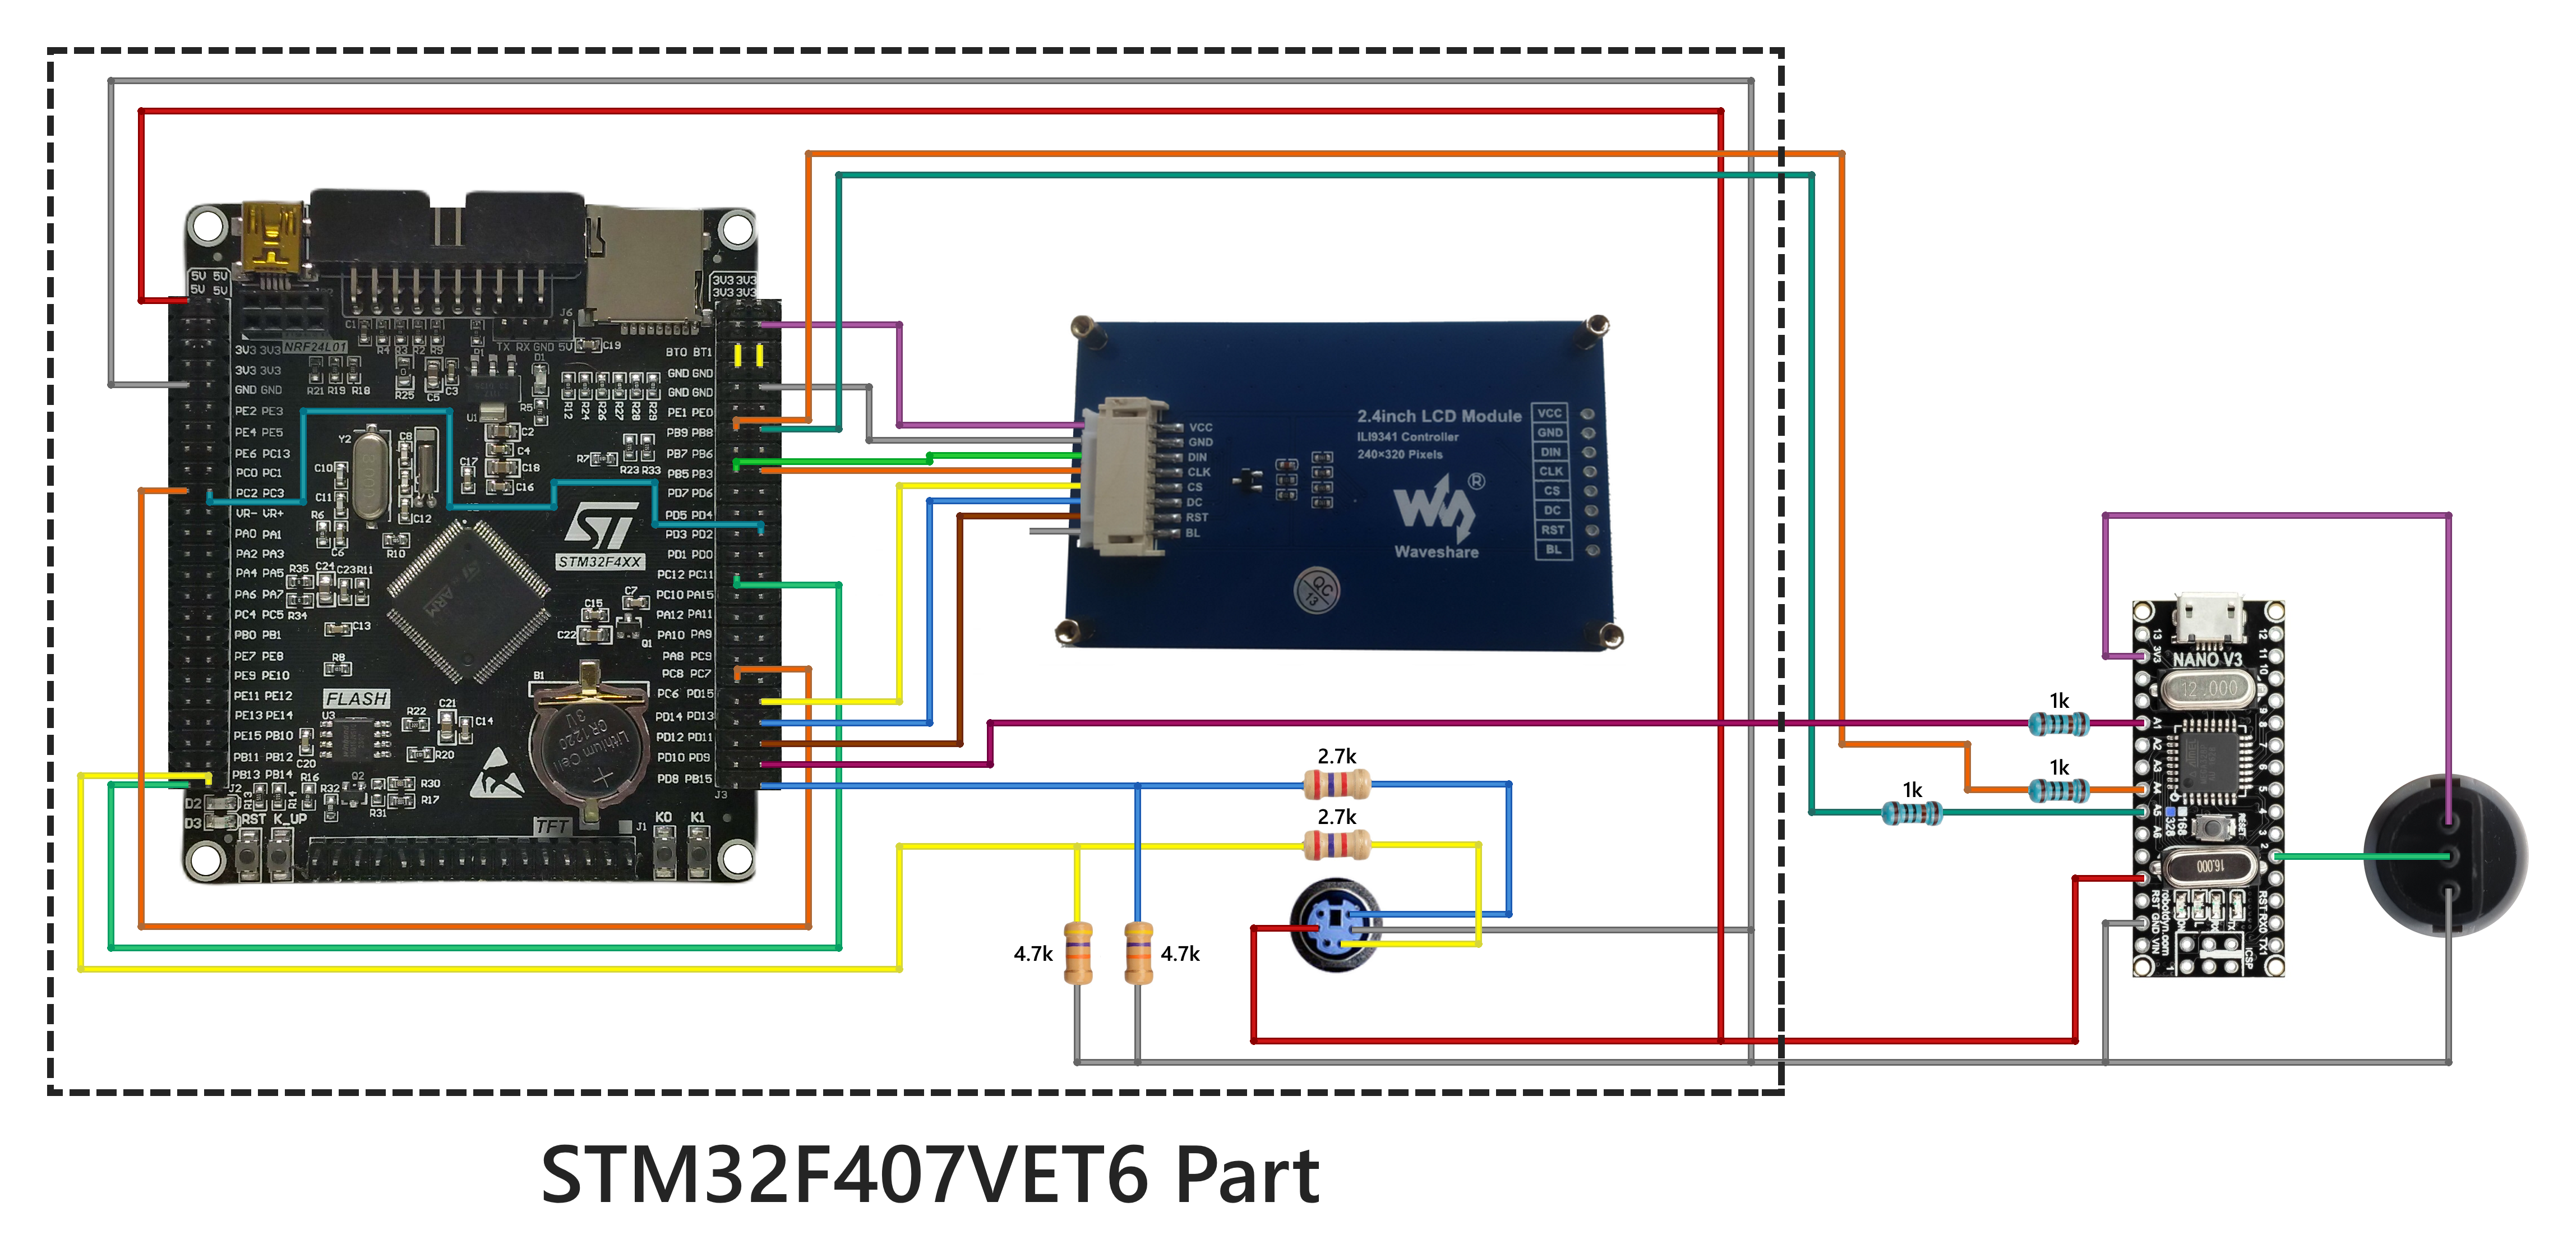
Flash STM32F407VET6After you’ve chosen the firmware you want to use and made the necessary modifications to it — make sure that the settings in the “Tools” tab match those on the picture above and upload the modified firmware into the STM32F407VET6.
Flash ArduinoUpload firmware from the “STM32F407VET6 Version\V1.0\Firmware_for_Arduino” folder into Arduino.
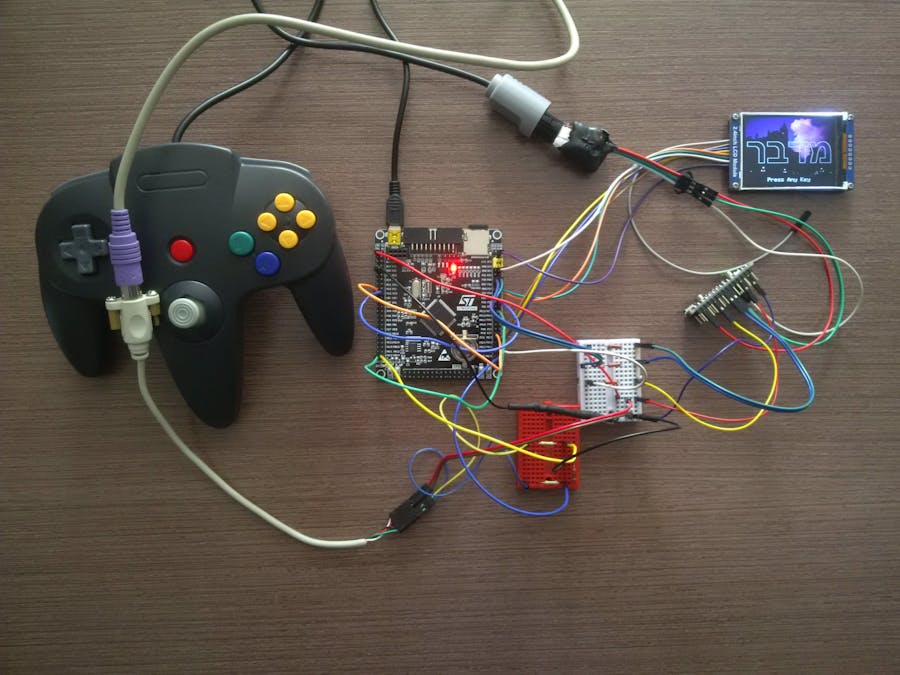
Assemble MidbarAssemble the circuit and insert a Micro SD card formatted to the FAT32 filesystem into the STM32F407VET6’s built-in SD card slot. When it comes to the “BL” pin of the ILI9341 display, different versions of the display have different requirements on what to do with it. Some versions specify that it must be connected to the +3.3V, some require it to be grounded, and others allow you to leave it unconnected.
Power The Midbar UpAfter powering the Midbar up, you should see the word “מדבר” alongside the “Press Any Key” inscription.
The Midbar (STM32F407VET6 Version) has only one lock screen, just like the Midbar (STM32F401CCU6 + Arduino Uno Version) and Midbar (Teensy 4.1 Version) V2.0.
Press any key on the PS2 keyboard or any button on the Nintendo 64 Controller to get to the next tab.
*Credit for the photo of Saint Paul:
Photo by Javier Quiroga on Unsplash
Set Master PasswordTo use the Midbar, you first need to set the master password.
You can’t change your master password without performing the factory reset first!
Midbar won’t be able to decrypt your data without your master password because the keys for the encryption algorithms are partially derived from it. Perhaps it won’t even unlock without the correct master password.
When you’re done entering your master password, press either the “Enter” or the “ESC” key on the PS/2 keyboard.
As for the Nintendo 64 controller:
- The “Start” button acts as the “Enter” key on the PS/2 keyboard;
- The “Z” button acts as the “Esc” key on the PS/2 keyboard;
- The “A” button acts as the “Continue/Add char” button;
- The “B” button acts as the “Backspace” key on the PS/2 keyboard;
- The “D-pad, ” “C-pad, ” “L” button, “R” button, and stick function as arrows on the PS/2 keyboard.
So, whether I would be referring to the keys on the PS2 keyboard, note that I also refer to their N64 equivalent.
After you’ve unlocked the vault and got to the main menu:
- Press the “↓” (DOWNWARDS ARROW) key on the PS/2 keyboard to go down the menu.
- Press the “↑” (UPWARDS ARROW) key on the PS/2 keyboard to go up the menu.
- Press either the “A” button on the Nintendo 64 Controller or the “Enter” key on the PS/2 keyboard to open the selected menu.
- While in the submenu, press either the “Esc” or the “Backspace” key on the PS/2 keyboard to return to the main menu.
While entering a text in a tab:
- Press “Enter” on the PS/2 keyboard to continue;
- Press the “Esc” button on the PS/2 keyboard to cancel the current operation.
The Midbar (STM32F407VET6 Version) utilizes the 3DES + AES + Blowfish + Serpent encryption algorithm in CBC mode with an integrity verification feature alongside the SD card to keep your data safe and organized.
To add a login:
- Select the “Logins” line in the main menu;
- Press either the “A” button on the Nintendo 64 Controller or the “Enter” key on the PS/2 keyboard;
- Select the “Add” line;
- Press either the “A” button on the Nintendo 64 Controller or the “Enter” key on the PS/2 keyboard;
- Choose the slot you want to put the login to by pressing the “←” (Leftwards Arrow) and “→” (Rightwards Arrow) keys on the PS/2 keyboard;
- Press either the “A” button on the Nintendo 64 Controller or the “Enter” key on the PS/2 keyboard;
- Enter the title;
- Press “Enter” on the PS/2 keyboard;
- Enter the username;
- Press “Enter” on the PS/2 keyboard;
- Enter the password;
- Press “Enter” on the PS/2 keyboard;
- Enter the website;
- Press “Enter” on the PS/2 keyboard.
*All credentials demonstrated here are entirely fictitious. Any similarity to actual credentials is purely coincidental.
View LoginTo view a login:
- Select the “Logins” line in the main menu;
- Press either the “A” button on the Nintendo 64 Controller or the “Enter” key on the PS/2 keyboard;
- Select the “View” line;
- Press either the “A” button on the Nintendo 64 Controller or the “Enter” key on the PS/2 keyboard;
- Choose the slot from which you want to view the login by pressing the “←” (Leftwards Arrow) and “→” (Rightwards Arrow) keys on the PS/2 keyboard;
- Press either the “A” button on the Nintendo 64 Controller or the “Enter” key on the PS/2 keyboard;
- Press either the “↑” (Upwards Arrow) key on the PS/2 keyboard or the “A” button on the Nintendo 64 Controller to print the record to the serial terminal.
*All credentials demonstrated here are entirely fictitious. Any similarity to actual credentials is purely coincidental.
Edit LoginTo edit a login:
- Select the “Logins” line in the main menu;
- Press either the “A” button on the Nintendo 64 Controller or the “Enter” key on the PS/2 keyboard;
- Select the “Edit” line;
- Press either the “A” button on the Nintendo 64 Controller or the “Enter” key on the PS/2 keyboard;
- Select the login you would like to edit by pressing the “←” (Leftwards Arrow) and “→” (Rightwards Arrow) keys on the PS/2 keyboard;
- Press either the “A” button on the Nintendo 64 Controller or the “Enter” key on the PS/2 keyboard;
- Enter the new password;
- Press “Enter” on the PS/2 keyboard.
*All credentials demonstrated here are entirely fictitious. Any similarity to actual credentials is purely coincidental.
Delete LoginTo delete a login:
- Select the “Logins” line;
- Press either the “A” button on the Nintendo 64 Controller or the “Enter” key on the PS/2 keyboard;
- Select the “Delete” line;
- Press either the “A” button on the Nintendo 64 Controller or the “Enter” key on the PS/2 keyboard;
- Select the login you would like to delete either by pressing the “←” (Leftwards Arrow) and “→” (Rightwards Arrow) keys on the PS/2 keyboard;
- Press either the “A” button on the Nintendo 64 Controller or the “Enter” key on the PS/2 keyboard.
The process of working with records of other types is very similar to the process of working with logins.
Hash StringTo hash a string:
- Select the “Hash Functions” line in the main menu;
- Press either the “A” button on the Nintendo 64 Controller or the “Enter” key on the PS/2 keyboard;
- Select the “SHA-256” or “SHA-512” line depending on the hash function you’d like to use;
- Press either the “A” button on the Nintendo 64 Controller or the “Enter” key on the PS/2 keyboard;
- Enter the string you’d like to hash;
- Press “Enter” on the PS/2 keyboard.
Although Midbar (STM32F407VET6 Version) is a bit slower than Midbar V4.0 and doesn’t allow you to use it as an arbitrary string encrypter, it’s still a fully functional vault.
More than that, this is the first STM32 version of Midbar that actually utilizes the STM32’s random number generator. Also, as I’ve mentioned earlier in this tutorial, this is the first version of Midbar that can simultaneously handle the PS2 keyboard and the Nintendo 64 Controller. Furthermore, Midbar (STM32F407VET6 Version) is very stable, even compared to the Midbar (Raspberry Pi Pico Version) V2.0.
And while Midbar is no guarantee of world peace or social harmony, I do believe that it’s an important contribution to the protection of your data from unauthorized access.
I think it’s also worth mentioning that Midbar’s source code is distributed under the MIT license. That grants you the freedom to customize, adapt, and modify Midbar according to your needs and preferences. In other words, you can create your own version of Midbar or use it as a starting point for building new projects without the need for external permission.
If you found this tutorial to be useful, please consider sharing it.
Thank you for reading this tutorial.


Comments