

Hardware components | ||||||
 |
| × | 1 | |||
| × | 1 | ||||
| × | 1 | ||||
| × | 1 | ||||
| × | 1 | ||||
| × | 1 | ||||
Software apps and online services | ||||||
 |
| |||||
Around three and a half years ago, I embarked on a self-guided journey to learn cryptography. During the first few months, I gathered most of the information I needed from Coursera, supplemented by additional resources from YouTube and various websites I discovered through Google. After acquiring a satisfactory level of theoretical knowledge (perhaps more than I could comprehend at that time), I slowed down my study of cryptography for roughly a year. Once I felt I had processed and comprehended most of the theory I had learned the previous year, I took a couple more courses, Googled the missing pieces, and started working with cryptographic primitives in practice. At first, I experimented with 3DES, then I created my own encryption algorithm based on it. Later on, I also started working with the implementation of Serpent. As I progressed further, I learned to use cryptography alongside different parts of the system and created the first version of Midbar. I then continued to refine Midbar, and after one and a half years of development, I finally made the fully functional IoT version of Midbar that is not just equipped with an advanced encryption algorithm coupled with the sophisticated integrity verification feature but also utilizes the capabilities of Google Firebase.
That version of Midbar stores the encrypted data in the cloud while keeping the keys on the ESP32!
As for why this project is called Midbar — Midbar (מדבר) is a Hebrew word that means “pasture, ” “uninhabited land, ” “wilderness, ” “large tracts of wilderness (around cities), ” and “desert.” I had two reasons for choosing the word Midbar as the name of this project. First — while working on my previous projects, I noticed that the so-called “device that keeps your personal data secure in an encrypted form” market is pretty much a “desert around the oasis of the password manager market.” Second — I couldn’t find a better word to describe this project. At first, I wanted to call it a “Password Vault, ” but it’s more than that. So, I decided to call it Midbar.
You can also read this tutorial on Instructables and Medium.
3DES + AES + Blowfish + Serpent Encryption Algorithm In CBC Mode
The “3DES + AES + Blowfish + Serpent” encryption algorithm in cipher block chaining mode first appeared in the Midbar V2.5. And since then has been utilized by the Midbar (Raspberry Pi Pico Version),Midbar V3.0,Midbar V4.0,KhadashPay V2.0,Midbar (Raspberry Pi Pico Version) V2.0,KhadashPay V2.0 (Raspberry Pi Pico Version),Midbar V5.0,Midbar (STM32F401CCU6 Version),KhadashPay V3.0 (STM32F401CCU6 Version),KhadashPay V3.0,Midbar (STM32F401CCU6 + Arduino Uno Version),KhadashPay V3.5,Black Swan V2.0,Midbar (Teensy 4.1 Version),Hash Latch,Midbar (Teensy 4.1 Version) V2.0,Midbar (ESP8266 Version) V2.0,Midbar (STM32F407VET6 Version) and Midbar (STM32F407VET6 + Arduino Uno Version).
Although the “3DES + AES + Blowfish + Serpent” encryption algorithm ain’t exactly what I would call “a cryptographically weak encryption algorithm, ” operating it in a weird derivation of the ECB mode, the way it was done by the Midbar V2.0 wasn’t the best idea that I had. Even though that wouldn’t’ve allowed the attacker to produce the legitimate ciphertext by swapping the blocks within the ciphertext, an attacker could still make a legitimate ciphertext by replacing the nth block of the ciphertext N1 with the nth block of the ciphertext N2. To fix that vulnerability (instead of just notifying the user that the decrypted ciphertext might’ve been forged), I made the “3DES + AES + Blowfish + Serpent” encryption algorithm work in CBC mode. So, if an attacker replaces a block of ciphertext, they spoil not just that block but also the subsequent one.
I’ll be honest with you, the bit-flipping attack “kinda works, ” but I doubt that it would ever go unnoticed because of the “HMAC-SHA256”-based integrity verification feature
And let’s not forget that this encryption algorithm performs the operation called superencryption.
As defined by NIST, superencryption is an encryption operation for which the plaintext input to be transformed is the ciphertext output of a previous encryption operation.
Such organization of the encryption algorithms makes a combined encryption algorithm that is at least as strong as the strongest one in the cascade, has a longer key, might be more resistant to some attacks, and might produce a ciphertext with higher entropy. Anyway. It won’t hurt to have an additional layer of security (or several of them).
Integrity Verification
The Midbar Firebase Edition V1.0 is the fifteenth version of Midbar that verifies the integrity of the whole record. So, the legitimate ciphertexts moved between the cells aren’t much of a threat to it.
The integrity verification feature of Midbar is based on “HMAC-SHA256.” When you enter data into Midbar, it consolidates all the data into a single string, computes a tag for that string, and saves the newly computed tag in encrypted form. When you decrypt your data, Midbar also decrypts the previously saved tag and computes a new one for the decrypted data. It then compares both tags. If they don’t match — Midbar notifies you that the integrity verification failed.
Install CP210x Driver And Configure Arduino IDE *OptionalIf you’ve never flashed ESP32 before you need to configure Arduino IDE and install CP210x driver to upload the firmware into the board, you can download the CP210x driver for ESP32 here: https://www.silabs.com/developers/usb-to-uart-bridge-vcp-drivers
Configuring IDE isn’t a part of this tutorial. You can read about it here: https://randomnerdtutorials.com/installing-the-esp32-board-in-arduino-ide-windows-instructions/
Download FirmwareYou can download the firmware for Midbar from one of these sources:
https://sourceforge.net/projects/midbar-firebase-edition/
https://github.com/Northstrix/Midbar-Firebase-Edition
Download And Install The LibrariesAdafruit-ST7735-Library: https://github.com/adafruit/Adafruit-ST7735-Library
Adafruit-GFX-Library: https://github.com/adafruit/Adafruit-GFX-Library
Adafruit_BusIO: https://github.com/adafruit/Adafruit_BusIO
PS2KeyAdvanced: https://github.com/techpaul/PS2KeyAdvanced
PS2KeyMap: https://github.com/techpaul/PS2KeyMap
Firebase-ESP32: https://github.com/mobizt/Firebase-ESP32
The process of unpacking libraries is typical. You can unpack the content of the archive into the folder: …\Arduino\libraries. Or open the Arduino IDE, click to the Sketch -> Include Library -> Add.ZIP Library… and select every archive with libraries.
Other required libraries are already present in one way or another.
Set Up Google Firebase
I would be happy to explain to you how to set up Google Firebase. However, I believe that the article at https://medium.com/firebase-developers/getting-started-with-esp32-and-firebase-1e7f19f63401 does a better job on that. I suggest reading the article up until the “Development Environment Setup” headline.
When setting up the database, save the “Realtime Database URL” and “Web API Key.”
These values will be needed later.
Generate Keys
To make the unauthorized deciphering of your data computationally infeasible — It is crucial to generate your own keys and never reuse them
It’s entirely up to you how to generate the keys. I can only offer you an option to do so.
I’ve modified one of my previous projects to work as a random number generator, the generated output seems “random enough” for me, but I haven’t run any tests. So, I can’t guarantee that it’s random.
Use it at your own risk!
To generate the keys — launch gen.exe from the “V1.0\Untested RNG” folder and click the “Generate keys for Midbar” button. The background turns from dark gray to light gray when you press that button.
Modify The Firmware
Open the “Firmware.ino” file from the “V1.0\Firmware” folder and put your values to the following variables:
WIFI_SSID
WIFI_PASSWORD
API_KEY
DATABASE_URL
After that, replace my keys with yours.
Switch The Partition Scheme To The “Huge APP (3MB No OTA/1MB SPIFFS)”
You have to switch the partition scheme to the “Huge APP (3MB No OTA/1MB SPIFFS)” before you flash ESP32 because the firmware is too big for the default partition.
Flash ESP32
Upload the firmware from the “V1.0\Firmware” folder into the ESP32. Don’t forget to hold the “BOOT” button when the firmware upload starts.
Some boards will flash without any problems.
Unfortunately, that’s not the case for all boards. If you configured IDE correctly, installed drivers, selected the corresponding port, and still keep getting this error: A fatal error occurred: Failed to connect to ESP32: Timed out waiting for packet header. Connect a 10µF capacitor to the board while flashing.
Connect the positive lead of the capacitor to the EN pin of the ESP32;
Connect the negative lead of the capacitor (usually indicated by the gray stripe) to the GND pin of the ESP32.
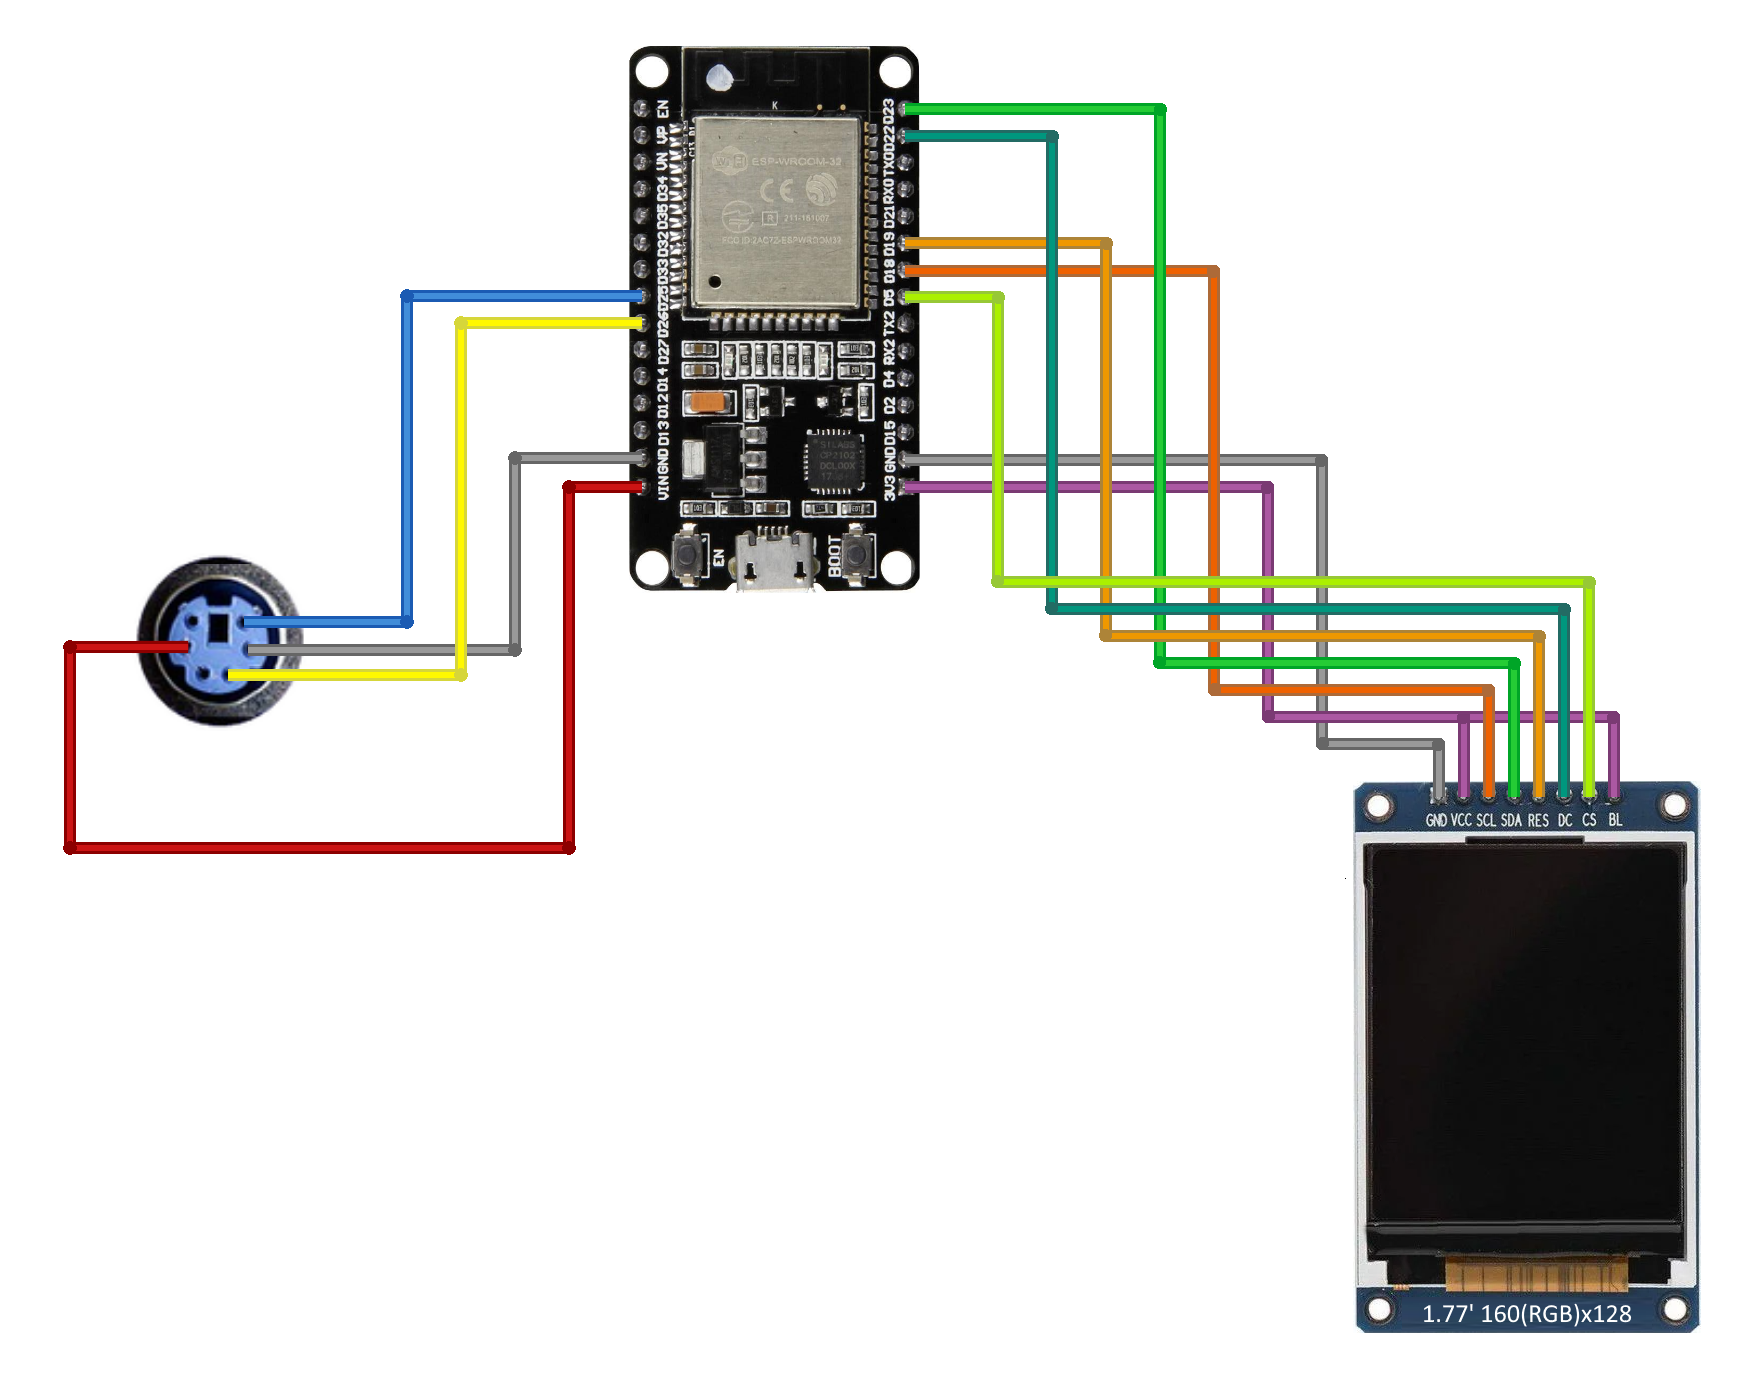
Assemble Midbar
It shouldn’t be hard to assemble.
Just compare it with Midbar (STM32F401CCU6 + Arduino Uno Version) or Midbar (RTL8720DN + Arduino Uno Version), and you’ll understand what I mean.
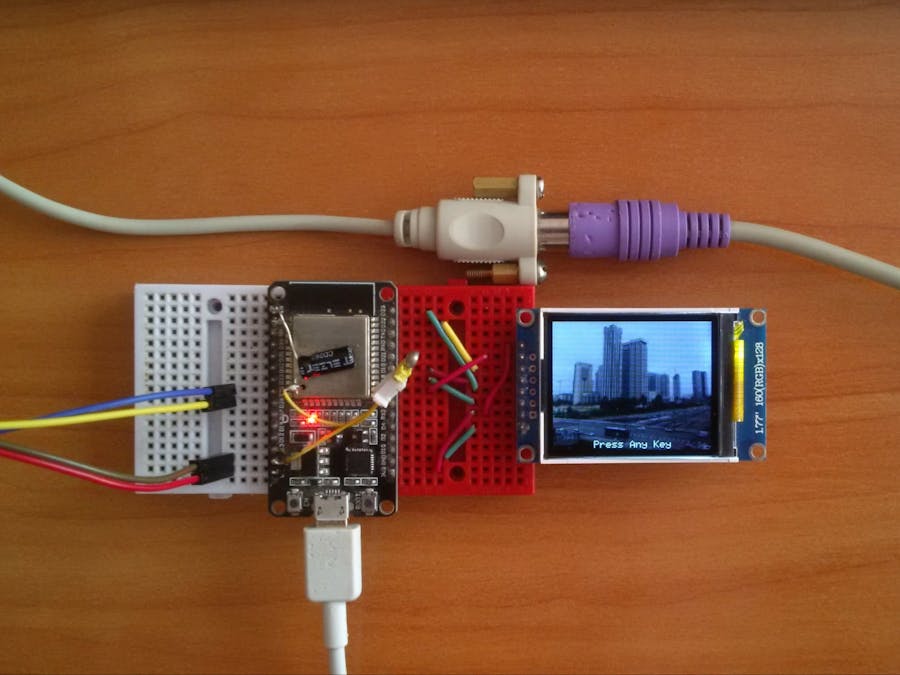
Power The Midbar Up
Power the Midbar up, wait till it connects to your access point (Wi-Fi), initialize the firebase, and display the random lock screen.
That version of Midbar has 18 lock screens.
*Credit for the used photos:
Photo by Joey Kyber on Unsplash
Photo by Levi Meir Clancy on Unsplash
Photo by Braden Egli on Unsplash
Photo by Talena Reese on Pexels
Photo by Igor Flek on Unsplash
Image by herdzmedia from Pixabay
Photo by Daniel McCullough on Unsplash
Image by Paul Brennan from Pixabay
Photo by Morgan Petroski on Unsplash
Image by RobinSaville from Pixabay
Photo by Jeffrey Eisen on Unsplash
Photo by Micah Camper on Unsplash
Photo by Nadine Shaabana on Unsplash
Set Master Password
To use the Midbar, you first need to set the master password.
You can’t change your master password without performing the factory reset first!
Midbar won’t be able to decrypt your data without your master password because the keys for the encryption algorithms are partially derived from it. Perhaps it won’t even unlock without the correct master password.
When you’re done entering your master password, press either the “Enter” or the “ESC” key on the PS/2 keyboard.
After you’ve unlocked the vault and got to the main menu:
- Press the “↓” (DOWNWARDS ARROW) key on the PS/2 keyboard to go down the menu.
- Press the “↑” (UPWARDS ARROW) key on the PS/2 keyboard to go up the menu.
- Press the “Enter” key on the PS/2 keyboard to open the selected menu.
- While in the submenu, press either the “Esc” or the “Backspace” key on the PS/2 keyboard to return to the main menu.
While entering a text in a tab:
- Press “Enter” on the PS/2 keyboard to continue.
- Press the “Esc” button on the PS/2 keyboard to cancel the current operation.
That version of Midbar allows you to store records of four types: login credentials, credit card information, notes, and phone numbers.
Since working with records of other types is basically the same as working with logins, I’ll only provide instructions on how to work with logins.
To add a login (from PS/2 keyboard):
- Select the “Logins” line in the main menu;
- Press the “Enter” key on the PS/2 keyboard;
- Select the “Add” line;
- Press the “Enter” key on the PS/2 keyboard;
- Choose the slot you want to put the login to by pressing the “←” (Leftwards Arrow) and “→” (Rightwards Arrow) keys on the PS/2 keyboard;
- Press the “Enter” key on the PS/2 keyboard;
- Select the “PS/2 Keyboard” line;
- Press the “Enter” key on the PS/2 keyboard;
- Enter the title;
- Press the “Enter” key on the PS/2 keyboard;
- Enter the username;
- Press the “Enter” key on the PS/2 keyboard;
- Enter the password;
- Press the “Enter” key on the PS/2 keyboard;
- Enter the website;
- Press the “Enter” key on the PS/2 keyboard.
*All credentials demonstrated here are entirely fictitious. Any similarity to actual credentials is purely coincidental.
View Login
To view login:
- Select the “Logins” line in the main menu;
- Press the “Enter” key on the PS/2 keyboard;
- Select the “View” line;
- Press the “Enter” key on the PS/2 keyboard;
- Choose the slot you want to view the login from by pressing the “←” (Leftwards Arrow) and “→” (Rightwards Arrow) keys on the PS/2 keyboard;
- Press the “Enter” key on the PS/2 keyboard;
- Press the “↑” (Upwards Arrow) key on the PS/2 keyboard to print the record to the serial terminal.
*All credentials demonstrated here are entirely fictitious. Any similarity to actual credentials is purely coincidental.
Edit Login
To edit a login:
- Select the “Logins” line in the main menu;
- Press the “Enter” key on the PS/2 keyboard;
- Select the “Edit” line;
- Press the “Enter” key on the PS/2 keyboard;
- Select the login you would like to edit by pressing the “←” (Leftwards Arrow) and “→” (Rightwards Arrow) keys on the PS/2 keyboard;
- Press the “Enter” key on the PS/2 keyboard;
- Enter the new password;
- Press “Enter” on the PS/2 keyboard.
*All credentials demonstrated here are entirely fictitious. Any similarity to actual credentials is purely coincidental.
Delete LoginTo delete a login:
- Select the “Logins” line;
- Press the “Enter” key on the PS/2 keyboard;
- Select the “Delete” line;
- Press the “Enter” key on the PS/2 keyboard;
- Select the login you would like to delete by pressing the “←” (Leftwards Arrow) and “→” (Rightwards Arrow) keys on the PS/2 keyboard;
- Press the “Enter” key on the PS/2 keyboard.
Despite some flaws and inconveniences and the requirement for Internet access to operate — the current version of Midbar also has its upsides. One of them — is the ability to (almost) effortlessly replace a broken Midbar with a new one without losing access to your valuable data. To do this, you only need to upload the same firmware and use the same master password on the new device.
And while Midbar is no guarantee of world peace or social harmony, I do believe that it’s an important contribution to the protection of your data from unauthorized access.
I think it’s also worth mentioning that Midbar’s source code is distributed under the MIT license. That grants you the freedom to customize, adapt, and modify Midbar according to your needs and preferences. In other words, you can create your own version of Midbar or use it as a starting point for building new projects without the need for external permission.
If you found this tutorial to be useful, please consider sharing it.
Thank you for reading this tutorial.


Comments