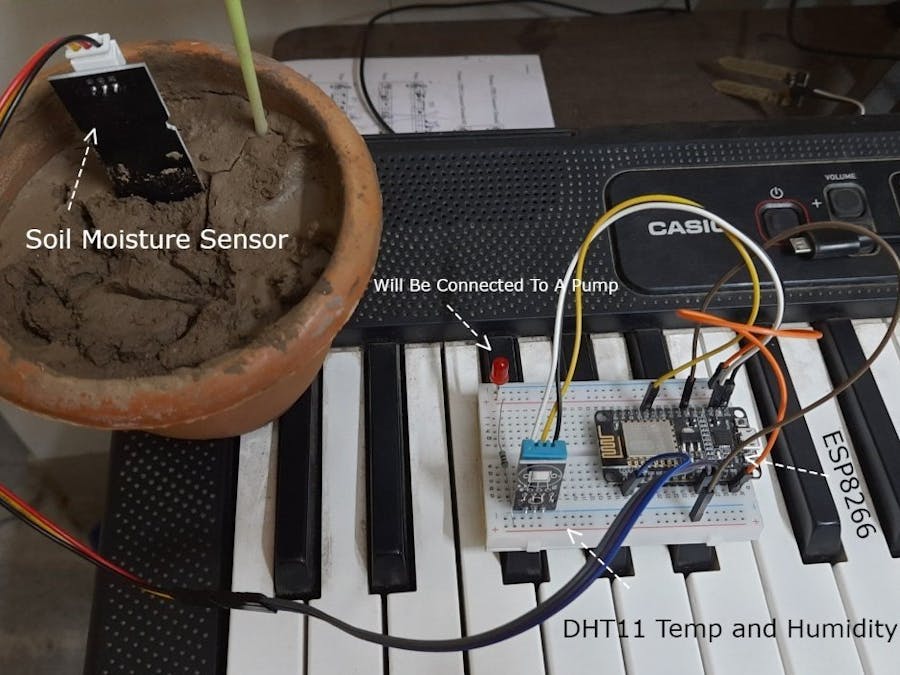
nishasi
Published © GPL3+

Automated Gardening With Blynk IOT

Measurement of Soil Moisture Levels with an automatic Irrigation System integrated in Blynk IOT

BeginnerFull instructions provided1,049
Automated Gardening With Blynk IOT

Things used in this project

Hardware components

Breadboard (generic)
×1
NodeMCU ESP8266 Breakout Board
×1
DHT11 Temperature & Humidity Sensor (3 pins)
Optional
×1
Gravity: Analog Capacitive Soil Moisture Sensor- Corrosion Resistant
DFRobot Gravity: Analog Capacitive Soil Moisture Sensor- Corrosion Resistant
Capacitive or Resistive -Here we have used capacitive sensor
×1
Jumper wires (generic)
×1
9V battery (generic)
We also need a mini pump with voltage requirement equal to what the battery can supply, but couldn't find it in the list so :3
×1
Relay (generic)
×1

Software apps and online services

Blynk
Blynk

Story

Read more

Schematics

Automated Irrigation System

Here, a soil moisture sensor is connected to the A0 pin of the ESP8266 board, which gives the analog input of soil moisture levels. That level is then mapped to a value between 0 and 100 to give an output in a percentage rather than random numbers that the user won’t be able to perceive. The sensor is set to run at an interval of 4 hours by default to avoid corrosion of the sensor. All values are synced to Blynk IOT platform for ease of use of user as well as accessibility. The DHT11 sensor is connected to the D4 pin of the board. Now, based on the percentage given out by the soil moisture sensor, a relay is run, which is connected to the D7 pin of the board, which is further connected to a mini pump to water the plants. The relay is trigger at 30% moisture level and continues to water the plants until 70% moisture level is reached, thus the plants always stay in a kind of goldilocks zone of neither too dry nor too wet. All this info is presented to the user on the blynk IOT dashboard via the internet, so it doesn’t matter how far away you are, your plants always stay healthy. The user is free to tinker with the time interval on the dashboard to suit their needs. Lastly, all of the components are powered by the 3.3V pins of the microcontroller. The code used in this project excluding header files for Blynk is given below:-
File missing, please reupload.

Code

Automated Irrigation System

Arduino
This project uses Blynk Edgent example file for getting set up. I have only given the code to be installed in the esp8266 board, you will have to go to Blynk IOT webpage and set up your own variables first and then the dashboard for this to work. It isn't hard, as I have named the variables here similarly, just create integer virtual pins with the same numbers as given here, or you can tinker with it yourself to suit your need. The code used in this project excluding header files for Blynk is given below:-
// Blynk IOT Macros
#define BLYNK_TEMPLATE_ID "TMPL6eWqbpU3"
#define BLYNK_DEVICE_NAME "Moisture Sensor"
#define BLYNK_FIRMWARE_VERSION        "0.1.0"
#define BLYNK_PRINT Serial
#define APP_DEBUG
#include "BlynkEdgent.h"
#include "DHT.h"
#define DHTTYPE DHT11
DHT dht(2,DHT11);

// Global Variables
int sensorValue;    
int limit = 300;
int time_interval;
int senseNow;
int warning;
int autoMode;
int hour = 3600000;
unsigned long time_now;
unsigned long time_duration = 0;
unsigned long time_active = 0;
// Syncing variables between Blynk and Device
BLYNK_WRITE(V1)
{
  time_interval = param.asInt();
  Serial.print("interval = ");
  Serial.println(time_interval);
}
BLYNK_WRITE(V2)
{
  senseNow = param.asInt();
  Serial.print("senseNow = ");
  Serial.println(senseNow);
}
BLYNK_WRITE(V3)
{
  autoMode = param.asInt();
  Serial.print("autoMode = ");
  Serial.println(autoMode);
}
// Setup
void setup()
{
  Serial.begin(115200);
  delay(100);
  pinMode(13,OUTPUT);
  dht.begin();
  BlynkEdgent.begin();
  time_interval=4;
  senseNow=0;
  warning=0;
  autoMode=0;
}
// Loop
void loop() 
{ 
  time_now = millis();
  BlynkEdgent.run();
  if(time_now-time_active>=2000)
  {
    time_active = time_now;
    if(senseNow||warning) readSensor();
  }
  if(time_now-time_duration>=hour*time_interval)
  {
    time_duration = time_now;
    readSensor();
  }
}
// Main Function
void readSensor()
{
  sensorValue=analogRead(A0);
  Blynk.virtualWrite(V5,dht.readTemperature());
  Blynk.virtualWrite(V6,dht.readHumidity());
  int i=map(sensorValue,limit,650,100,0); // Mapping analog values to a percentage
  if(i<0) i=0;
  else if(i>100) i=100;
  Serial.println(i);
  Blynk.virtualWrite(V0,i); // Syncing variables between Device and Blynk
  if(autoMode)
  {
    if(i<30)
    {
      Blynk.logEvent("low_moisture"); // Warning
      warning=1;
    }
    if(warning) pump(i);
  }
}

void pump(int x)
{
  if(x>70)
  {
    digitalWrite(13,LOW);
    warning=0;
  }
  else
  {
    digitalWrite(13,HIGH);
  }
}

Credits

nishasi

nishasi

0 projects • 0 followers

Comments