


Hardware components | ||||||
| × | 1 | ||||
| × | 1 | ||||
| × | 1 | ||||
| × | 1 | ||||
| × | 1 | ||||
| × | 1 | ||||
| × | 1 | ||||
 |
| × | 1 | |||
| × | 1 | ||||
Software apps and online services | ||||||
 |
| |||||
 |
| |||||
Hand tools and fabrication machines | ||||||
 |
| |||||
 |
| |||||
Many people probably feel the same — USB MIDI devices often feel like silent boxes without a PC. Sometimes, I even wonder if I should’ve just bought a traditional synthesizer instead. With serial MIDI, connecting to a synth or sound module produces sound right away. But USB MIDI isn’t that simple. Many USB MIDI devices don’t even have serial MIDI signals internally, since USB MIDI and serial MIDI use completely different formats.
The time estimate listed on this page assumes basic assembly and programming using M5 Stack units. Personally, I chose to start with a cheap USB MIDI device, just in case something went wrong.
My WorkThat’s where M5Stack (ESP32-S3) comes in handy. By acting as a USB Host, it can convert USB MIDI signals into serial MIDI signals. M5Stack receives USB MIDI data as a host, processes it, and sends out converted serial MIDI to a synthesizer — enabling sound generation without a PC. But USB is complicated. So, I created a simple-to-use library for the Arduino IDE. All you need to do is define a handler function and write just six lines of code, like this:
#include "UsbMidi.h"
UsbMidi usbMidi;

void onMidiMessage(const uint8_t (&data)[4]) {
    /* USB-MIDI message received. See examples for more info. */
}
void setup() {
    usbMidi.onMidiMessage(onMidiMessage);
    usbMidi.begin();
}
void loop() {
    usbMidi.update();
}
This minimal setup is all you need to get started.
Use CasesYou can turn USB MIDI devices into standalone synthesizers or use them as custom controllers. They can also serve as auxiliary tools for PCs. In this project, I built a standalone synthesizer using USB MIDI controller and M5Stack. This approach opens up new possibilities for USB MIDI hardware — no PC required.
UniquenessThis project's uniqueness lies in its "OMOCHA" (toy) philosophy, offering a complete starter kit that prioritizes a joyful, immediate creative experience with USB MIDI over complexity. It is designed to be a gentle bridge, allowing you to have fun and learn the basics of USB MIDI on the ESP32S3 before advancing to the next level of development.
Advanced FeaturesBesides receiving MIDI messages, the library also supports sending MIDI messages via USB. Outgoing messages are internally queued and sent efficiently without blocking the main task, ensuring smooth real-time performance.
Because using USB MIDI can sometimes disable USB serial communication, the library includes a Wi-Fi based debugging output feature to help with development and troubleshooting.
DesignThis library is built on the Arduino framework with ease of use as the top priority. It allows you to get started with USB MIDI development quickly, without dealing with the complexity of low-level USB handling or RTOS-based task management.
To achieve that simplicity, some trade-offs have been made — for example, incoming MIDI messages are handled in the main task, and overall performance is optimized more for convenience than for maximum throughput or minimal latency.
If you're looking for the best possible performance or advanced multitasking capabilities, using ESP-IDF with custom tasks is the right direction. In fact, this library is designed to be a stepping stone: a way to explore MIDI development in a friendly environment, and a gateway to deeper, more powerful implementations when you're ready.
Start by enjoying MIDI — and if you find yourself wanting more, the path to ESP-IDF awaits.
PhilosophyRooted in my personal philosophy behind this design, this project is inspired by the concept of OMOCHA — the Japanese word for "toy." My philosophy is that anyone, regardless of their background or skill level, should be able to pick up this library and start enjoying MIDI right away, just like a child playing with a toy.
OMOCHA represents an environment where beginners can freely explore and have fun without worrying about complexity or performance. As you grow and learn more, like a child who eventually understands the deeper workings of their toys, you can move on to more advanced, professional tools and frameworks — such as ESP-IDF for deeper control and performance.
This philosophy encourages a gentle introduction to MIDI and USB development: start with something simple and playful, then dive deeper when you’re ready.
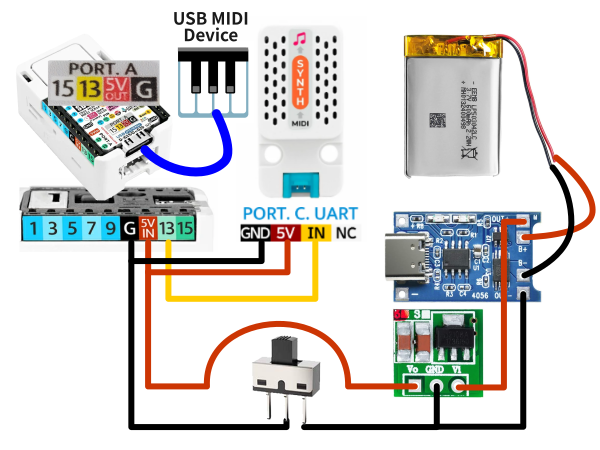
Circuit and ImplementationThe components are connected according to the circuit diagram included on this page. In this project, I used a universal PCB (perforated board) for the assembly, but the component layout and wiring are completely flexible. As long as you follow the circuit diagram, the project will work regardless of how the components are arranged. I also designed and 3D-printed an enclosure to house all the components in one unit. However, this is optional — the project works fine without the enclosure.
Practical ExamplesThis library lets your ideas come to life. It’s all in your hands!
Several examples are shown in the photos to illustrate different applications. However, detailed step-by-step instructions are provided only for the main example. Other examples are included for reference and inspiration, but not fully documented here. This project demonstrates the core concept, but with your own ideas and creativity, you can extend it in many different ways! Feel free to customize and adapt the design to suit your specific needs or to explore new applications.
This time, I made a custom charging device, but a power bank is also fine.
When an amplifier (such as Unit Synth) is not used, it has been confirmed that M5 Capsule can function on its built-in battery. M5 Unit MIDI has a line output, but with headphones, it still delivers decent sound. However, some MIDI devices that require 5V may not function properly. With M5 Unit MIDI, you can easily output serial MIDI signals via DIN 5-pin or 3.5mm jack. Since M5 Capsule and M5 Unit MIDI are connected using a Grove cable, no soldering is required.
Of course, when connected to a portable speaker with an amplifier, it delivers loud and high-quality sound.
This is an example of integrating RGB LEDs with a USB MIDI controller. An external battery is being used for this setup.
This is an example of using both MIDI IN and MIDI OUT simultaneously.
Additionally, M5 Capsule's built-in battery allows for simultaneous use of USB Host and Wi-Fi, enabling communication with a PC, as far as I know.


Comments