
Hardware components | ||||||
 |
| × | 1 | |||
| × | 1 | ||||
| × | 1 | ||||
| × | 2 | ||||
 |
| × | 1 | |||
Software apps and online services | ||||||
 |
| |||||
Build your own multi-room temperature monitoring station with ESP8266 based Arduino board.
Introduction
In this project, imagine a scenerio where you have a few rooms/areas which you would like to monitor the temperature and humidity. Data from all rooms would be sent to a centralised display.
Temperature and Humidity
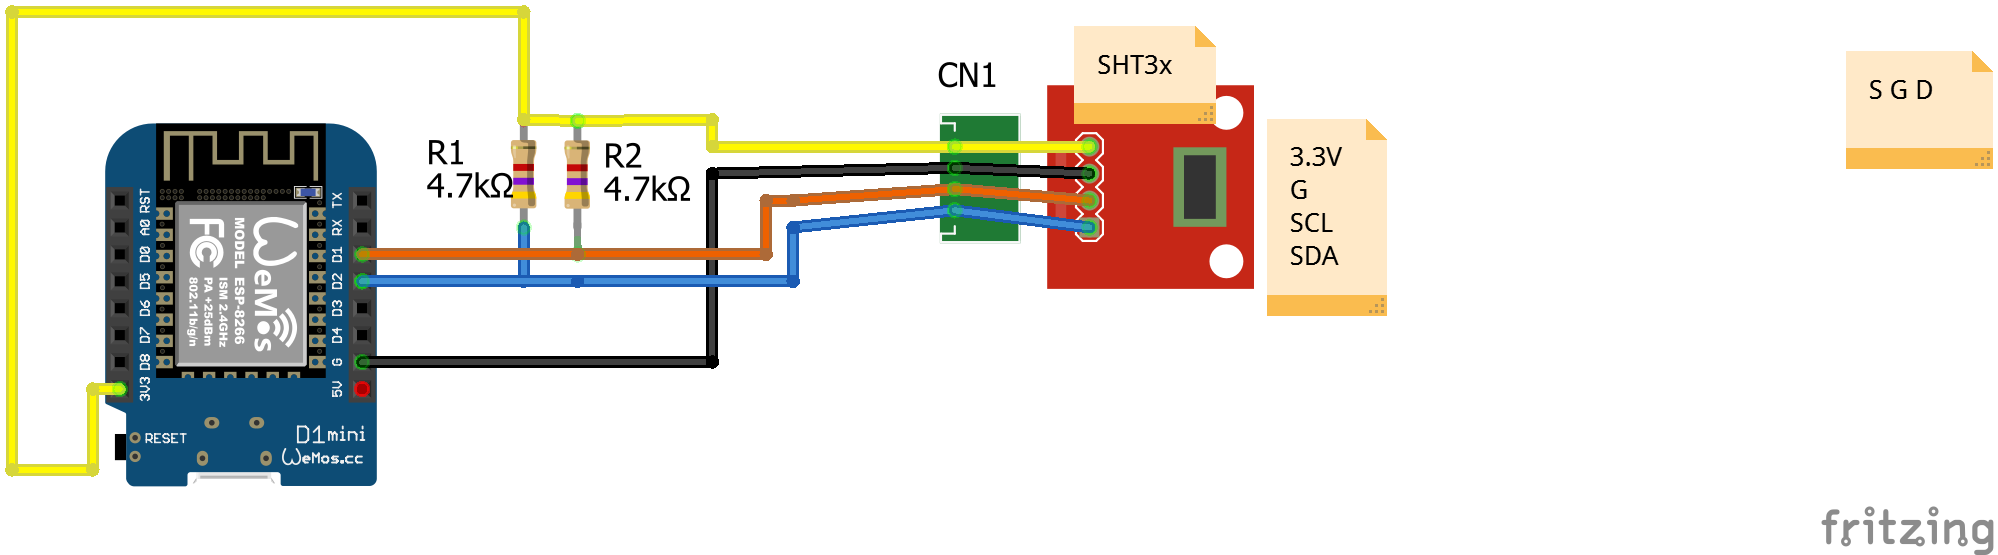
For maximum accuracy the SHT31 sensor has been chosen, the SHT31 is more stable in terms of calibration compared to DHT22, which is a cheaper and more common sensor on the market. Fortunately Adafruit has offered a nice and very easy to use api for SHT31. The library is available for download here
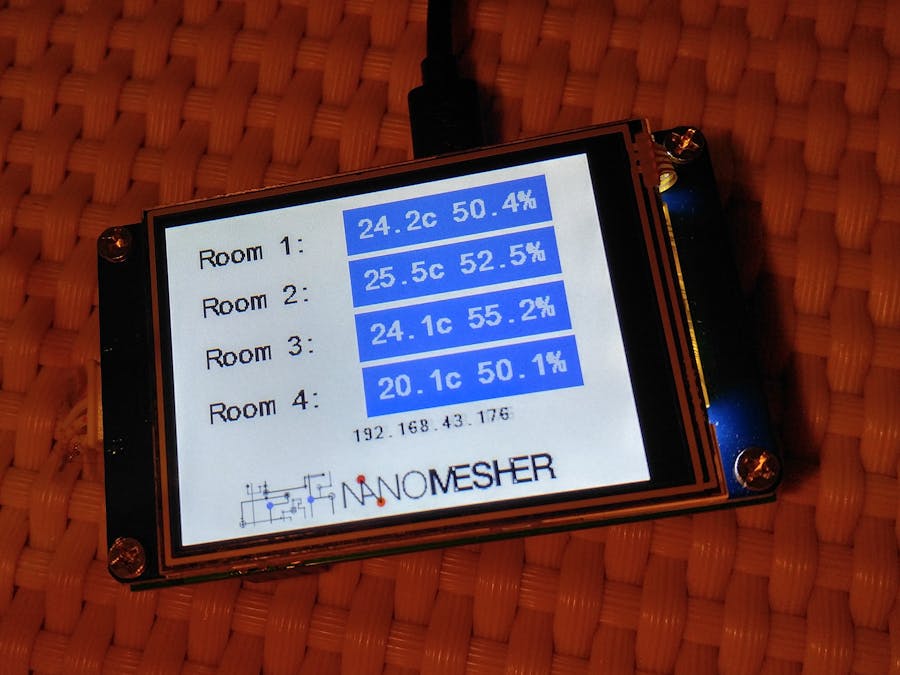
Displaying the data - Wireless HMI
It would be more cost effective if we can view the data all in one screen. We need a simple display which accept requests wirelessly and display it on a screen. We can't find anything fully suited to this purpose and hence we have built our own by combining a Nextion Display with touch screen and Wemos D1 mini - The Nanomesher Human Machine Interface (Nanomesher HMI). There is also an onboard LED + Speaker on the Nanomesher HMI.
We have offered the Nanomesher HMI on kickstarter.
Building user interface on the Nextion Display does not require any coding, there is a WYSIWYG editor available which allow us to drag and drop control , compile and test the result on a PC. Afterwards, copy the compiled result (.tft) file onto the Nextion display (NOT the Wemos).
We have written both HTTP and MQTT based api to set values on the display.
For example, if there is a Text component called "line1", to set the text control. Just make the following http request to set it to "Hello", where p is the pageid and n is the component name and 192.168.1.12 is the IP address of the wireless HMI. Having this API out of the box allow application developers to focus on building the application rather than playing low level Arduino display code.
http://192.168.1.12/TextSetText?p=0&n=line1&v=Hello
Designing the User Interface
Using the free Nextion editor, we built a simple user interface with 8 Text Controls by dragging and dropping and naming the component. Make a note of the component name "line1","line2","line3","line4"
Next you can use the debug tool to test the user interface on a PC.
After testing, open the build folder and copy the tft file to a sd card.
Plug the sd card into the Nextion display's sdcard slot and power on. The new tft will be automatically deployed into the Nextion display.
WeatherSender - WeatherHttpSender Arduino Code
The purpose of WeatherHttpSender is to continously read temperature and humidity and update the Wireless HMI.
Here's the code to read the humidity and termperature. It's very simple thanks to Adafruit library
       t = sht31.readTemperature();
       h = sht31.readHumidity();
To update Wireless HMI, below http call will send the data to the HMI display. Where 192.168.1.12 is the IP address of the WIreless HMI display.
       String url = "http://192.168.1.12/TextSetText?p=0&n=line1&v=";
       HTTPClient http;
       USE_SERIAL.print("[HTTP] begin...\n");
       http.begin(url + temp + "c " + humid + "%"); //HTTP
Some changes are needed before deploying. In below code, set your wifi's SSID and password here:
WiFiMulti.addAP("SSID", "PASSWORD");
and set the update interval here:
delay(10000);


Comments