

Hardware components | ||||||
 |
| × | 1 | |||
 |
| × | 1 | |||
 |
| × | 1 | |||
 |
| × | 1 | |||
 |
| × | 1 | |||
 |
| × | 1 | |||
 |
| × | 1 | |||
Software apps and online services | ||||||
 |
| |||||
| ||||||
What if your machine could actually tell you it's under a lot of stress and could just shout at you whenever it needs rest, guys it's now possible because of the Bolt Wifi Module.
This project will allow your PC to communicate with you when it's CPU usage is higher than the threshold limit with the help of buzzer and LED.
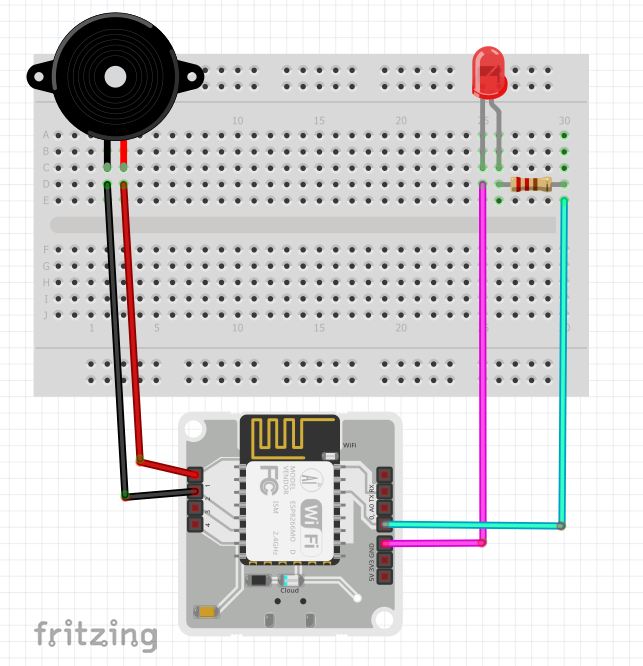
1. HARDWARE SETUP:- Take your breadboard and plug in the LED and the buzzer on it.
- Connect one end of the 330 ohm resistor to the longer leg(i.e positive) of the LED and connect the other end of the resistor to the '0' pin of the Bolt device.
- Connect the shorter leg(i.e negative) of the LED to the 'GND' pin of the Bolt device.
- Now connect the longer leg(i.e positive) of the buzzer to the '1' pin of the device and shorter leg(i.e negative) to the '2' pin of the Bolt device.
In this project, LED is used to indicate that the CPU usage is under the set threshold and the buzzer indicates CPU usage is more than the threshold.
2.SOFTWARE SETUP:
2.1Setting up Your BOLT device
First of all, you need to power up your Bolt Wifi Module using a USB cable and an adaptor or direclty connecting the USB cable to your PC.
Secondly, you have to set up your Bolt Device which can be done by going through this link https://cloud.boltiot.com/docs
2.2Getting yourAPI key and Device Id
Login to your Bolt Account http://cloud.boltiot.com/ and copy the device Id
Now click on the API tab and Enable the key, now copy it.
You need to copy both your device Id and API key because they will be used in the code.
2.3 Setting up the Environment
For this project I have used the PyCharm IDE, you can use any other IDE you like, here is the link for downloading latest version of python, the PyCharm IDE and it's setup
https://www.python.org/downloads/
https://www.jetbrains.com/pycharm/download/
After setting up the environment, you need to import the Bolt Library for the Bolt Projects for that follow the below steps:
- Go to file > settings > project interpreter
- Then add the required library, for this project it is "boltiot"
- Download this package, and you are good to go.
You can also refer to this video about how to install pip packages in PyCharm
2.4 Code
2.4.1Configuration file
First you need to create a new python file say details.py, here we will enter all the details of our Bolt device like the device id and API key and the details of our Twilio account.
To create an account on Twilio follow the below steps:
- Go to https://www.twilio.com/ and click on sign up
- Enter the necessary details and start your free trial
- Follow all the steps to setup your account
- After completing, go to your Dashboard page and you will get the below details.
- Copy your 'Trial Number', 'Account SID' and 'Auth Token'
- Paste the above data in the python file you created before by the name details.py
SID = 'You can find SID in your Twilio Dashboard'
AUTH_TOKEN = 'You can find  on your Twilio Dashboard'
FROM_NUMBER = 'This is the no. generated by Twilio. You can find this on your Twilio Dashboard'
TO_NUMBER = 'This is your number. Make sure you are adding +91 in beginning'
API_KEY = 'This is your Bolt Cloud accout API key'
DEVICE_ID = 'This is the ID of your Bolt device'
Below is thetypeof SMS you will get from Twilio after running the code
Here is the video of how this project works


Comments