


Hardware components | ||||||
_ztBMuBhMHo.jpg?auto=compress%2Cformat&w=48&h=48&fit=fill&bg=ffffff) |
| × | 1 | |||
 |
| × | 1 | |||
 |
| × | 1 | |||
| × | 8 | ||||
 |
| × | 1 | |||
Software apps and online services | ||||||
 |
| |||||
 |
| |||||
I recently had bought a kit to make a robot, and it came with an HC-05. As I was making a line-following robot, I did not need this yet. However, I was still quite curious about it, and wanted to use it-I did not want a component just sitting on my table. So, I decided to use it to control an LED, using a mobile app developed with MIT app inventor.
You can access MIT app inventor from this link:
Also, it is quite nice to be able to switch on and off an LED using a mobile app.
To do this, you do not really need much of prior knowledge at all, and is very easy to do.
The MIT App Inventor is created by MIT to allow easy app creation. You need almost little to no programming knowledge to do this-there are just blocks which you have to move around.
The main way this is going to work is when you click a button on the app on your phone. Then, there is a signal sent to the arduino uno via bluetooth communication, and the arduino receives the signal. Then, we can program the arduino to act based on this signal. We can use the MIT App Inventor to choose what signal gets sent. In this case, I have chosen to send text of '0' or '1'. However, you can change it to send whatever you'd like.
A bluetooth module can be connected to via bluetooth, and can be communicated with via serial communication. So, the RX and TX pins are important. If you do not want to use these pins, you will have to use the Software Serial library. This tutorial does not cover that.
So, the main way to do this is by using the bluetooth module and the MIT app inventor too. You have to create an app in order to control the LED using bluetooth. I will demonstrate the app making process.
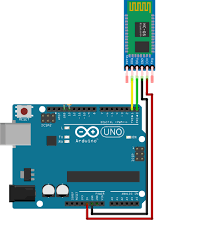
The SchematicsFirst, the connections are important. There are 6 pins on the bluetooth module. For this project, we will only need to use the middle 4 pins.
The image is an accurate representation of the connections. The labels are given on the back of the HC-05 bluetooth module. The RX pin should be connected to TX on the arduino, while the TX pin should be connected to RX on the arduino. The rest is as in normal components: The GND to GND on arduino and VCC to 5 volt power supply.
HC-05-->Arduino
RX-->TX
TX-->RX
GND-->GND
VCC-->5v
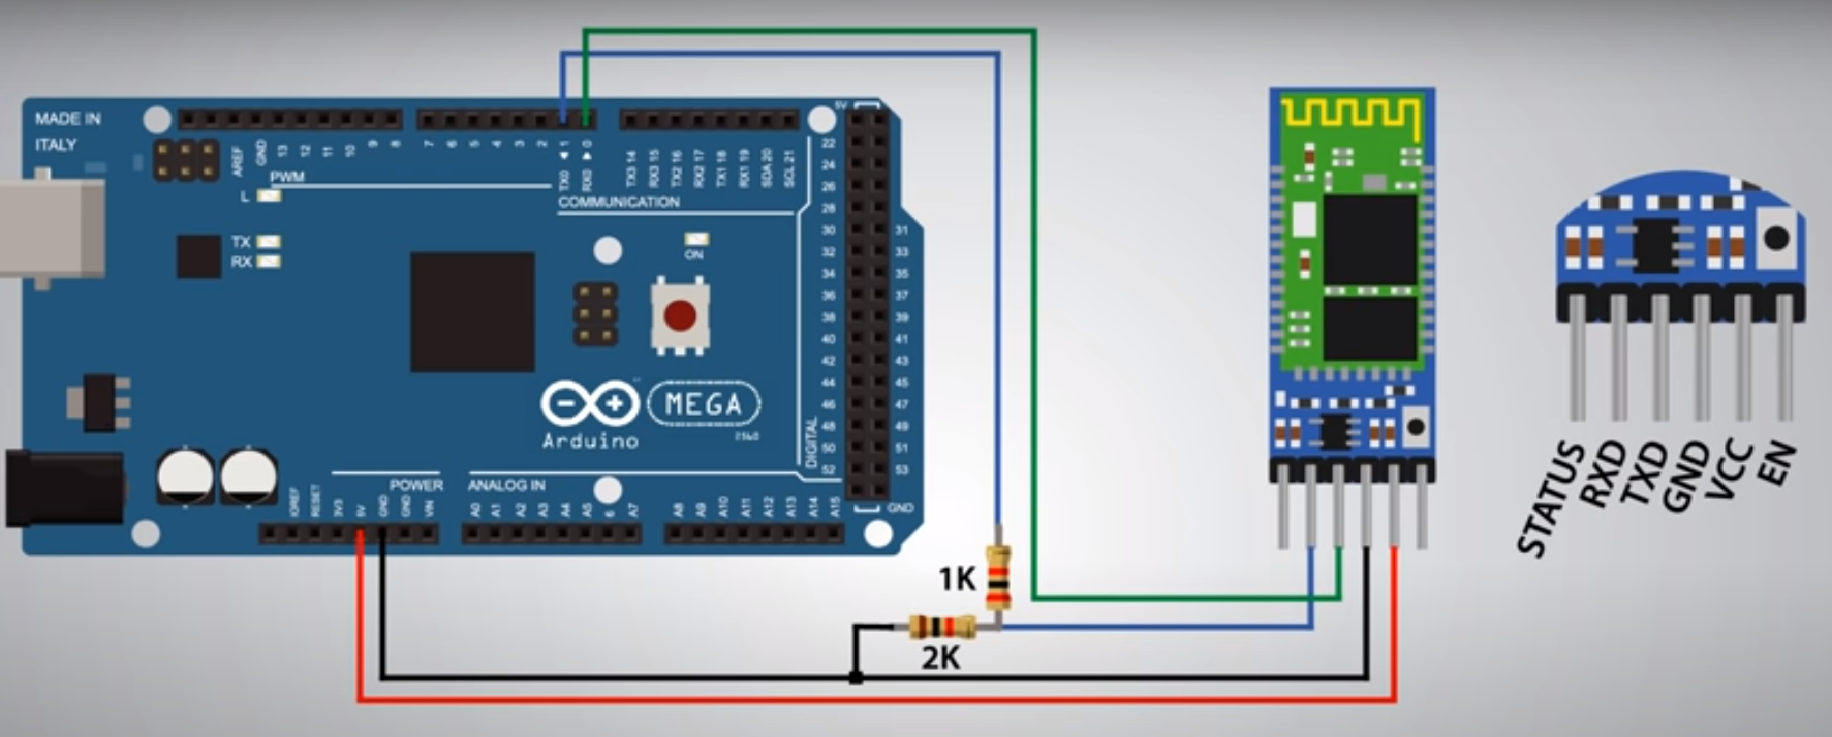
In order to play it safe though, it is important to first connect RX to a resistor, and then to TX on the Arduino. Then, connect RX to another resistor, then to GND.
The GND from the HC-05 will connect to this resistor, and then will go to GND on the Arduino. So, both the RX and the GND of HC-05 go to GND of Arduino. This will ensure that there is no failure of components.
However, since we are using a breakout board(which has an in-built voltage-regulator), there will be no issues at all, even if you do not follow that schematic described.
This is called a voltage divider circuit, which divides voltage, acting like a resistor. The following image is the schematic of it. It is shown using an Arduino mega, though it is applicable for the Arduino Uno too.
HC-05-->Arduino
RX-->TX
RX-->GND
TX-->RX
GND-->GND
VCC-->5v
Connect the long LED of the LED to pin 5 on the Arduino while connecting the short leg of the LED to GND. It is advisable to use a resistor while connecting from pin 5 to avoid burning out the LED. The LED in general only needs 1.7 volts, not 5! Connect pin 5 to the breadboard, and use a resistor to connect to long leg of the LED. I chose pin 5-although you can choose any pin, but also need to change the code appropriately.
LED-->Arduino Uno
Positive leg(Long leg)-->Any pin you like
Negative leg(Short leg)-->GND
Note:While uploading the code, you have to ensure that there are no wires connected to the TX and RX pins of arduino. Once the code is uploaded, you can connect those wires. Arduino uses TX and RX to upload code, so another wire there can interfere, and will result in an error.
If you want to use pins other than TX and RX pins, then you have to use the Software Serial library.
Here is the blocks you need on the MIT app inventor. It is fairly simple. You need a list picker, two buttons and a Bluetooth client, which can be picked easily from the 'Design' section.
You can name the components however you like. I just stuck to simple names like Button1 and Button2, as can be seen. You can rename your components on the pane which is the furthest to the right. You can choose components and designs on the pane furthest to the left.
The two panes in the middle are for the design and component listing. I have gone for a very simple design, as can be seen. A list picker is essential. This is what I have named 'Bluetooth'.
We will code so that when this button is pressed, it displays all Bluetooth devices nearby. The Bluetooth client can be seen in one of the middle panes, listed. It is not on the screen, as the user will not be able to see it, but it is what will be tracking other Bluetooth devices. The 'ON' and 'OFF' I have used are the buttons.
After designing, you have to switch to the blocks section, which can be done on the top-right of the page. Then you just have to drag the blocks as follows! On our phones, before picking anything on the list picker, we want the list of all Bluetooth devices on our phones.
So, we set listpicker1's elements to addresses and names which the Bluetooth client can find, before we pick anything on it. We have just asked the app to display a list of all Bluetooth devices.
Then, after we select our choice, we want to connect to it. Then, depending on which button you click, you want to send either a '1', or a '0'. It can be any character you would like. Then, based on the character received, we program the Arduino to either turn on or turn off the LED. I have asked Button1 to send text of '1'. This is my 'ON' button. So, I will program the Arduino appropriately.
Then, the rest is very simple! All you have to do is download the MIT app inventor companion app onto your phone, and then scan a code from the website, and you can have the app on your phone.
You just have to open your app which you made on the website, click on connect, and then select AI companion. Then, you just just scan the QR code from your phone's MIT app, and then you will have the app on your phone, but only temporarily. You have to scan every time you want to use it. It will stay open for a while, but it will lose connection if you close it, or leave it inactive for long.
Next, just click on the list picker, and choose a Bluetooth device. The password for HC-05 is generally 1234 or 0000. Connect to the HC-05, and then click on the 'ON' and 'OFF' buttons (or however you have named them) and it will work, if you have connected the circuit properly!
Do not forget to program the Arduino! That is the most important thing. The code is at the end of the page.
Once you have learnt this, you can use the same principle to make other amazing projects using Bluetooth! Just remember to send text from the module to Arduino via the app, and then program the Arduino to make something happen! It is as easy as programming a button-but you just have to be careful to use 'char' with text and not 'int' while programming. I made that mistake! I plan to make a Bluetooth-controlled robot next, which you can control from your phone.
HC-05 to Arduino Connections


Comments