

Hardware components | ||||||
_ztBMuBhMHo.jpg?auto=compress%2Cformat&w=48&h=48&fit=fill&bg=ffffff) |
| × | 1 | |||
 |
| × | 1 | |||
 |
| × | 1 | |||
 |
| × | 1 | |||
 |
| × | 1 | |||
 |
| × | 1 | |||
 |
| × | 1 | |||
Software apps and online services | ||||||
 |
| |||||
In the Arduino Button tutorial you are going to learn about interfacing the button with Arduino using the Arduino digitalRead function. The buttons are very easy to use with Arduino but you have to take care of few things like using the pull up resistor or using the pull down resistor that I am going to explain in this tutorial. Without these things, the button will behave erratically.
We will first simply connect the button with Arduino and will observe the unusual behavior of the button. Then I will explain to you when is happening and we will overcome this problem by using either the external Pull up or Pull down resistor or internal Pull up resistor of the Arduino.
Then we will follow a more practical example and will make the LED high on pressing the button two times and the LED will go LOW on pressing the button one time.
For Custom Projects, hire me at https://www.freelancer.com/u/Muhammadaqibdutt
Components Required for Arduino Button TutorialThe components you will be required for Arduino button tutorial are as follows
- Arduino Uno
- PushButton
- Led
- 10k resistor
- 220 ohm resistor
- Jumper wires
- Breadboard
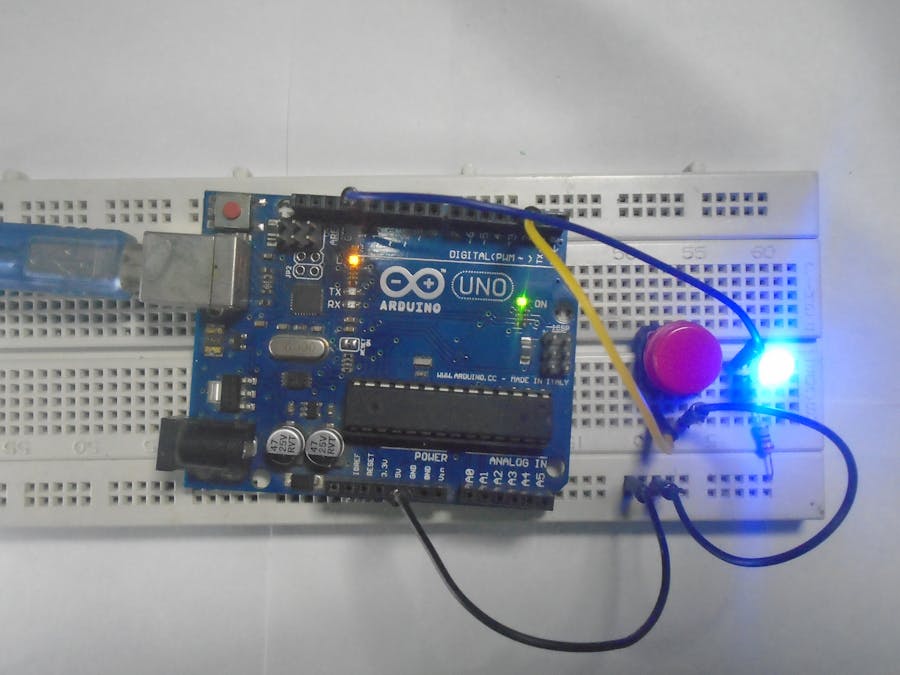
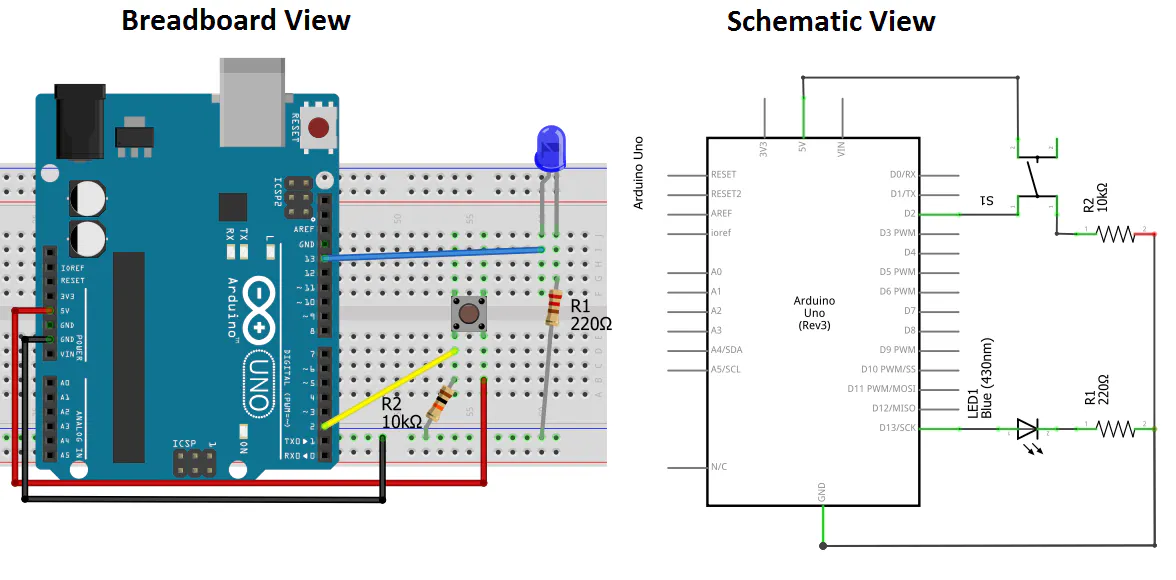
Just connect the 5V from Arduino to the one side of the button and connect the other side of the button to the Pin 2 of Arduino.
Then connect the pin 13 of Arduino to the positive side of LED and connect the other side of LED to the GND through the 220 ohm resistor.
Now you will see that the LED will behave erratically because when the button will not be pressed, pin 2 will not be connected to anything and it will become floating pin. Therefore we will get a series of unstable ‘1’s and ‘0’s.
Keep in mind that ‘Just because you have nothing at all connected to an input pin doesn’t mean it is a logical zero.’
To overcome this problem, we will have to use a pull down or pull up resistor which will help us in getting a LOW when the button will not be pressed. We can also use an internal pull up resistor which is explained at the end of the post.
Arduino CodeI have modified the Arduino button example code and it is given below. I have shown the output on the serial monitor and have added the delay so that we can see the output of the button. The button state changes so quickly that we cannot see it without the delay.
// constants won't change. They're used here to
// set pin numbers:
const int buttonPin = 2;     // the number of the pushbutton pin
const int ledPin =  13;      // the number of the LED pin
// variables will change:
int buttonState = 0;         // variable for reading the pushbutton status
void setup() {
  Serial.begin(9600);
  // initialize the LED pin as an output:
  pinMode(ledPin, OUTPUT);
  // initialize the pushbutton pin as an input:
  pinMode(buttonPin, INPUT);
}
void loop() {
  // read the state of the pushbutton value:
  buttonState = digitalRead(buttonPin);
  // Show the state of pushbutton on serial monitor
  Serial.println(buttonState);
  // check if the pushbutton is pressed.
  // if it is, the buttonState is HIGH:
  if (buttonState == HIGH) {
    // turn LED on:
    digitalWrite(ledPin, HIGH);
  } else {
    // turn LED off:
    digitalWrite(ledPin, LOW);
  }
  // Added the delay so that we can see the output of button
  delay(100);
}
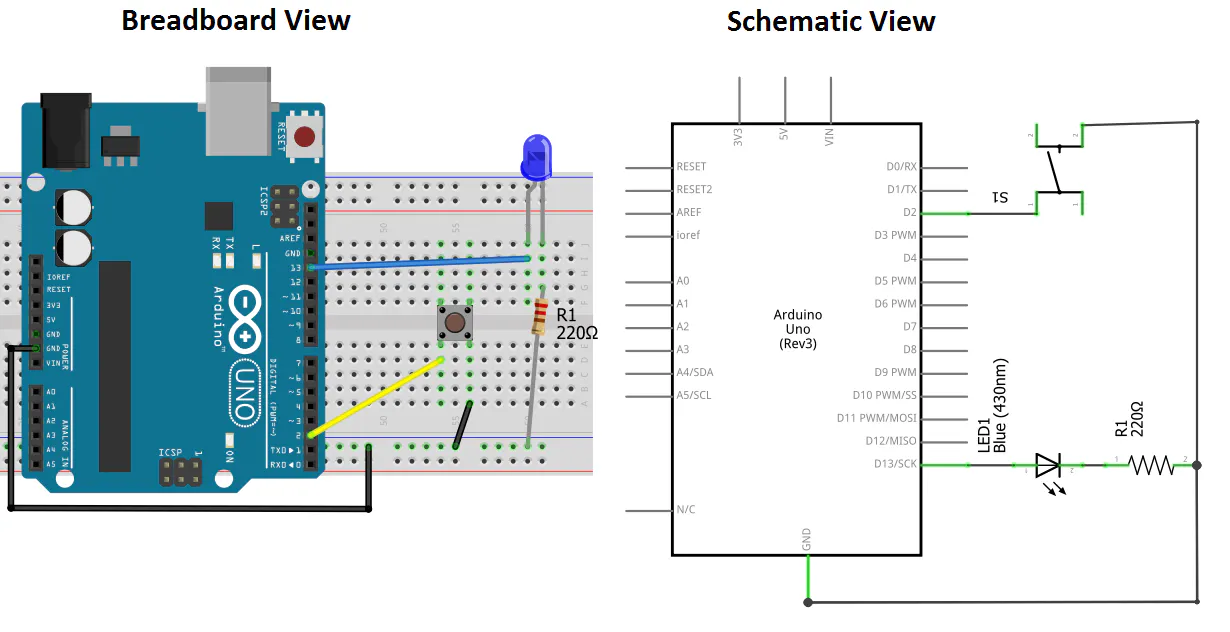
On connecting the circuit in this way, we will get a LOW state when the button will not be pressed and a HIGH state when the button will be pressed.
The circuit is same as the previous one, the only thing you need to change is connect the 10k resistor to that side of button where you have connected the pin 2 of Arduino and connect the other side of this 10k resistor to the ground of Arduino.
Now when you will press the button, then you will get a HIGH because the current from 5V pin of Arduino will flow to the pin 2 of Arduino and when the button will not be pressed, then you will get a LOW because now the pin 2 will be connected to GND through the 10k resistor.
Arduino CodeThe code is same as for the simple button connection.
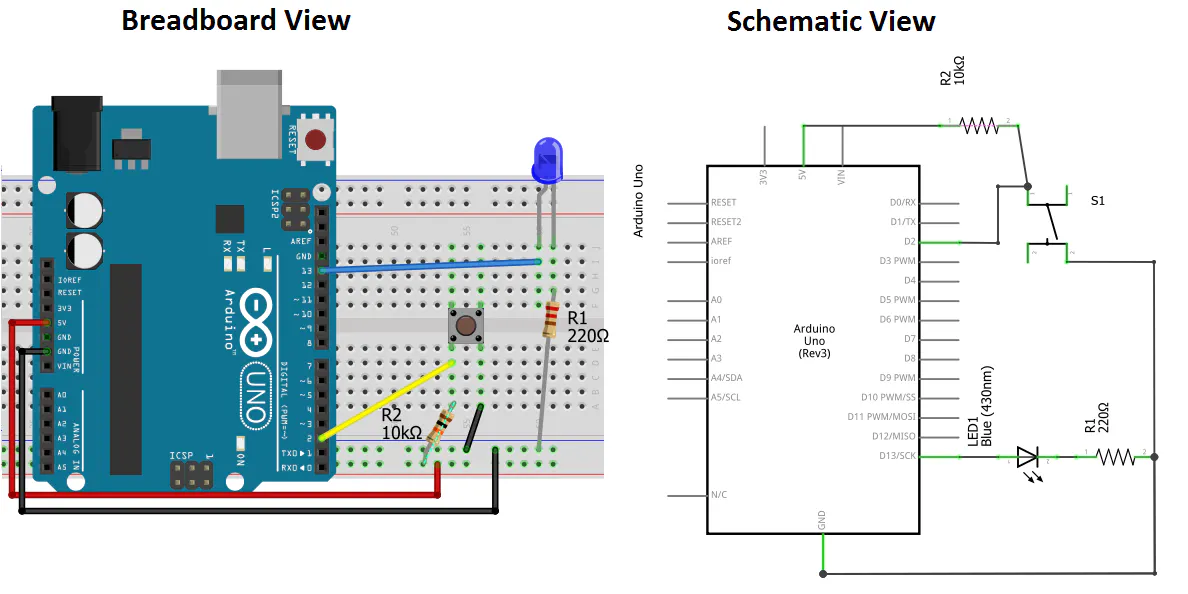
VideoUsing External Pull UP ResistorThe pull up resistor will keep the initial state of the button as HIGH. So when the button is not pressed, we will get a HIGH and when the button will be pressed, we will get a LOW.
For this circuit, connect one side of the button to the pin 2 of Arduino and connect the same side to the 5V of Arduino through the 10k resistor. Connect the other side of button to GND of Arduino. Then connect the LED.
When the button will not be pressed, then the current will flow from the 5V of Arduino to the pin 2 of Arduino and the Arduino will read a HIGH state and when the button will be pressed, the current will flow from the resistor to the GND and the input pin will read a LOW.
In this case, if won’t have used the 10k resistor then the 5V will have connected directly to GND when the button will be pressed which is very bad. In other words, there would be a short circuit.
Arduino Code
The code is same as for the simple button connection.
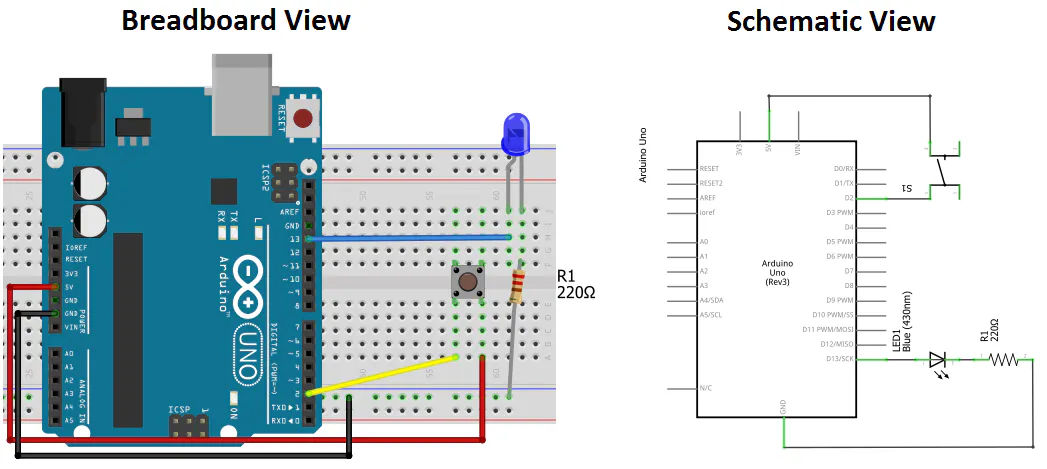
VideoUsing Internal Pull UP ResistorSince the pull up resistors are so common, many micro-controllers including Arduino have the internal pull up resistors that we can enable or disable through the code to avoid using the external pull up resistors.
Keep in mind that the Arduino only have the pull up resistor. Not pull down resistor.
To use the internal pull up resistor, connect one side of the button to the pin 2 of Arduino and connect the other side of button to the ground of Arduino. Then connect the LED with Arduino.
Now the LED will light up when the button will be in open state and it will go LOW when the button will be pressed.
Arduino Code// constants won't change. They're used here to
// set pin numbers:
const int buttonPin = 2; // the number of the pushbutton pin
const int ledPin = 13; // the number of the LED pin
// variables will change:
int buttonState = 0; // variable for reading the pushbutton status
void setup() {
Serial.begin(9600);
// initialize the LED pin as an output:
pinMode(ledPin, OUTPUT);
// initialize the pushbutton pin as an input:
pinMode(buttonPin, INPUT_PULLUP);
}
void loop() {
// read the state of the pushbutton value:
buttonState = digitalRead(buttonPin);
// Show the state of pushbutton on serial monitor
Serial.println(buttonState);
// check if the pushbutton is pressed.
// if it is, the buttonState is HIGH:
if (buttonState == HIGH) {
// turn LED on:
digitalWrite(ledPin, HIGH);
} else {
// turn LED off:
digitalWrite(ledPin, LOW);
}
// Added the delay so that we can see the output of button
delay(100);
}
Now let’s follows a more practical example and light up the LED on two button presses and make the LED low on single button press.
The circuit diagram for this is same as the one we used for external pull down resistor.
Arduino Code
const int  buttonPin = 2;    // the pin that the pushbutton is attached to
const int ledPin = 13;       // the pin that the LED is attached to
// Variables will change:
int counter = 1;   // counter for the number of button presses
int buttonState = 0;         // current state of the button
int lastButtonState = 0;     // previous state of the button
void setup() {
  // initialize the button pin as a input:
  pinMode(buttonPin, INPUT);
  // initialize the LED as an output:
  pinMode(ledPin, OUTPUT);
  // initialize serial communication:
  Serial.begin(9600);
}
void loop() {
  // read the pushbutton input pin:
  buttonState = digitalRead(buttonPin);
  // compare the buttonState to its previous state
  if (buttonState != lastButtonState) {
    // if the state has changed, increment the counter
    if (buttonState == HIGH) {
      // if the current state is HIGH then the button
      // went from off to on:
      counter++;
      Serial.println(counter);
    }
    // Delay a little bit to avoid bouncing
    delay(50);
  }
  // save the current state as the last state for next time through the loop
  lastButtonState = buttonState;
  // turns on the LED after two button pushes
  if (counter >= 3) {
    digitalWrite(ledPin, HIGH);
    counter = 0;
  }
  // turns off the LED after one button pushes
  else if (counter == 1){
    digitalWrite(ledPin, LOW);
  }
}
Also Read:
If you have any questions, feel free to ask in the comment section.


_3u05Tpwasz.png?auto=compress%2Cformat&w=40&h=40&fit=fillmax&bg=fff&dpr=2)
Comments