

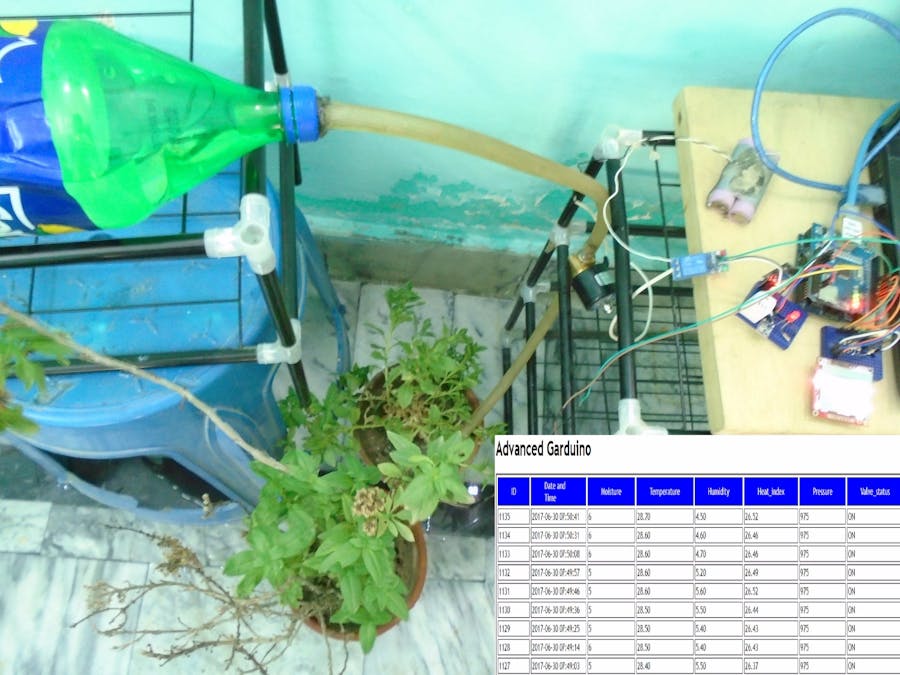
Everyone wants to grow plants in their home but it is not easy to keep a regular schedule of watering the plants. So, we have made an Advanced Garduino with Data Logging to Database which not only will automatically water the plants and will tell you the moisture, temp, humidity, pressure and heat index but also will store this data in the database. So, you can see that what was the moisture value at what time and date and also at which time the valve was ON.
If you want to do this project without the database part, then I have uploaded the Arduino code for that in the end.
For Custom Projects, hire me at https://www.freelancer.com/u/Muhammadaqibdutt
What Advanced Garduino Project will do- DHT22 will give the Temperature, humidity and heat index value
- BMP180 will give you the Pressure value
- FC-28 will sense the moisture in the soil
- Relay module will turn ON or OFF the value according to the moisture value
- Nokia 5110 LCD will show all the sensor values
- A database created will store all these values
- A webpage will show the data in the browser window
The components required for Advanced Garduino project are as follows
- Arduino Uno
- Arduino Ethernet Shield
- FC-28 soil moisture sensor
- DHT22 temperature and humidity sensor
- BMP180
- Nokia 5110 LCD
- 5V relay module
- 12V Solenoid Valve
- 12V battery
- LED
- 1k potentiometer
- 4 X 10K resistors
- 1K resistor
- 330 ohm resistor
- 220 ohm resistor
- Logging data to database using Arduino Ethernet Shield
- Interfacing Nokia 5110 LCD with Arduino
- Temperature and Humidity Sensor DHT22 interfacing with Arduino
- Relay Module interfacing with Arduino
1. The first step you need to do is to install Xampp. Go to the below link and install it from there.
After installing it, run the Xampp as administrator by right clicking on it and selecting run as administrator as shown in below picture.
2. After running it, click on config button next to apache and select “Apache (httpd.config)” as shown below.
3. A notepad file will open; change the port written next to word “listen” from 80 to 8095. The reason of why we need to change the port is that the port 80 is sometimes used by other applications so it will cause error. Therefore, we have selected a separate port to avoid any error.
4. After that, click on config button in the top right corner as highlighted in the below figure
5. While pressing the config button, a window will open; check the mysql and apache boxes as shown below
6. After doing all the above steps, restart you PC and run again the Xampp as administrator. You will see the apache and mysql service started.
1. Open your browser and type “localhost:8095/phpmyadmin/”. It will ask for a username and password, the default username is “root” and leave the password as blank. After giving the username and password, it will open the phpmyadmin.
Then go to databases tab and create the new database. I have created the database with the name “garduino” as shown below
2. Then go to SQL tab next to databases tab and paste the below code there. It will create a table where we will enter the data of the sensors from the Arduino.
CREATE TABLE `garduino`.`data` (
`ID` INT NOT NULL AUTO_INCREMENT PRIMARY KEY,
`Event` TIMESTAMP NOT NULL DEFAULT CURRENT_TIMESTAMP ,
`Moisture` VARCHAR( 10 ) NOT NULL,
`Temperature` VARCHAR( 10 ) NOT NULL,
`Humidity` VARCHAR( 10 ) NOT NULL,
`Heat_index` VARCHAR( 10 ) NOT NULL,
`Pressure` VARCHAR( 10 ) NOT NULL,
`valve_status` CHAR( 10 ) NOT NULL
)Now we are going to create the php pages which will help us in making connection between the Arduino and the Database.
1. First go to C:\xampp\htdocs and create a new folder named ‘garduino’. Create a new text file in this folder and save the name as ‘connection.php’. Paste the below code there and save the file. This PHP file will make a connection between the Arduino and the database.
<?php
$username = "root";
$pass = "";
$host = "localhost";
$db_name = "garduino";
$con = mysqli_connect ($host, $username, $pass);
$db = mysqli_select_db ( $con, $db_name );
?>
2. Then create a new text file and save the name as ‘write_data.php’. Paste the below code there and save it. This PHP file will log the data into the database from the Arduino.
<?php
include ('connection.php');
$sql_insert = "INSERT INTO data (moisture, temperature, humidity, heat_index, pressure, valve_status) VALUES ('".$_GET["moisture"]."', '".$_GET["temperature"]."', '".$_GET["humidity"]."', '".$_GET["heat_index"]."', '".$_GET["pressure"]."', '".$_GET["valve_status"]."')";
if(mysqli_query($con,$sql_insert))
{
echo "Done";
mysqli_close($con);
}
else
{
echo "error is ".mysqli_error($con );
}
?>
3. You can manually check that if the database is receiving the data from these pages or not or you can say that if the connection between the database and these pages is made or not. To check that, place the below line in your browser
http://localhost:8095/garduino/write_data.php?moisture=10&temperature=15&humidity=14&heat_index=13&pressure=99&valve_status="ON"After entering the above line in your browser, if “Done” will be shown, then it means that the values are stored in the database. You can see the stored value by going into the database.
Step 4 Sending Data from ArduinoNow, we are going to send the data from Arduino to the database.
The circuit diagram for Advanced Garduino Project is shown below. Make the connections as shown.
The following articles might help you in making the connections
- Interfacing Nokia 5110 LCD with Arduino
- Temperature and Humidity Sensor DHT22 interfacing with Arduino
- Relay Module interfacing with Arduino
Download the libraries required from the below link. No need to download the Ethernet, wire and SPI library because it comes with the Arduino IDE installation.
Now paste the below code in the Arduino IDE
#include <Adafruit_BMP085.h>
#include <Wire.h>
#include <PCD8544.h>
#include <SPI.h>
#include <Ethernet.h>
#include "DHT.h"
#define DHTPIN 8
#define DHTTYPE DHT22
DHT dht(DHTPIN, DHTTYPE);
PCD8544 lcd;
Adafruit_BMP085 bmp;
char PRESSURESHOW[4];
char Str1[] = "ON";
char Str2[] = "OFF";
int valve_pin = 9;
byte mac[] = { 0xDE, 0xAD, 0xBE, 0xEF, 0xFE, 0xED };
byte ip[] = {192, 168, 1, 18 }; //Read the code explanation
byte serv[] = {192, 168, 1, 5} ; //Read the code explanation
EthernetClient cliente;
void setup() {
Ethernet.begin(mac, ip);
lcd.begin(84, 48);
dht.begin();
pinMode(valve_pin, OUTPUT);
digitalWrite (valve_pin, HIGH);
lcd.setCursor(0, 0);
lcd.print(" WELCOME ");
lcd.setCursor(0, 1);
lcd.print(" To");
lcd.setCursor(0,2);
lcd.print("ElectronicsHobbyists.com");
delay(2000);
lcd.clear();
if (cliente.connect(serv, 8095)) {
lcd.setCursor(0, 0);
lcd.print("Connection Successful");
delay(1000);
lcd.setCursor(0, 2);
lcd.print("Sending Values");
delay(1000);
cliente.stop(); //Closing the connection
}
else{
lcd.setCursor(0, 0);
lcd.print("Connected Failed");
delay(10000);
}
}
void loop() {
lcd.clear();
int sensorValue = analogRead(A0);
int output = map(sensorValue, 0, 1023, 100, 0); //converting in percentage because the moisture is measured in percentage
float hum = dht.readHumidity(); //Reading the humidity and storing in hum
float temp = dht.readTemperature(); //Reading the temperature as Celsius and storing in temp
float fah = dht.readTemperature(true); //reading the temperature in Fahrenheit
float heat_index = dht.computeHeatIndex(fah, hum); //Reading the heat index in Fahrenheit
float heat_indexC = dht.convertFtoC(heat_index); //Converting the heat index in Celsius
if (isnan(hum) || isnan(temp) || isnan(fah)) { //Checking if the arduino have recieved the values or not
lcd.print("Failed to read from DHT sensor!");
return;
}
if (!bmp.begin()){
lcd.print("Failed to read from BMP180!");//if there is an error in communication
while (1) {}
}
String PRESSUREVALUE = String(bmp.readPressure());
// convert the reading to a char array
PRESSUREVALUE.toCharArray(PRESSURESHOW, 4);
if (cliente.connect(serv, 8095)) { //Connecting at the IP address and port we saved before
cliente.print("GET /garduino/write_data.php?"); //Connecting and Sending values to database
cliente.print("moisture=");
cliente.print(output);
cliente.print("&temperature=");
cliente.print(temp);
cliente.print("&humidity=");
cliente.print(hum);
cliente.print("&heat_index=");
cliente.print(heat_indexC);
cliente.print("&pressure=");
cliente.print(PRESSURESHOW);
cliente.print("&valve_status=");
if(output <50)
{
cliente.println(Str1);
}
else
{
cliente.println(Str2);
}
//Printing the values on the LCD
lcd.setCursor(0,0);
lcd.print("Moist ");
lcd.print(output);
lcd.print("%");
lcd.setCursor(0, 1);
lcd.print("Temp: ");
lcd.print(temp);
lcd.print("*C ");
lcd.setCursor(0, 2);
lcd.print("Humi: ");
lcd.print(hum);
lcd.print("%\t");
lcd.setCursor(0,3);
lcd.print("Hi: ");
lcd.print(heat_indexC);
lcd.print("*C ");
lcd.setCursor(0,4);
lcd.print("Pre: ");
lcd.print(PRESSURESHOW);
lcd.print("hpa ");
lcd.setCursor(0,5);
lcd.print("Valve: ");
if(output <50)
{
digitalWrite (valve_pin, LOW);
lcd.print(Str1);
}
else
{
digitalWrite (valve_pin, HIGH);
lcd.print(Str2);
}
cliente.stop(); //Closing the connection
}
else {
// if you didn't get a connection to the server:
}
delay(10000);
}You need to make changes in the following two lines. Make sure that the Ethernet wire is connected to the Ethernet shield.
byte ip[] = {192, 168, 1, 18 }; //dhcp ip
byte serv[] = {192, 168, 1, 5} ; //PC IP IPV4
1. In the Arduino IDE, go to files-Examples-Ethernet-DHCPAdressPrinter. A new window will open up, upload the code and in the serial printer, it will show you the IP Address. Enter it in “byte ip[] = {192, 168, 1, 18 };”
2. Then open the command prompt (cmd) and type in “ipconfig” and it will show you the IPv4. Enter it in “byte serv[] = {192, 168, 1, 5} ; ”
The remaining code is explained with the comments.
Step 5 Displaying the DataTo display the data, you will need to create another PHP file that will read the data from the database and will show it on the webpage.
Create another PHP file with the name “display.php” and place it in the same folder where you have placed the other PHP files (C:\xampp\htdocs\garduino\). Paste the following code in the display.php and save the file.
<?php
$url=$_SERVER['REQUEST_URI'];
header("Refresh: 5; URL=$url"); // Refresh the webpage every 5 seconds
?>
<html>
<head>
<title>Garduino</title>
<style type="text/css">
.table_titles {
padding-right: 40px;
padding-left: 40px;
color: #000;
}
.table_titles {
color: #FFF;
background-color: #0000FF;
}
table {
border: 2px solid #333;
}
body { font-family: "Trebuchet MS", Courier; }
</style>
</head>
<body>
<h1>Advanced Garduino</h1>
<table border="4" cellspacing="4" cellpadding="2">
<tr>
<td class="table_titles">ID</td>
<td class="table_titles">Date and Time</td>
<td class="table_titles">Moisture</td>
<td class="table_titles">Temperature</td>
<td class="table_titles">Humidity</td>
<td class="table_titles">Heat_index</td>
<td class="table_titles">Pressure</td>
<td class="table_titles">Valve_status</td>
</tr>
<?php
include('connection.php');
$result = mysqli_query($con,'SELECT * FROM data ORDER BY id DESC');
// Process every record
$oddrow = true;
while($row = mysqli_fetch_array($result))
{
if ($oddrow)
{
$css_class=' class="table_cells_odd"';
}
else
{
$css_class=' class="table_cells_even"';
}
$oddrow = !$oddrow;
echo "<tr>";
echo "<td '.$css_class.'>" . $row['ID'] . "</td>";
echo "<td '.$css_class.'>" . $row['Event'] . "</td>";
echo "<td '.$css_class.'>" . $row['Moisture'] . "</td>";
echo "<td '.$css_class.'>" . $row['Temperature'] . "</td>";
echo "<td '.$css_class.'>" . $row['Humidity'] . "</td>";
echo "<td '.$css_class.'>" . $row['Heat_index'] . "</td>";
echo "<td '.$css_class.'>" . $row['Pressure'] . "</td>";
echo "<td '.$css_class.'>" . $row['valve_status'] . "</td>";
echo "</tr>";
}
// Close the connection
mysqli_close($con);
?>
</table>
</body>
</html>
Now type the following line in the browser, webpage with data will be shown like shown in below figure
http://localhost:8095/garduino/display.phpArduino Code without database |Advanced_garduino_without_database
VideoIf you have any questions, then feel free to ask us in the comment section.


Comments