amna anjumNabhaan MohamedSaad TariqAshar AnwerNARENDRAN
Published

IoT Based Greenhouse Monitoring & Control system

A remotely controlled Greenhouse System using Blynk, NodeMCU-12E and Arduino.

IntermediateFull instructions provided4 hours4,873
IoT Based Greenhouse Monitoring & Control system

Things used in this project

Hardware components

Arduino UNO
Arduino UNO
×1
NodeMCU ESP8266 Breakout Board
×1
DHT11 Temperature & Humidity Sensor (4 pins)
×1
SparkFun Soil Moisture Sensor (with Screw Terminals)
×1
DC motor (generic)
For Fan (humidity control)
×1
DC motor (generic)
for Pump (soil moisture control)
×1
I2C 16x2 Arduino LCD Display Module
DFRobot I2C 16x2 Arduino LCD Display Module
×1
Grove - 2-Channel SPDT Relay
Seeed Studio Grove - 2-Channel SPDT Relay
×1
Jumper wires (generic)
For connections
×1
AA Batteries
AA Batteries
×2
Rechargeable Battery, Lithium Ion
×1
Breadboard (generic)
×1

Software apps and online services

Arduino IDE
Arduino IDE
Blynk
Blynk

Hand tools and fabrication machines
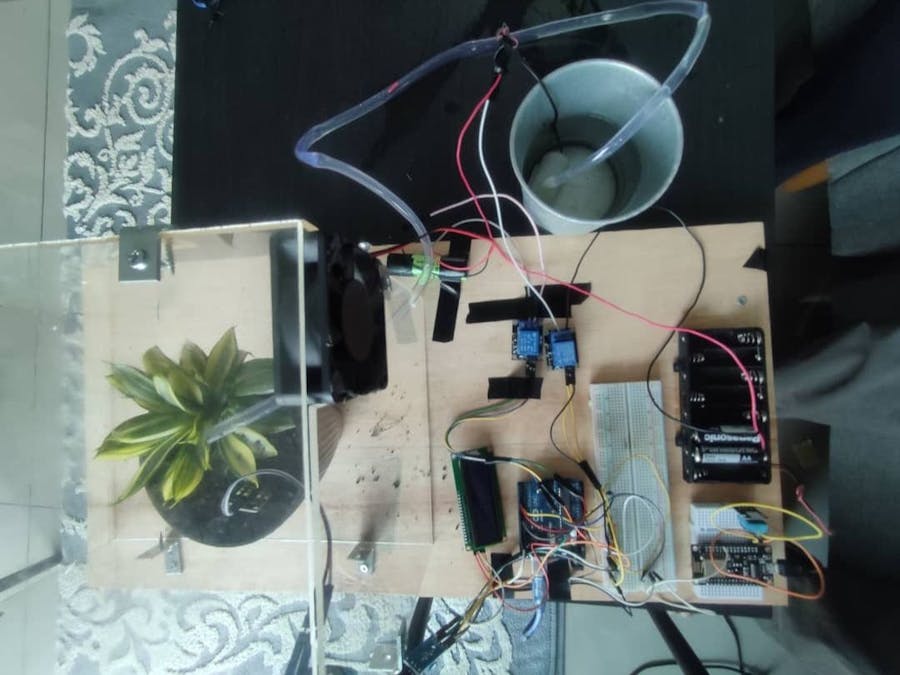
Drill / Driver, Cordless
Multitool, Screwdriver

Story

Read more

Code

Finalised group Arduino code

Arduino
Used to monitor and control the humidity, temparature and soil moisture levels
//* How to use the DHT-11 sensor with Arduino
//   Temperature and humidity sensor and
//   I2C LCD1602
 //  SDA --> A4
 //  SCL --> A5

//Libraries
#include <DHT.h>
//I2C LCD:
#include <LiquidCrystal_I2C.h>
#include <Wire.h>

LiquidCrystal_I2C lcd(0x27,16,2); // set the LCD address to 0x27 for a 16 chars and 2 line display
  
//Constants
#define DHTPIN 7     // what pin we're connected to
#define DHTTYPE DHT11   // DHT 11
DHT dht(DHTPIN, DHTTYPE); //// Initialize DHT sensor for normal 16mhz Arduino

//Variables
//int chk;
int h;  //Stores humidity value
int t; //Stores temperature value

void setup()
{
    Serial.begin(9600);
   // Serial.println("Temperature and Humidity Sensor Test");
    dht.begin();
    lcd.init(); //initialize the lcd
    lcd.backlight(); //open the backlight
     pinMode(2, OUTPUT);
  digitalWrite(2, HIGH);
   pinMode(3, OUTPUT);
  digitalWrite(3, HIGH);
}

void loop()
{
    //Read data and store it to variables h (humidity) and t (temperature)
    // Reading temperature or humidity takes about 250 milliseconds!
    h = dht.readHumidity();
    t = dht.readTemperature();
    
    //Print temp and humidity values to serial monitor
    Serial.print("Humidity: ");
    Serial.print(h);
   Serial.print(" %, Temp: ");
    Serial.print(t);
    Serial.println(" ° Celsius");
        

    //to print live temperature on LCD
    lcd.setCursor(9, 1);
    lcd.print("T:");
    lcd.print(t);
    lcd.print("C");
    
    //to print live humidity anf fan status on LCD  
    lcd.setCursor(9, 0);
    lcd.print("H:");
    lcd.print(h);
    lcd.print("%");
    if (h < 60) {
    digitalWrite(3, LOW);
    lcd.setCursor(0, 1);
    lcd.print("fan:OFF");
    } 
    else {
    digitalWrite(3, HIGH);
    lcd.setCursor(0, 1);
    lcd.print("fan:ON ");
     //lcd.setCursor(0, 6);
    //lcd.print(value);
  }

    int SensorValue = analogRead(A0); //read the input on analog pin 0
    Serial.println(SensorValue); //prints the value read by sensor on the serial monitor:
    //to print live pump status on LCD 
    if (SensorValue < 750) {
      digitalWrite(4, LOW);
      Serial.print("pump:OFF");
      lcd.setCursor(0, 0);
      lcd.print("pump:OFF");
  } else {
    digitalWrite(4, HIGH);
    lcd.setCursor(0, 0);
    lcd.print("pump:ON ");
    Serial.print("pump:ON ");
  }
  delay(1000); //Delay 1 sec.
}

Moisture sensor Code

Arduino
Code for running water pump based on moisture sensor values
//Libraries
#include <Wire.h>

void setup()
{
    Serial.begin(9600);
    pinMode(4, OUTPUT);
}

void loop() {
  // defining variable for sensor rerading
  int SensorValue = analogRead(A1); //read the input on analog pin 1
  Serial.println(SensorValue); //prints the value read by sensor on the serial monitor:
  if (SensorValue < 650) {
    digitalWrite(4, LOW);
    Serial.print("pump:OFF");
  } else {
    digitalWrite(4, HIGH);
    Serial.print("pump:ON ");
  }
  delay(1000); //Delay 1 sec.
}

NodeMCU Code

Arduino
Used to send the DHT sensor values to blynk dashboard
#define BLYNK_TEMPLATE_ID "TMPL2F7xiPEqi"
#define BLYNK_TEMPLATE_NAME "Temp and Humidity Monitor"
#define BLYNK_AUTH_TOKEN "Ed26TTzykYiBtx8u-z7ZdJ36asj2nQlj"

#define BLYNK_PRINT Serial
#include <ESP8266WiFi.h> 
#include <BlynkSimpleEsp8266.h>

#include <DHT.h>


char auth[] = BLYNK_AUTH_TOKEN;

char ssid[] = " ";  // type your wifi name
char pass[] = " ";  // type your wifi password

BlynkTimer timer;


#define DHTPIN 2 //Connect Out pin to D4 in NODE MCU
#define DHTTYPE DHT11  
DHT dht(DHTPIN, DHTTYPE);


void sendSensor()
{
  float h = dht.readHumidity();
  float t = dht.readTemperature(); // or dht.readTemperature(true) for Fahrenheit

  if (isnan(h) || isnan(t)) {
    Serial.println("Failed to read from DHT sensor!");
    return;
  }
  // You can send any value at any time.
  // Please don't send more that 10 values per second.
    Blynk.virtualWrite(V0, t);
    Blynk.virtualWrite(V1, h);
    Serial.print("Temperature : ");
    Serial.print(t);
    Serial.print("    Humidity : ");
    Serial.println(h);
}
void setup()
{   
  
  Serial.begin(115200);
  

  Blynk.begin(auth, ssid, pass);
  dht.begin();
  timer.setInterval(100L, sendSensor);
 
  }

void loop()
{
  Blynk.run();
  timer.run();
 }

DHT11- Humidity and Temperature Code

Arduino
Code for running the fan based on humidity
//Libraries
#include <DHT.h>
//I2C LCD:
//#include <LiquidCrystal_I2C.h>
#include <Wire.h>

//LiquidCrystal_I2C lcd(0x27,16,2); // set the LCD address to 0x27 for a 16 chars and 2 line display
  
//Constants
#define DHTPIN 7     // what pin we're connected to
#define DHTTYPE DHT11   // DHT 11
DHT dht(DHTPIN, DHTTYPE); //// Initialize DHT sensor for normal 16mhz Arduino

//Variables
//int chk;
int h;  //Stores humidity value
int t; //Stores temperature value

void setup()
{
    Serial.begin(9600);
   // Serial.println("Temperature and Humidity Sensor Test");
    dht.begin();
   // lcd.init(); //initialize the lcd
   // lcd.backlight(); //open the backlight
     pinMode(2, OUTPUT);
  digitalWrite(2, HIGH);
}

void loop()
{
    //Read data and store it to variables h (humidity) and t (temperature)
    // Reading temperature or humidity takes about 250 milliseconds!
    h = dht.readHumidity();
    t = dht.readTemperature();
    
    //Print temp and humidity values to serial monitor
    Serial.print("Humidity: ");
   Serial.print(h);
   Serial.print(" %, Temp: ");
    Serial.print(t);
   Serial.println(" ° Celsius");
        
// set the cursor to (0,0):
// print from 0 to 9:

  //  lcd.setCursor(0, 8);
  //  lcd.println("Now Temperature ");
    
   // lcd.setCursor(9, 1);
   // lcd.print("T:");
   // lcd.print(t);
//lcd.print("C");

  //  lcd.setCursor(8, 0);
   // lcd.println("2020 ");
     
   // lcd.setCursor(9, 0);
   // lcd.print("H:");
   // lcd.print(h);
   // lcd.print("%");


     int value = analogRead(A0);
  Serial.println(value);
  if (h < 65) {
    digitalWrite(2, LOW);
   // lcd.setCursor(0, 0);
    Serial.print("fan: Off ");
   //  lcd.setCursor(0, 6);
   // lcd.print(value);
   delay(1000);
  } else {
    digitalWrite(2, HIGH);
   // lcd.setCursor(0, 0);
    Serial.print("fan:On");
    // lcd.setCursor(0, 6);
    //lcd.print(value);
  delay(1000); //Delay 1 sec.
  }
  Serial.print("\n");
}

Credits

amna anjum

amna anjum

1 project • 2 followers
Nabhaan Mohamed

Nabhaan Mohamed

1 project • 3 followers
Saad Tariq

Saad Tariq

1 project • 3 followers
Ashar Anwer

Ashar Anwer

1 project • 2 followers
NARENDRAN

NARENDRAN

19 projects • 22 followers

Comments