

Hardware components | ||||||
| × | 1 | ||||
| × | 1 | ||||
| × | 1 | ||||
| × | 1 | ||||
| × | 1 | ||||
| × | 2 | ||||
| × | 1 | ||||
| × | 1 | ||||
| × | 4 | ||||
| × | 3 | ||||
| × | 2 | ||||
| × | 1 | ||||
| × | 7 | ||||
| × | 1 | ||||
| × | 1 | ||||
| × | 1 | ||||
| × | 1 | ||||
 |
| × | 1 | |||
Software apps and online services | ||||||
 |
| |||||
| ||||||
| ||||||
Hand tools and fabrication machines | ||||||
| ||||||
| ||||||
| ||||||
| ||||||
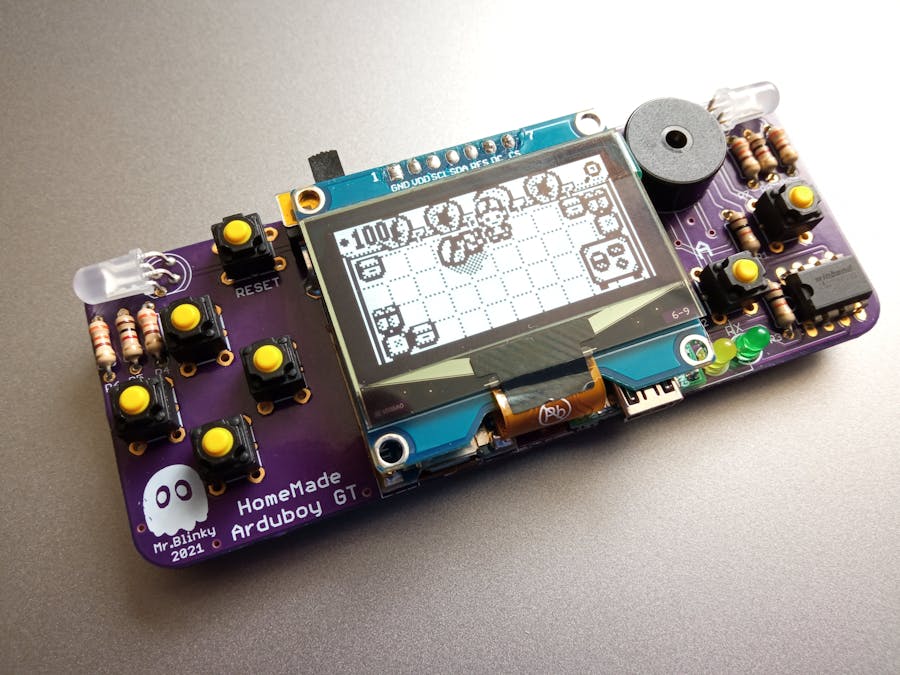
For the Arduboy contest I took the opportunity to design a custom PCB for a homemade Arduboy that uses only through hole parts and easy to obtain modules. In addition to that I wanted to make it stand out from other Homemade Arduboys by using some other then usual parts.It uses a Teensy 2.0 as core, a 1.54" OLED display, 2 x RGB LEDs, a 16MB flash chip for games, a Real Time Clock and has support for two kind of buttons. Below an image that shows all the parts used.
As core board a Teensy 2.0 is used. Because it has all the GPIO pins broken out that are used by official Arduboy. This offers best compatibility with Arduboy. and original hex files can be used. Before the Teensy can be soldered to the custom PCB, some preperations need to be made.
Prepping the Teensy - soldering pin headersFirst the pin headers must be soldered to the Teensy. the easiest way to solder these on straight is to put the Teensy upside down and insert header pins. Don't forget to insert the two pins in the middle. After all pins are seated put the teensy in the custom PCB. Do this by keeping the Teensy upside down and put the custom PCB on top. After that turn the teensy and custom PCB around and put it on your workbench.
Now the pins can be soldered at the top of the teensy. After soldering the pins at the top, remove the Teensy from the custom PCB and remove the black strips of the pinheaders. The easiest way to do this is to put the Teensy with the pinheaders on the workbench and use a thin flat screw driver or other flat tool to gently push the black strips down at the sides little by little until they come off. do not use excessive force.
In the above image you see the discription to cut the track. Do not do this yet. But do this later on in the project when told to. When cutting it now, the Teensy doesn't get power and you cannot perform early tests.
The Teensy uses a non standard bootloader that needs to replaced with the Cathy3K bootloader. To flash the new bootloader a ISP programmer is required. This can be an Arduino UNO, TinyISP, USBasp or any other AVR ISP programmer.The easiest way to flash the bootloader is to use the Arduino IDE with the Arduboy Homemade Package installed.
- From the tools menu select Board > Arduboy versions > Arduboy
- From the tools menu select bootloader > Cathy3K (starts with menu)
- From the Tools menu select your programmer (Arduino as ISP when using an Arduino)
- From the tools menu select Burn bootloader to program the bootloader.
The image below shows how to connect the ISP programmer to the Teensy.
The Teensy is now ready to be soldered to the custom PCB. But before you do I recommend to add some kapton tape or masking tape to the charger module and teensy areas for some extra insulation. When adding the tape make sure no pin holes get covered. They need to remain clear for the solder to flow in to the holes.
After inserting the Teensy into the custom PCB, cut all the pins before you start soldering them. As a general rule for soldering parts with multiple pins: Always solder one pin first and check if the part is aligned properly, if not you can reheat the single solderjoint and realign the part.
After the Teensy is soldered, you can use similar method to solder the charger module. After soldering that start with soldering the resistors, power switch (add some kapton on top of the switch) buzzer, flash chip, LEDs and buttons.
When soldering the resistors. Note the color bands:
- Orange Orange Brown 330 Ohm
- Brown Black Red 1K
- Brrown Black Orange 10K
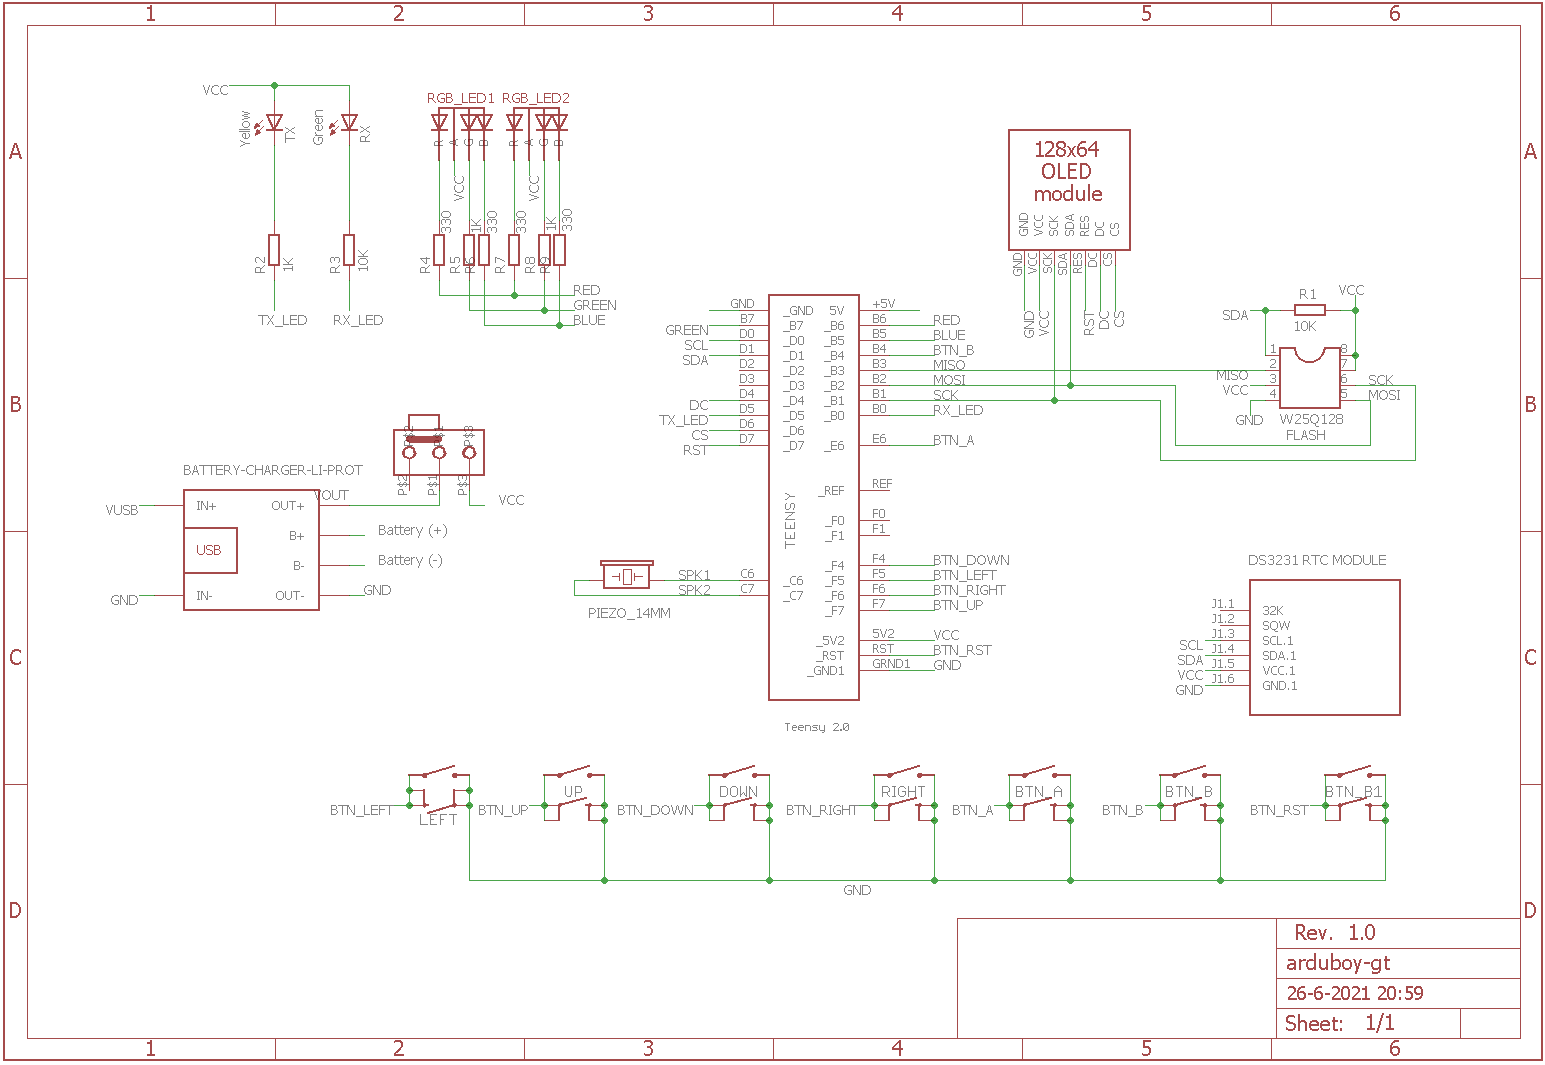
Here's the PCB layout that shows which resistor value goes where.
When soldering the LEDs note the length of the leads. The in the part image above showss how the LEDs should be inserted. The RGB LEDs are intended to point to the left and right. This prevents the RGB LEDs from blinding you and illuminate your hands during play for a cool effect.
Two odd pins need to be bended right at the RGB LED base and the other two pins a few mm from the base (you can use the edge of custom PCB as a distance guide).Note that the pins have different length. Make sure they are inserted in to the holes correctly. Also note that the right RGB LED pins are inserted opposite of the left one because of it facing right.
When soldering the flashchip, note the small notch at one side. It should face in the same direction as marked on the PCB. Also bend the pins at the bottom of the PCB almost but not completely flat.
When soldering the buttons. Make sure the buttons are resting completely into the PCB and not partially floating above it. Also bend the pins at the bottom of the PCB almost but not completely flat.
Before the OLED display can be soldered. the pins on the module must be heated with a soldering iron and pushed down a bit. This will make sure the pins will fit into the custom PCB holes far enough.
Also try inserting the OLED display and tilt it a little so the pins make contant and then power the Arduboy GT from USB PC connection. Make sure you insert the display in the left most header pin holes. The header pin holes surrounded by white outline should remain clear.
If everything is well you should see a USB boot icon on the display. if not try pressing reset a few times. If reset is pressed your PC should also make a USB connect sound. If you don't see the icon appear then check the solder joints.
Soldering the OLED displayIf all is well you can solder the OLED display to the custom PCB. Again make sure the pins are in the left most holes. First solder one pin and after making sure the display is aligned properly solder the remaining pins.
Uploading a test sketch After soldering the display. Connect it to USB again and check if USB boot icon is shown. Als try uploading a sketch so you can check buttons, sound and RGB LEDs.
When uploading a sketch through the Arduino IDE, use the following settings:
- From tools menu Board > Arduboy versions > Homemade Arduboy
- From tools menu Based on > Arduino Leonardo
- From the tools menu Display > SSD1309
- From the tools menu Flash select > Pin2 / D1 / SDA
The Arduboy GT is almost fully compatible with an original Arduboy. The almost is because I chose to use a larger 1.54" SSD1309 display over those small 0.96" SSD1306. displays. The difference in displays is only in the display initialisation and original games can be patched on the fly using my Python tools so it's possible to play original Arduboy games.
To upload the original game library to the flashchip, download the Portable Activator package, unzip it and double click the run-uploader-gui-windows batch file to start the tool. Then:
- From the Options menu check the apply SSD1309 display patch option.
- click on the '...' button at the right of the Upload flash image button, browse to the extracted folder and select the flash-image file.
- Click on the Upload flash image button to start uploading the to the flash chip.The RGB LEDs will flash red during uploading and briefly flashes green after the upload is completed.
You can now browse games using the D-Pad and select a game to play using the A or B button.
Sofar the Arduboy GT is usuable by powering it directly from a USB port. But now it's time to add the LiPo battery for portability. Before soldering the battery to the board a small modification is made the the teensy.The USB power is cut so the teensy is no longer powered by USB. Look at the image below where the power should be cut. You can use a small hobby knife to cut the track. To check that the track is cut completely, connect power to the USB port. If the cut was successful the Arduboy GT stays off.
Next a small wire needs to be soldered from the VUSB pad of the charger module to the VUSB pad of the teensy. With this modification the Teensy USB port can be used for charging.
Note:When the above modification is not made. The power switch must always be in the OFF position when connecting to USB and charging is only possible throught the charger board USB port.
Connecting the LiPobattery
The LiPo battery wires are soldered to thebattery pads at the bottom of the custom PCB. Solder red wire to B+ pad and the black wire to the B- pad. Stick some double sided foam tape or sticky rubber putty to the Battery and stick it to the custom PCB.
The RTC module is soldered at the bottom of the custom PCB. But before it can be soldered, a few modifications need to be made.
- The Power LED and charging resistor near de diode must be removed. This can be easily done by adding a solder blob and then remove the parts. Also remove the excess solder from the pads of the removed parts.
- The pin headers must be bend straight in upright position and then cut down to approx. 3mm / 0.15" just enough so the pins pass though the custom PCB.
- The CR2032 battery holder must be desoldered so the module will be flatter. The RTC will be powered by the LiPo battery.
- Solder a approx. 5cm / 2" wire to the battery pad near the pin header. This wire will be connected to the power switch center pin later.
After making the above modifications insert the RTC module at the bottom of the custom PCB and solder the pins at the top. Solder one pin first and check that the module is aligned properly. If so solder the remaing pins. Solder the battery wire to the center pin of the power switch. This wire wil lmake sure the RTC gets power from the LiPo battery even when the switch is in the OFF positon.
GT stands for Game and Time and is a reference to Nintendo Game and Watch. The idea is to show the date and time in the loader menu when you switch Arduboy GT on. Unfortunately due to insufficent time I was not able to finish the bootloader that displays the date and time on the loader menu.
Here's a picture of a test sketch of what it should look like. The test sketch can be found on GitHub.
Thank you for reading through this project. You've reached the end now. I hope you enjoyed it and as a small reward, here's a video showing the Arduboy GT from various angles.


Comments