

Hardware components | ||||||
_baVEVgguW1.jpg?auto=compress%2Cformat&w=48&h=48&fit=fill&bg=ffffff) |
| × | 1 | |||
 |
| × | 1 | |||
| × | 1 | ||||
Software apps and online services | ||||||
 |
| |||||
| ||||||
In the first workshop, we'll be spending most of the time building the robots and testing them using Blynk and Arduino. If you'd like to get the most out of the workshop, please bring a laptop computer and a smartphone or tablet. Don't worry if you don't have them, we'll be working in teams, and we'll pair you up with others who have all the equipment.
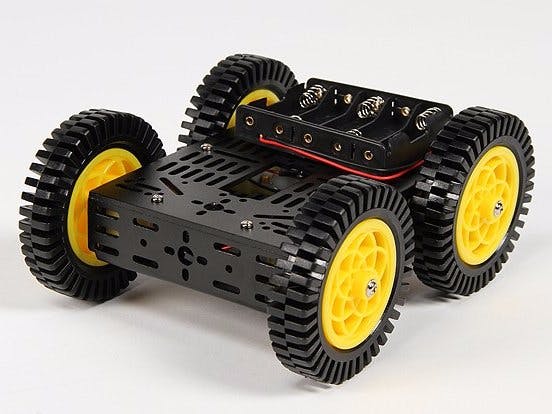
The robot chassis we will be using is the Dago Multi-Chassis 4WD ATV Model:
- Assemble the Robot Chassis, the Assembly Manual is located here.
- Install the latest version of the Arduino IDE on your laptop computer.
- Once the Arduino IDE is installed, start the Arduino IDE and add the Adafruit Motor Shield Library, using the Sketch -> Library Manager. More information is available at Adafruit.
- Install the Blynk Library for Arduino using the Sketch -> Library Manager. More information is available at Blynk.
- Install the Blynk Application on your smartphone or tablet. More information is available at Blynk.
- Download and Install the Arduino sketch for the workshop, named - Arduino101_BLE_Blynk_AdaMotor_V2.ino
- Using the Blynk application on your smart phone or tablet, clone the project user interface using the QR Code. This is a nice Blynk feature to save you the time of manually entering all the information required.
Once the project has been cloned, go to the setup menu (Nut Icon) and email yourself the "Auth Token" for the project. Each user will have their own unique "Auth Token". Enter that string into your Arduino sketch:
char auth[] = "xxxxxxxxxxxxxxxxxxxxxxxxxxxxxxxxxxxxxxxxx";
Connect your Arduino101 board to your laptop computer using the USB cable and wait for the USB port to enumerate. This can take several minutes the first time as drivers are downloaded and installed.
From the Arduino "Tools" menu select the Arduino101 board type and the correct COM: port for the Arduino101 board.
Click on the Arduino IDE "Upload" button to compile and upload your sketch to the robot board. From your smarthphone/laptop, click the "Connect" icon to connect the Bluetooth radio to your robot.
Now use the buttons and speed control slider to control your robot.
If one or more of the motors spins incorrectly, reverse the wire leads to that motor to fix the direction.
That's it! In the following workshops, we'll work on more independent robot control and work up to the PARTS robot challenge.


Comments