

Hardware components | ||||||
 |
| × | 1 | |||
Software apps and online services | ||||||
 |
| |||||
 |
| |||||
 |
| |||||
| ||||||
- Description: Send email on a button press
- Difficulty: Easy
- Hardware: ESP8266 NodeMCU
- Firmware: Mongoose OS
- AWS services: AWS IoT, AWS Lambda, AWS SNS, AWS CloudFormation
This is an Internet Button reference project: when a button on the device is pressed, a cloud backend gets a notification and performs an action. In this particular case, AWS Lambda function sends an email to the specific email address. But, again, the action could be anything.
Prerequisites- Hardware: ESP8266 NodeMCU
- Amazon AWS account
- Amazon's AWS management utility (see https://aws.amazon.com/cli)
The data flow is as follows:
- User presses the button
- Device sends a message to the MQTT topic "DEVICE_ID/button_pressed"
- AWS IoT receives the message and calls AWS Lambda Function
- AWS Lambda Function publishes a message to the AWS SNS (Simple Notification Service)
- AWS SNS notifies subscribers: in this case, just sends a message to a single email address
- User receives the email
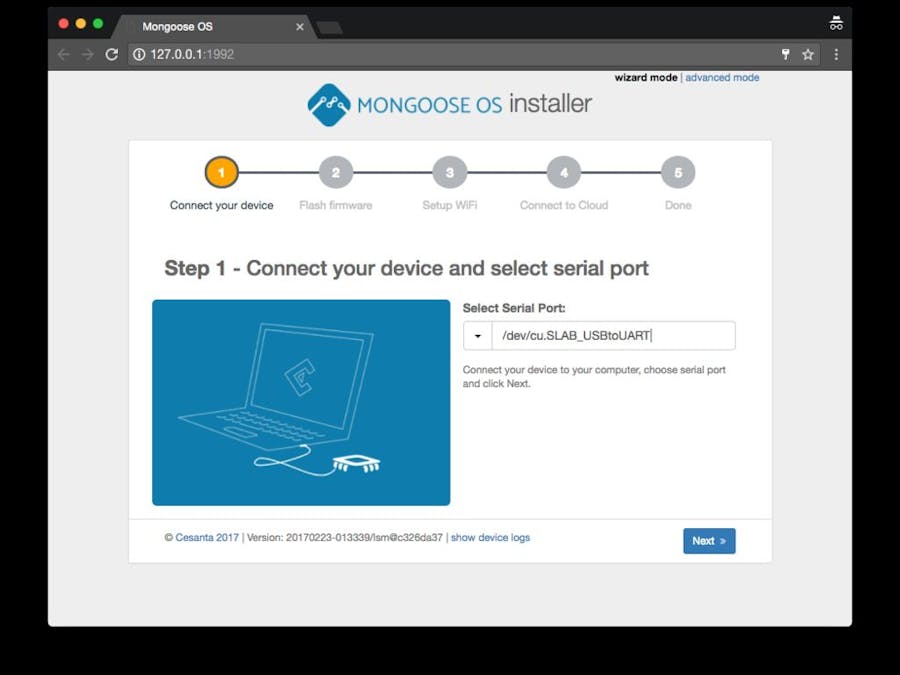
git clone <a href="https://github.com/cesanta/mongoose-os.git" rel="nofollow">https://github.com/cesanta/mongoose-os.git</a>  # Clone mongoose-os repo<br>cd mongoose-os/fw/examples/aws_iot_button  	      # Go to the button example project
mos flash mos-esp8266  				      # Install Mongoose OS
DEVICE_ID=$(mos config-get device.id)   # Get device ID
MY_EMAIL=my@email.com                   # Set email address
# You can change "my-internet-button" stack name to something else
aws cloudformation create-stack \
    --stack-name my-internet-button \
    --parameters \
        ParameterKey=TopicName,ParameterValue=$DEVICE_ID/button_pressed \
        ParameterKey=SubscriptionEmail,ParameterValue=$MY_EMAIL \
    --capabilities CAPABILITY_IAM \
    --template-body file://aws_button_template.json
# Wait until the stack creation is completed (it may take a few minutes).
# Alternatively, you can use the web UI to check the status and read event
# details: <a href="https://console.aws.amazon.com/cloudformation/home" rel="nofollow"> https://console.aws.amazon.com/cloudformation/hom...</a>
# NOTE: During stack creation, AWS will send a Subscription Confirmation email,
# so check your email and confirm the subscription by following a link.
aws cloudformation wait stack-create-complete --stack-name my-internet-button
mos put init.js    				# Copy init.js on the device
mos wifi WIFI_SSID WIFI_PASSWORD  		# Set wifi configuration
mos aws-iot-setup --aws-iot-policy=mos-default 	# Setup device to connect to AWS IoT
mos console  					# Watch device logs
When the device is connected to the AWS IoT, push the button on your device. In the device's console, you'll see a message like this:
Published: yes topic: esp8266_DA84C1/button_pressed message: {"free_ram":26824,"total_ram":44520}
Now, check your email. It'll contain a new message:
Button pressed: esp8266_DA84C1/button_pressed
Now you can go to your AWS dashboard and play with your stack. For example, you may add more subscriptions to the SNS: other than sending emails, it can also call some URL, send SMS, etc. And, of course, you can modify your lambda function to do whatever you want in response to the button press.
Have fun!
If you like this and find useful, please hit the 'Respect project' button and don't forget to 'Share'. That way we will hear your feedback and bring even more exciting projects to you door.
For a more in-depth introduction, see the Mongoose OS documentation and video tutorials.
Check also other projects by Mongoose OS team.
Questions? Feedback? Reach us via forum.cesanta.com


Comments