

Hardware components | ||||||
 |
| × | 1 | |||
 |
| × | 1 | |||
 |
| × | 1 | |||
| × | 1 | ||||
 |
| × | 1 | |||
 |
| × | 1 | |||
Software apps and online services | ||||||
 |
| |||||
This is one of the most interesting and hardest experiment to do, Why?because the circuit we want to build is a little bit hard and tricky.
Most of the tutorial in the internet do it with relay to turn on-off the AC heater to increase the temperature,it's not an accurate way to control the water temperature,and will not be able to reach to your target temperature.
To explain it in a simple example: you want to increase a temperature of the water to be about 60 degree Celsius,With a relay when you reach to 60 degree Celsius,the relay turn off the Heater, that makes the temperature decrease rapidly so the relay will turn on and increase temperature rapidly again , so the relay will turn on-off within a short time which will damage the relay and maybe damage the heater it self.
Best way to adjust the temperature by control AC voltage output applied on AC heater.
build a (crappy) AC triac circuit not just unprofessional but also will not work well,With inappropriate heatsink,no protection from ac short circuit or overload current, and most important no protection for you,any small fault might kill you,be careful.
So let's see the best way to control AC heater, and offer a high protection from electrical shock hazard,and give us a full control over the water temperature.
We want to control AC Water heater, and control the water target temperature with temperature sensor feedback signal,and we want to control Applied AC voltage on the AC water heater so we can control accurately the water temperature.
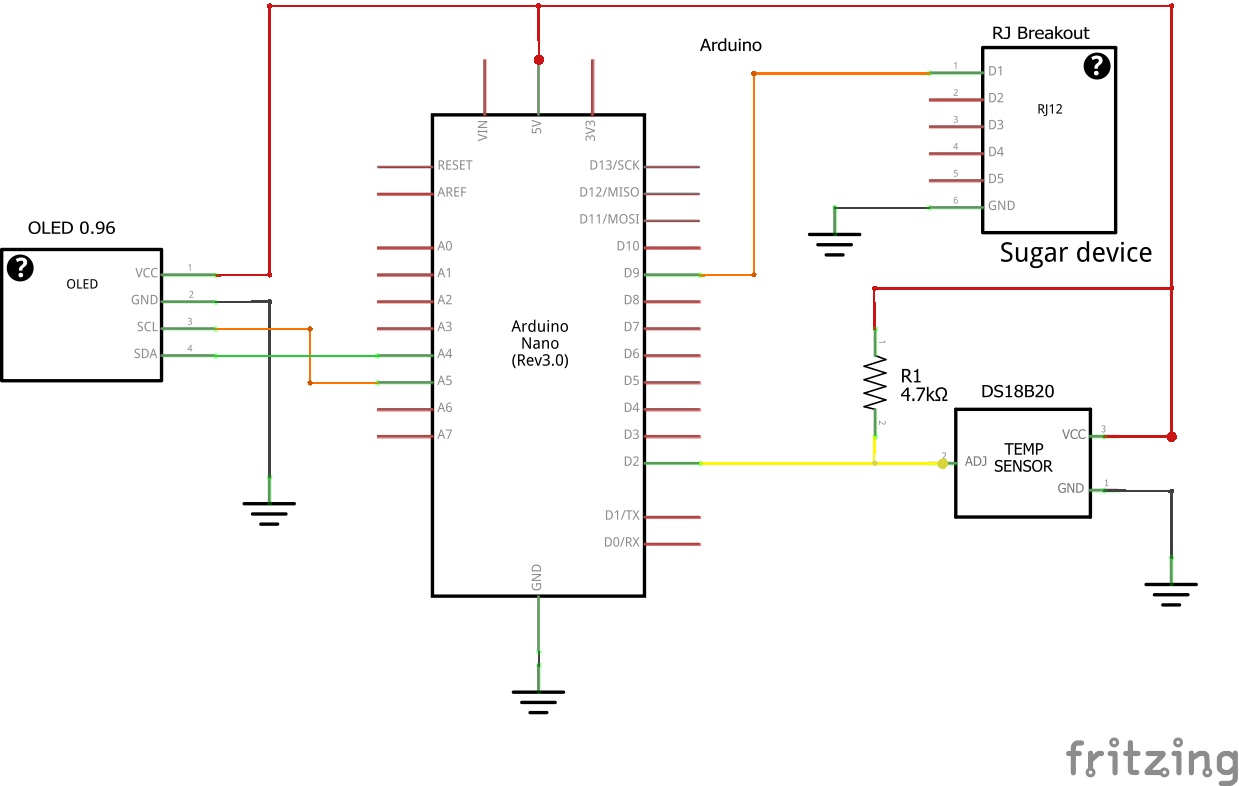
We will use an LCD to show all information an parameters on it.
the components we need are:
- Arduino Board"I used arduino Nano".
- Power Cable C14.
- OLED 0.96 inch display.
- DS18B20 water proof temperature sensor.
- 4.7K resistor
- Breadboard and solderless jumper
- Oscillscope"optional".
You can check all feature about sugar and support sugar team on indiegogo Now:
As we see no need for any naked wire, or cutting any AC wires to connect the components together "like in the relay circuits".
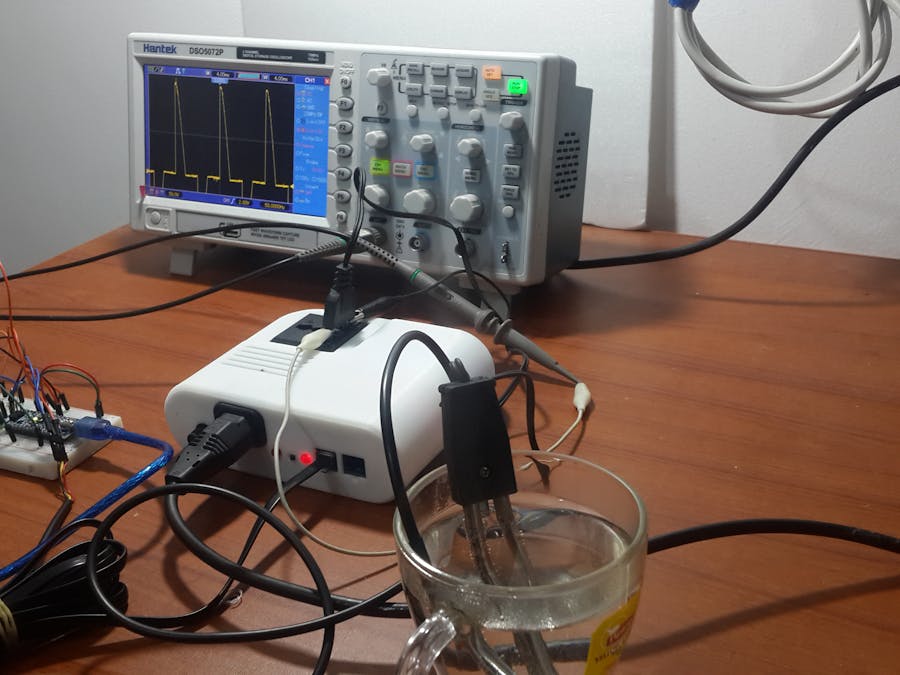
and we will use an oscilloscope to see the AC voltage waveform and ensure the sugar device control the applied ac voltage on water heater.
in the final all you need to do is
- Connect to connect the water heater element to Sugar device output socket.
- Connect the AC power cable to sugar device to power it up.
- connect the RJ12 cable between sugar device and arduino, use RJ breakout to connect the cable to Arduino nano.
and you need a glass of water too put the heater inside it with the DS18B20 sensor
well during this test, i faced something may happen for everyone, the power consumption by the AC Heater was larger than 300W and the AC current was higher than I expected, thanks for Sugar device , the ac fuse protect the circuit and cut off the power source, for such a circumstances,Sugar is capable to protect your self and equipment you use from any short circuit or overload fault.
all similar circuits on the internet won't do that, you will be under the mercy of AC current which will damage all unprotected component and put you life under threat.
remember safety is a priority.and with sugar I safely remove the fuse and replace it by a new one,no need to open the device or touch any dangerous ac components.
last thing to say:you need to observe the temp target and the sensor temp and adjust the value of the output voltage in the code go to "" void UpdatePWM() "" and change the value to match your requirements
See the video to see how the circuit works
If you like our project we hope you support us on indiegogo Now
and you can see the oscilloscope waveform shows how the sugar control AC Voltage output


Comments