

Hardware components | ||||||
 |
| × | 1 | |||
| × | 1 | ||||
 |
| × | 1 | |||
| × | 1 | ||||
 |
| × | 1 | |||
 |
| × | 1 | |||
 |
| × | 1 | |||
Software apps and online services | ||||||
 |
| |||||
| ||||||
In this simple tutorial, we will explore how to control a servo over the internet. For that, we will use a great couple of devices, the NodeMCU ESP12-E and a Blynk App.
We will start learning how to connect the servo with the NodeMCU, knowing how to control it locally with a potentiometer, how to see its position on an OLED display and finally how to control it over the internet using a smartphone. The Block diagram gives us an overview of what will be the final project.
Also, the bellow video shows the final project working:
Step 1: BoM- NodeMCU ESP8266-12E V1.0 (US$ 8.79)
- Mg995 Servo 180 Degree (US$ 19.99)
- Breadboard Power Supply Module 3.3V/5V (US$ 5.99)
- 10K ohms Potentiometer (US$ 7.19)
- 400 points Breadboard (US$ 5.89)
- Dupont Cables (US$ 7.29)
The first thing that we will do, is to setup the NodeMCU to handle the 180o Servo, controlling it thru a 10K ohm potentiometer.
Take care that the NodeMCU is powered with 5V, but all its GPIOs work with a 3.3V level.
Let's split the Breadboard power raids, one for 5V and the other for 3.3V. For that, we will use the breadboard Power Supply as the one shown in the diagram below:
NOTE: During the development phase, when your PC is connected to NodeMCUvia the USB port, you do not need connecting Vin to +5V (red wire at the diagram), once the power will be provided by your computer. Leave it disconnected.Servos
For Servo operation, we will use the Servo.h library:
#include <Servo.h>   // Include the library
Servo servo1;        // Create the Servo and name it "servo1"
#define servo1Pin D2 // Define the NodeMCU pin to attach the Servo
During setup(), the servo1 must be initiated:
servo1.attach(servo1Pin);
The 10K potentiometer will work as a voltage divisor, changing the analog input level on NodeMCU (A0) from 0 to 3.3V. Internally, the 10 bits ADC (Analog-Digital converter) will generate a digital value (from 0 to 1023), the potReading, equivalent to the analog voltage input.
potReading = analogRead(A0);
We should "map" this digital value, in order that the Pulse Width Modulated (PWM) digital output of pin D2, will vary from 0 to 180 (servo1Angle).
servo1Angle = map(potReading, 0, 1023, 0, 180);
With this signal, the servo will turn from 0 to 180 degree, using the bellow command:
servo1.write(servo1Angle);
The position value that is sent to Servo will be displayed during this test phase on Serial Monitor:
Serial.println(servo1Angle);
The full code for Servo's tests can be downloaded from my GitHub:
The below video shows the servo test:
Step 3: Let's Display!It is OK during tests, to use the Serial Monitor, but what's happen when you are using your prototypes far from your PC in a stand alone mode? For that, let's install an OLED display, our old friend, SSD1306, which main characteristics are:
- Display size: 0.96"
- I2C IIC SPI Serial
- 128X64
- White OLED LCD LED
Connect the OLED pins to the NodeMCU, as described bellow and shown at above electrical diagram:
- SDA ==> D1 (5)
- SCL* ==> D2 (4) * Also you can find "SDC" in the text
- VCC ==> The SSD1306 can be powered with both 5V or 3.3V (in our case, 3.3V)
- GND ==> GND
Once we have connected the display, let's download and install its library on our Arduino IDE: the "ESP8266 OLED Driver for SSD1306 display" developed by Daniel Eichhorn (Make sure that you use Version 3.0.0 or bigger!).
Bellow the library that must be downloaded and installed on your Arduino IDE:
https://github.com/squix78/esp8266-oled-ssd1306
Once you restarted the IDE, the library should be already installed.
The library supports I2C protocol to access the OLED display using the built-in Wire.h library:
#include <Wire.h>
#include "SSD1306.h"
SSD1306  display(ADDRESS, SDA, SDC);
Let's list some important API that will be used with our OLED display. The complete list can be found at the GITHub provided above.
A. Display Control:
void init(); // Initialise the display
void displayOn(void); // Turn the display on
void displayOff(void); // Turn the display offs
void clear(void); // Clear the local pixel buffer
void flipScreenVertically(); // Turn the display upside down
B. Text Operations:
void drawString(int16_t x, int16_t y, String text); // (xpos, ypos, "Text")
void setFont(const char* fontData);  // Sets the current font.
Available default fonts:
 ArialMT_Plain_10,
 ArialMT_Plain_16,
 ArialMT_Plain_24
Once the both the OLED itself and its Library are installed, let's write a simple program to test it. Enter with bellow code on your IDE, the result should be a display as shown in the above photo:
/*NodeMCU */
#include <ESP8266WiFi.h>
/* OLED */
#include "SSD1306Wire.h"
#include "Wire.h"
const int I2C_DISPLAY_ADDRESS = 0x3c;
const int SDA_PIN = 0;
const int SCL_PIN = 2;
SSD1306Wire     display(I2C_DISPLAY_ADDRESS, SDA_PIN, SCL_PIN);
void setup ()
{
  Serial.begin(115200);
  displaySetup();
}
void loop()
{
}
/* Initiate and display setup data on OLED */
void displaySetup()
{
  display.init();         // initialize display
  display.clear();        // Clear display
  display.display();      // Put data on display

  Serial.println("Initiating Display Test");

  display.setFont(ArialMT_Plain_24);
  display.drawString(30, 0, "OLED");  // (xpos, ypos, "Text")
  display.setFont(ArialMT_Plain_16);
  display.drawString(18, 29, "Test initiated");
  display.setFont(ArialMT_Plain_10);
  display.drawString(10, 52, "Serial BaudRate:");
  display.drawString(90, 52, String(11500));
  display.display();  // Put data on display
  delay (3000);
}
Now let's "merge" the previous 2 codes, so we can not only control the servo position using the potentiometer but also see its position in the OLED display.
The code can be downloaded from my GitHub:
NodeMCU_Servo_Control_Test_OLED
And the result can be verified on the video:
Step 5: Creating a Blynk App to Control the ServoBasically, we will need to change our previous code to include the Blynk part of it:
#include <BlynkSimpleEsp8266.h>
char ssid [] = "YOUR SSID";
char pass [] = "YOUR PASSWORD";
char auth [] = "YOUR AUTH TOKEN"; // Servo Control Project
/* Reads slider in the Blynk app and writes the value to "potReading" variable */
BLYNK_WRITE(V0)
{
  potReading = param.asInt();
}
/* Display servo position on Blynk app */
BLYNK_READ(V1)
{
  Blynk.virtualWrite(V1, servo1Angle);
}
void setup ()
{
  Blynk.begin(auth, ssid, pass);
}
void loop()
{
  Blynk.run();
}
So, we must define a virtual pin V0, where Blynk will "Write" a servo position, the same way as we did with the potentiometer. On Blynk App, we will use a "Slider" (with output defined from 0 to 1023) to command the servo position.
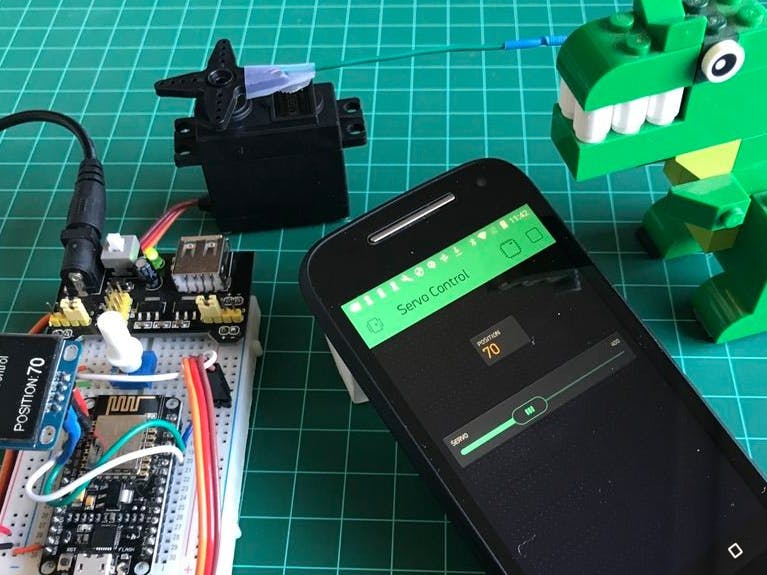
Another virtual pin, V1, will be used to "Read" the servo position, same as we do with the OLED. On Blynk App, we will use a "Display" (with output defined from 0 to 180) to show the servo position.
The above foto shows the App screens.
You can download the complete program from GitHub:
Step 6: ConclusionAs always, I hope this project can help others find their way in the exciting world of electronics, robotics, and IoT!
Please visit my GitHub for updated files:
For more projects, please visit my blog: MJRoBot.org
Saludos from the south of the world!
See you at my next tutorial!
Thank you,
Marcelo


Comments