


Hardware components | ||||||
 |
| × | 1 | |||
 |
| × | 1 | |||
Software apps and online services | ||||||
 |
| |||||
The Atmel® Tiny Programming Interface (TPI) is featured on selected low-end Atmel AVR® microcontrollers, and allows external programmers to access the nonvolatile memory (NVM) of the device. The interface provides access to device lock bits, the program flash memory, and the signature, configuration, and calibration sections.
The TPI can be accessed via three pins:
- RESET: TPI enable input
- TPICLK: TPI clock input
- TPIDATA: TPI data input/output
Therefore, it is only a small subset of AVR ATtiny microcontrollers that actually use TPI programming. They are listed here
- ATtiny4
- ATtiny5
- ATtiny9
- ATtiny10
- ATtiny102
- ATtiny104
- ATtiny20
- ATtiny40
These AVR ATtiny devices can be programmed using tools from ATMEL or simply using USBASP which mostly uses ATMEGA8A.
Both ATMEL STUDIO and MPLAB X supports ATtiny controller program development and programming the device.
We can use both AVRISP MKII or USBasp for programming device. There are other third party vendor IDE and compilers are available. Similarly there are other tools available from MICROCHIP or other vendors.
In this project we will see how to program the ATtiny chips using TPI protocol using ATMEL STUDIO, MPLAB X development environment along with AVRISP MKII and USBasp programmer. The scope of the project limited to ATtiny4/5/9/10 controllers only.
ATMEL STUDIO with AVRISP MKII:This is one of the easiest and straight forward method to develop and program the ATtiny chips. Just write the code in C or assembly and program using many tools which includes AVRISP MKII.
ATtiny4/5/9/10 ICs comes in 2 package style. The easier one to handle is SOT23-6 package. We can have a small adapter board which converts SOT23-6 to DIP6 300mil. We can easily get 6 pin IC Base with machined round pins. We can find the similar board from HERE which is also having Sch and Layout files.
To use a machined 6 pin IC base, we also need to have round pins in the adapter.
These round pins are useful for handling the ICs with a 6 pin IC base.
Most of the other designs for the same purpose uses square pins with square pin compatible header. We can use those square pins for programming, breadboard development and using male or female jumper wires. But we can not fit that into a normal IC base. Since 6 pin DIP IC base is commonly used for Optocouplers, it is readily available and directly mounts on the board.
Now we have the devices mounted on DIP6 formfactor IC adapter boards. The device marking on silk screen is optional. It is just easy to read and handle. There is a marking for pin 1 as white dot.
Now we have to make some arrangement for holding these devices between the programmer and the target ICs.
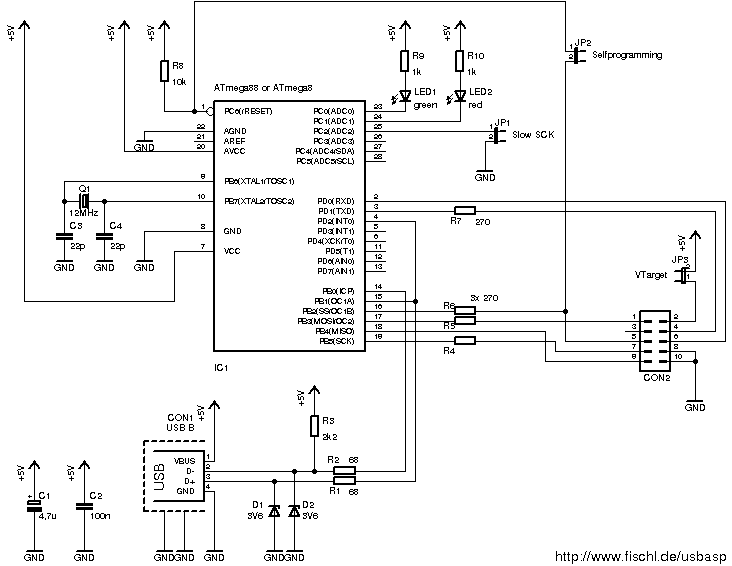
USBasp programmer uses 10 pin FRC connector and AVRISP MKII uses 6 pin connector. Depends on the programmer in hand, we need to decide which target board is useful.
10 pin target connector:The above board uses 10 pin connector similar to USPasp programmer. Many pins are unused. The advantage is we can directly insert the IC and programmer connector into this board for programming. There is NO additional target POWER is required.
The fully assembled board will look like below image
D3 and R1 and just power indicator. D2 and R2 are connected to the Target IC's RB2 port pin which is not used for programming. Both the feature are optional and not required for regular operation. U4 is 6 pin target holder. Pay attention while inserting the target IC for pin number 1. Both dots should match and IC base have additional cut for easy alignment of orientation.
6 pin target connector:Some other programmer uses 6 pin target connector for programming. Compared to 10 pin connector, 6 pin uses 5 of the pins for programming.
R5 and and D1 are just power indicator and placed under the IC base and not required for normal operation. R3 and PB2(LED) are connected to PB2 port pin. This is also optional.
The assembled board will look like below
There are few things worth noting in the above board.
First one is the Red Jumper near the CON6. This jumper should be in TPI position if we are using AVRISP MKII or any other dedicated TPI programmer with 6 pin connector.
The jumper should be in ISP position if we are using USBasp or other 10 pin programmers. This jumper is necessary to route the MOSI or MISO signal, which was assigned to AVRISP MKII and USBasp programmer differently.
Another thing to note is the right side PWR_5V connector. For USBasp programmer which will provide the power to the target and does not depends on external power. But AVRISP MKII requires external 5V for the target IC. AVRISP MKII will only provide the programming signal and will not power to the target IC.
For the above reason the PWR_5V header is added to the target. We can provide the power to the board by either 4 pin or 5 pin header. Only 5V and GND is used.
We can insert any of the compatible USB connector breakout board having 4 or 5 pins with female header of 2.54mm pitch.
To connect the USBasp programmer into this 6 pin target board, we need a 10 pin to 6 pin converter
Pay attention while inserting the 10 pin to 6 pin converter into the board if the connector does not have a locking notch for proper orientation. The signal names are marked in the bottom of the board so that we can easily match the connections. We also need to set the jumper into the ISP side for proper operation.
While using AVRISP MKII, the red jumper should be in TPI side and we need to provide the additional power +5V and GND.
Make sure the target IC orientation with the target adapter board pin 1 alignment.
ATMEL STUDIO with AVRISP MKII:Open the ATMEL STUDIO and write the blink LED program. Compile it. Select the programmer as AVRISP MKII. Provide the target power of 5V and GND. Now we can erase and program flash or lock bits etc.,
ATMEL STUDIO with USBasp:There are procedure to attach the USBasp as the default programmer and appears in the listed devices. But I have used the AVRDUDE along with AVRDUDESS for GUI based instead of command line typing of commands.
MPLAB X with USBasp:
The MPLAB X supports all the devices with TPI protocol. We can easily write the program using MPLAB X IDE with required device selection as target.
The ELF or HEX file can be selected and programmed using USBasp.
The best option is using the 10 pin FRC connector with 10 pin connector which does not require any additional conversion, jumper or external power.
In the above video we can see the RunTiny GAME which was developed for ATtiny10 is running on ATtiny9 with 128x32 SSD1306 OLED, push button and a 3.3 or 3.2 external power from a single Li battery or from a regulated output.
In the above picture the ATtiny is mounted on SIP6 and not DIP6 so save space.
There is also a TETRIS game available for ATtiny10.
These games are real challenge to fit the code with very limited resource.
FIRMWARE Update:With Windows 10 and Windows 11 the USBasp may not be recognized properly. We can try THIS firmware with integrated WinUSB driver support which eliminates any third party drivers.
So updating the Firmware eliminates the dependency on driver in windows OS.


Comments