Meet BEAPER Pico!BEAPER is short for Beginner Electronics and Programming Educational Robot, and Pico refers to the Raspberry Pi Pico family of microcontrollers used to control it.
I designed BEAPER Pico to teach microcontroller programming and robotics in high school level computer technology and robotics classes, but it's also a great beginner circuit for maker spaces, robotics clubs, and hobbyists who want to learn to use the Raspberry Pi Pico in their projects. BEAPER Pico was inspired by my BEAPER Nano project for Arduino Nano ESP32.
BEAPER Pico assembled as a low-cost robot on a piece of MDF.
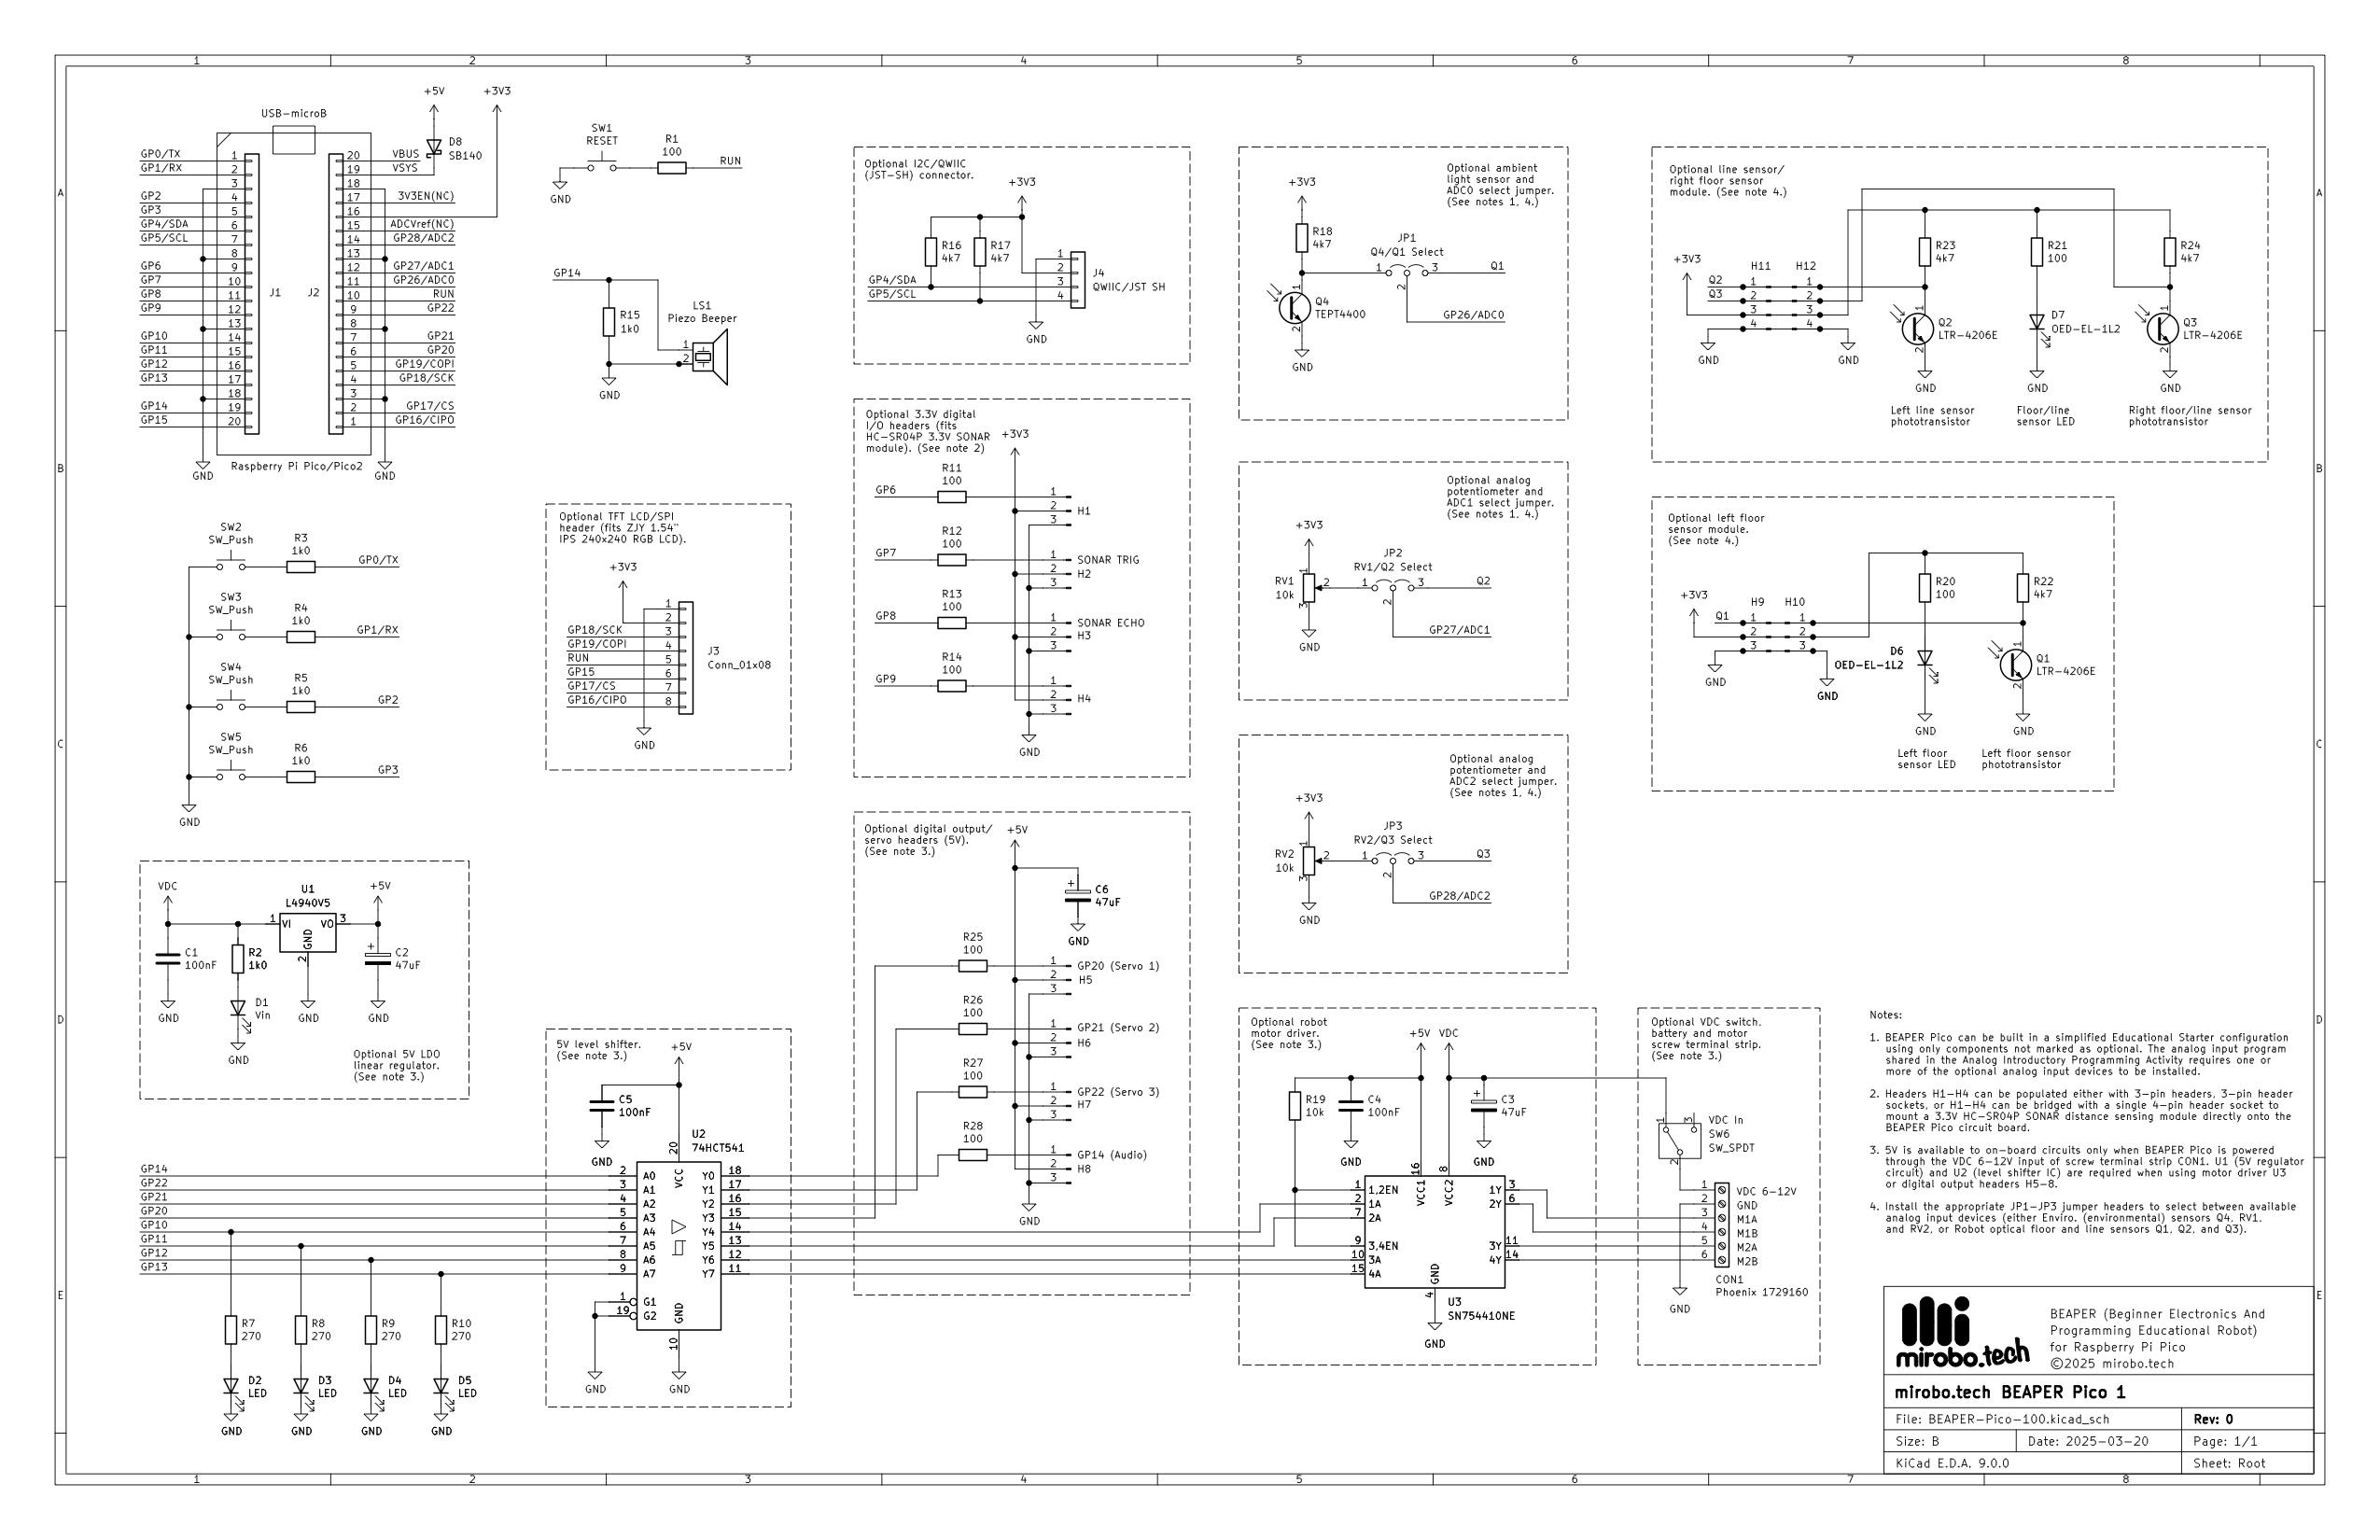
BEAPER Pico is a through-hole circuit designed to be assembled in stages – three common build configurations are described below. Assembling the circuit in stages enables learners to start programming it more quickly while giving instructors the opportunity to save parts costs, stretch the circuit over multiple courses/years, or provide for greater student choice and project customization.
BEAPER Pico's strength is that it includes all of the common beginner electronic circuits on board. This enables learners to rapidly focus on developing fundamental programming skills instead of building and de-bugging breadboard circuits. The circuit is designed to grow with the learners, and BEAPER Pico can be built into a variety of projects including simple robots, an animatronics (servo) controller, an IoT device (with Pico W), a mini game system (with its optional LCD), and many, many more.
BEAPER Pico build configurationsEducational Starter configuration
BEAPER Pico assembled in the minimal-components Educational Starter configuration with only four pushbuttons, four LEDs, and a piezo buzzer.
The Educational Starter configuration is the hard-wired equivalent of connecting a Raspberry Pi Pico to pushbuttons and LEDs on a breadboard. It contains all of the components beginners need to start learning microcontroller programming, but without the rats-nest of wires and potentially loose parts! Learners start with:
- a Raspberry Pi Pico or Pico 2 microcontroller
- 4 user pushbuttons
- 4 user LEDs
- a piezo speaker
Using the Educational Starter configuration allows students to start learning programming fundamentals including: input, output, variables, loops, sound, and simple software functions. Adding potentiometers or the ambient light sensor to this starter configuration enables beginners to learn analog processing techniques as well.
Robot Starter configuration
BEAPER Pico was designed from the start to make it easy to build robots. Its PCB includes break-away optical sensor modules intended to be used as robot floor and line sensors. For wall and obstacle sensing, a 3.3V SONAR module can be plugged into an on-board header socket, or an optical ToF (Time of Flight) module can be connected to the I2C/QWIIC connector. The on-board screw terminal strip makes it easy to attach an external battery holder and two DC motors, and header pins support servos.
BEAPER Pico's Robot Starter configuration adds the regulator circuit, motor driver, and servo headers (bottom), as well as a SONAR socket (top – between the break-away optical floor and line sensor modules).
The Robot Starter configuration adds the following components to the Educational Starter configuration:
- 5V low drop-out linear regulator and power switch circuit
- 74AHCT541 3.3V to 5V level shifter IC to drive external servos and the on-board motor driver
- SN754410NE motor driver IC (an improved L293D) and screw terminal strip
- 2 break-away optical floor and line sensor modules containing IR LEDs and phototransistors
- 3-pin jumpers to route analog floor sensor inputs to the Pico's ADC (Analog-to-Digital Converter)
- optional 4-pin header socket to mount an HC-SR04P 3.3V SONAR distance sensor module
- optional JST-SH QWIIC connector to connect a ToF distance sensor module and other I2C devices
Front corner view of a BEAPER Bot robot. Left 'L' and right 'R' optical sensor modules are connected by extension cables, and a ToF distance module is plugged into the I2C/QWIIC connector.
I've designed the 3D-printable BEAPER Bot robot chassis to hold the BEAPER Pico circuit, two N20 gear motors, a 4-AA battery holder, and slide-in optical sensor modules. All of the components slide or clip together without using screws, and servo mounts and other accessories can be designed to fit into dove-tail slots around its perimeter. The entire BEAPER Bot design is freely editable in TinkerCad (search BEAPER).
Close-up of the optional LCD showing floor sensor Q1-Q3 reflectivity, ToF module distance, Pico die temperature, and battery voltage. The two green dots in the BEAPER Pico sensors indicate floor present.
IoT configuration
BEAPER Pico's IoT (Internet of Things) configuration is designed specifically to be used with Raspberry Pi Pico W and Pico 2 W microcontrollers to make WiFi- and Bluetooth-enabled devices.
The IoT configuration adds the following components to the Educational Starter configuration:
- an ambient light sensor and two potentiometers along with the 3-pin jumpers to route their analog signals to the Pico W microcontroller
- 4 digital I/O headers to connect external, 3.3V digital input and output devices
- an I2C/QWIIC connector to connect external 3.3V I2C devices and sensors
- an optional full-colour 240 X 240 pixel TFT LCD display panel
Students can use the Pico module's on-chip temperature sensor along with BEAPER Pico's ambient light sensor and potentiometers to make a basic environmental monitor or to experiment with processing analog signals. They can also connect additional devices using the I2C/QWIIC connector.
The full-colour graphical LCD enables learners to display simple parameter readouts or even create advanced games.
Controlling a block-breaker game using the on-board potentiometer.
How can I get started with BEAPER Pico?
As a retired high school computer technology teacher I understand the challenges of funding computer technology and STEM classes. For this reason I've made BEAPER Pico PCBs available from PCBWay, allowing instructors to order them in bulk for the lowest possible cost. Coupled with the ability to build BEAPER Pico in stages, as well as its incredible versatility and expandability, it's possible for students to reuse and expand their same BEAPER Pico circuit from year to year.
Individual BEAPER Pico PCBs and parts kits are available on the mirobo.tech website as well as on my Lectronz store (better for purchasers in the EU).
Full assembly instructions for BEAPER Pico are posted on my website.
A complete set of beginner learning activities for BEAPER Pico is shared in my GitHub repository. These activities lead learners through all of the programming concepts they will need to make BEAPER Pico into a robot, an alarm system, an environmental control system, a NeoPixel driver, and more. The programming concepts covered by the beginner learning activities include:
- Output
- Timing
- Input
- Constants and Variables
- Decision Structures
- Conditional Loops
- Counted Loops
- Functions
- Analog input
- Analog Output
- Non-blocking Timing
- State Machines
- Starter templates for various extension and challenge projects
A set of follow-up intermediate learning activities will introduce data structures, I2C bus interfacing, LCD display graphics, and hardware interrupts. These intermediate activities will be shared in the GitHub repository at a later point.


Comments