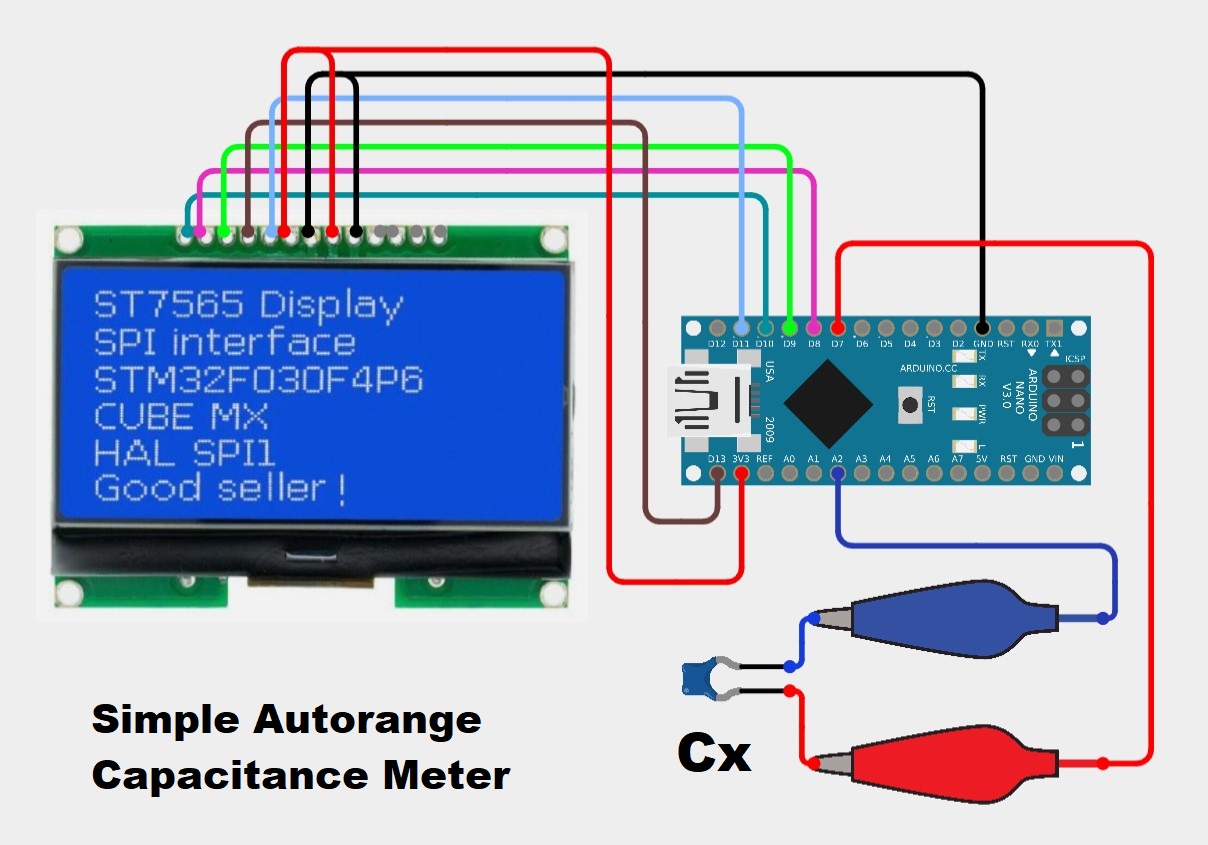
The capacity measurement option is usually only available in more expensive multimeters, so it is desirable to make such an instrument ourselves, especially if it is very simple to make and inexpensive.
Exactly these conditions are fulfilled in the instrument described below. The measured value is displayed on a large readable display, and its measuring range is from 1 pF to 99 µF which are actually the most frequently used values.
The fact that only two components are needed to make this capacitance meter is almost unbelievable, namely an Microcontroller board and an LCD display.
I specifically in this case use an Arduino Nano microcontroller board, and LCD Dispaly 128x64 dots with ST7565 driver chip.
This project is sponsored by PCBWay. They has all the services you need to create your project at the best price, whether is a scool project, or complex professional project. On PCBWay you can share your experiences, or get inspiration for your next project. They also provide completed Surface mount SMT PCB assemblY service at a best price, and ISO9001 quality control. Visit pcbway.com for more services.
The measurement is performed in such a way that the measured capacitor is charged with current from the PULLUP resistor from the microprocessor input, and the required charging time is measured. The capacitor whose value we need to measure is connected to one analog and one digital pin of the microcontroller, and if it is a polarized capacitor, the positive pole is connected to the first defined pin in the code. The simplicity of this device is due to the excellent "capacitor" Arduino library that is made specifically, for this purpose and you can download it directly from the author's GitHub page.
Now let's see how this useful instrument works in real conditions. For this purpose I will use capacitors of different types and with different values. At first, the display shows a capacitance of about 1 pF which is actually the capacitance between the wires and the connectors, which is minimal and does not affect measurements.
As you can see from the presentation, the accuracy and speed of measurement are satisfactory. As you can see from the presentation, the accuracy and speed of measurement are satisfactory.
And finally a short conclusion. This is the simplest possible stand-alone capacitance meter that you can make using only two electronic components. Even simpler, if you use the device on your desktop, you only need the microcontroller, and you can read the results on the serial monitor from the Arduino IDE application on the PC. Of course, it is advisable to embed the device in a suitable box with plugins, so that you can make measurements more easily.


Comments