/*
Arduino based VU meter by KTAudio.
Developed by ThomAce (Tamas Kamocsai) based on siemenwauters, theredstonelabz and michiel H's VU meter.
GNU GPL License v3
Developer: ThomAce (Tamas Kamocsai)
Mail: thomacepcg@gmail.com
Version: 1.0
Last modification date: 2019.09.24
Original version:
https://www.instructables.com/id/ARDUINO-VU-METER/
Original description:
VU meter by siemenwauters, theredstonelabz and michiel H don't forget to like and subscribe to support my work. tnx
Modified by mircemk (Mirko Pavleski)
*/
#include <LiquidCrystal.h>
byte Bar[8] = {
B11111,
B00000,
B11111,
B11111,
B11111,
B11111,
B00000,
B11111
};
byte L[8] = {
B00111,
B01000,
B10100,
B10100,
B10100,
B10111,
B01000,
B00111
};
byte R[8] = {
B00111,
B01000,
B10110,
B10101,
B10110,
B10101,
B01000,
B00111
};
byte EndMark[8] = {
B10000,
B01000,
B00100,
B00100,
B00100,
B00100,
B01000,
B10000
};
byte EmptyBar[8] = {
B11111,
B00000,
B00000,
B00000,
B00000,
B00000,
B00000,
B11111
};
byte peakHoldChar[8] = {
B11111,
B00000,
B01110,
B01110,
B01110,
B01110,
B00000,
B11111
};
String main_version = "1.0";
int right; //Variables to store and calculate the channel levels
const int numReadings = 5; //Refresh rate. Lower value = higher rate. 5 is the defaul
int indexR = 0;
int totalR = 0;
int maxR = 0;
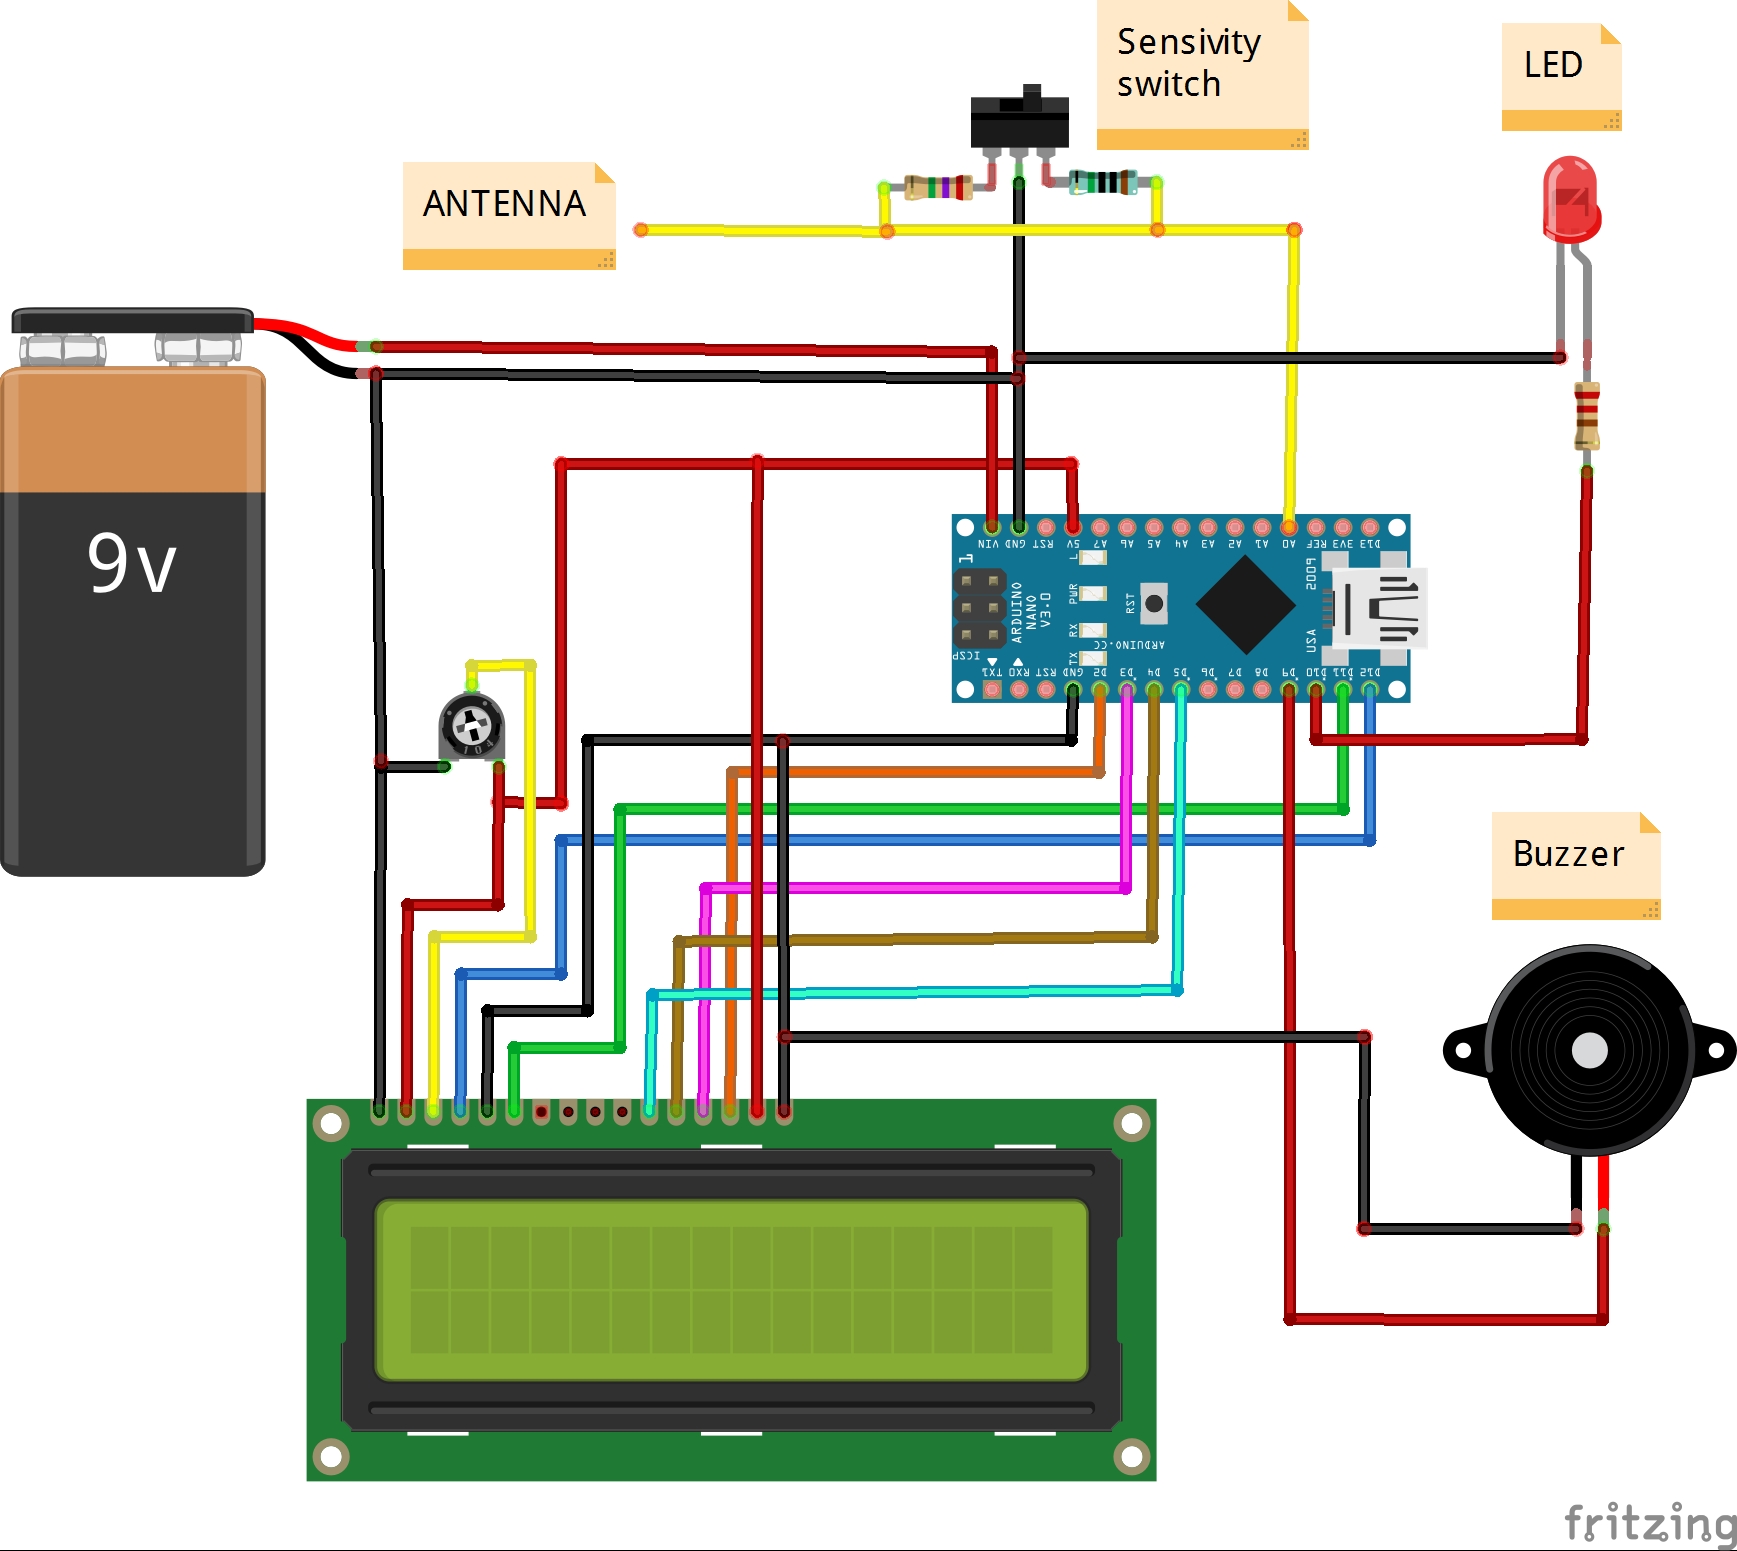
int inputPinR = A0; //Input pin Analog 0 for RIGHT channel
int volR = 0;
int rightAvg = 0;
long peakHoldTime = 100; //peak hold time in miliseconds
long peakHold = 0;
int rightPeak = 0;
long decayTime = 0;
long actualMillis = 0;
int pin10 = 10; // output of red led
int val = 0;
int pin9 = 9;
LiquidCrystal lcd(12, 11, 5, 4, 3, 2); //lcd configuration
void setup()
{
lcd.begin(40, 2); //Setting up LCD. 16 chars and 2 rows
lcd.createChar(1, Bar);
lcd.createChar(3, R);
lcd.createChar(4, EmptyBar);
lcd.createChar(5, EndMark);
lcd.createChar(6, peakHoldChar);
//Showing loading message and loading bar
String KTAudio = " MIRCEMK";
for (int i = 0; i <= 16; i++)
{
lcd.setCursor(0, 0);
lcd.print(KTAudio.substring(0, i));
delay(50);
}
KTAudio = " EMF-detector " + main_version;
for (int i = 0; i <= KTAudio.length(); i++)
{
lcd.setCursor(0, 1);
lcd.print(KTAudio.substring(0, i));
delay(50);
}
delay(500);
lcd.clear();
lcd.setCursor(0, 0);
lcd.print("Loading...");
for (int i = 0; i < 16; i++)
{
lcd.setCursor(i, 1);
lcd.write(4);
}
for (int i = 0; i < 16; i++)
{
lcd.setCursor(i, 1);
lcd.write(1);
delay(50);
}
delay(500);
lcd.clear();
decayTime = millis();
}
void loop()
{
lcd.setCursor(0, 0);
lcd.write(" EMF-intensity");
actualMillis = millis();
lcd.setCursor(0, 1); //R channel index
lcd.write(3); //R symbol
lcd.setCursor(15, 1); //closing tag / end mark index 2
lcd.write(5); //closing tag / end mark
totalR = analogRead(inputPinR) ;
if(totalR >= 1){
totalR = constrain(totalR, 0, 100); // mess with these values
totalR = map(totalR, 0, 100, 1, 255); // to change the response distance of the device
analogWrite(pin10, totalR); // *note also messing with the resistor should change
analogWrite(pin9, totalR); // the sensitivity
}else{ // analogWrite(pin10, val); just tuns on the led with
// the intensity of the variable val
analogWrite(pin10, 0); // the else statement is just telling the microcontroller
analogWrite(pin9, 0); // to turn off the light if there is no EMF detected
}
if(totalR > maxR)
{
maxR = totalR;
}
indexR++;
if (indexR >= numReadings)
{
indexR = 0;
right = maxR;
maxR = 0;
}
volR = right / 3;
if(volR > 14)
{
volR = 14;
}
if (volR < (rightAvg - 2))
{
if (decayTime < actualMillis)
rightAvg--;
volR = rightAvg;
}
else if (volR > (rightAvg + 2))
{
volR = (rightAvg + 2);
rightAvg = volR;
}
else
{
rightAvg = volR;
}
if (volR > rightPeak)
{
rightPeak = volR;
}
drawBar(volR, rightPeak, 1);
if (decayTime < actualMillis)
decayTime = (millis() + 50);
if (peakHold < actualMillis)
{
peakHold = (millis() + peakHoldTime);
rightPeak = -1;
}
}
void drawBar(int data, int peakData, int row)
{
//If the previous peak data is 1 or 0, then not taking care of the value.
if (peakData < 2)
{
peakData = -1;
}
//First char (idx 0) = R or L
//Last (16th) char (idx 15) is the closing mark of the bar.
//We have 14 chars to write.
for (int col = 1; col < 15; col++)
{
lcd.setCursor(col, row);
if (col < data)
{
lcd.write(1); //write bar element
}
else if (peakData == col)
{
lcd.write(6); //write the peak marker
}
else
{
lcd.write(4); //write "empty"
}
}
}


Comments