

Hardware components | ||||||
 |
| × | 1 | |||
 |
| × | 1 | |||
| × | 1 | ||||
 |
| × | 1 | |||
Software apps and online services | ||||||
 |
| |||||
Hand tools and fabrication machines | ||||||
 |
| |||||
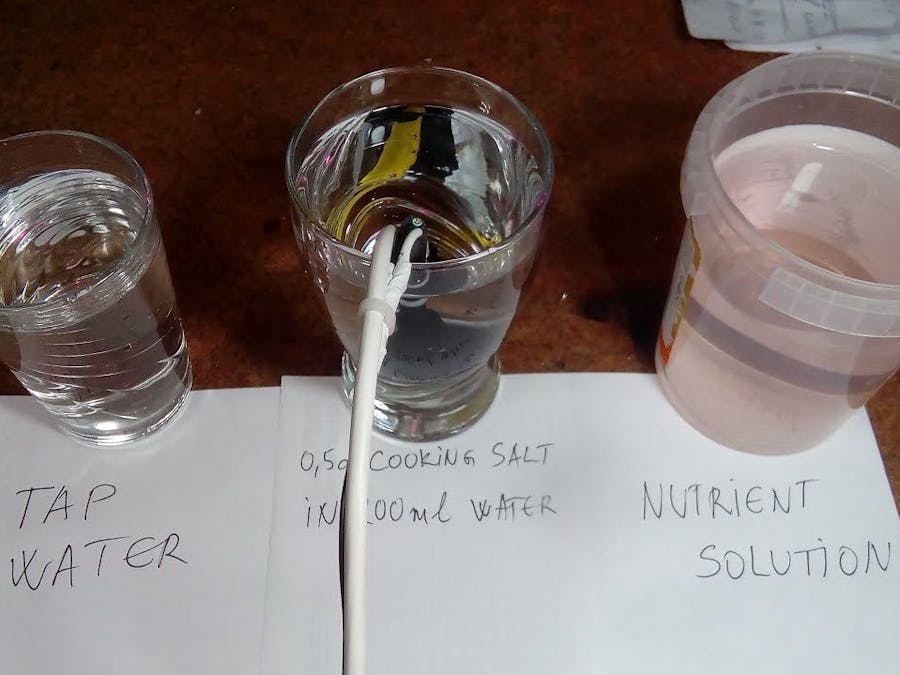
I made this simple instrument for controlling the PPM value of the nutrient solution of my hydroponic system.
Building instructions : https://hackaday.io/project/7008-fly-wars-a-hackers-solution-to-world-hunger/log/24646-three-dollar-ec-ppm-meter-arduino
Used Arduino libraries:
https://github.com/aroth/OneWire
https://github.com/esp8266/Basic/tree/master/libraries/dallas-temperature-control
The value of the constant [k] depends on what type of plug is used for probe:
EU plug: K= 1.76
US Plug: K= 2.88
/*
ElCheapo Arduino EC-PPM measurments
This scrip uses a common USA two prong plug and a 47Kohm Resistor to measure the EC/PPM of a Aquaponics/Hydroponics Sytem.
You could modift this code to Measure other liquids if you change the resitor and values at the top of the code.
This Program will give you a temperature based feed controller. See Read me in download file for more info.
28/8/2015 Michael Ratcliffe Mike@MichaelRatcliffe.com
This program is free software: you can redistribute it and/or modify
it under the terms of the GNU General Public License as published by
the Free Software Foundation, either version 3 of the License, or
(at your option) any later version.
This program is distributed in the hope that it will be useful,
but WITHOUT ANY WARRANTY; without even the implied warranty of
MERCHANTABILITY or FITNESS FOR A PARTICULAR PURPOSE. See the
GNU General Public License for more details.
You should have received a copy of the GNU General Public License
along with this program. If not, see .
Parts:
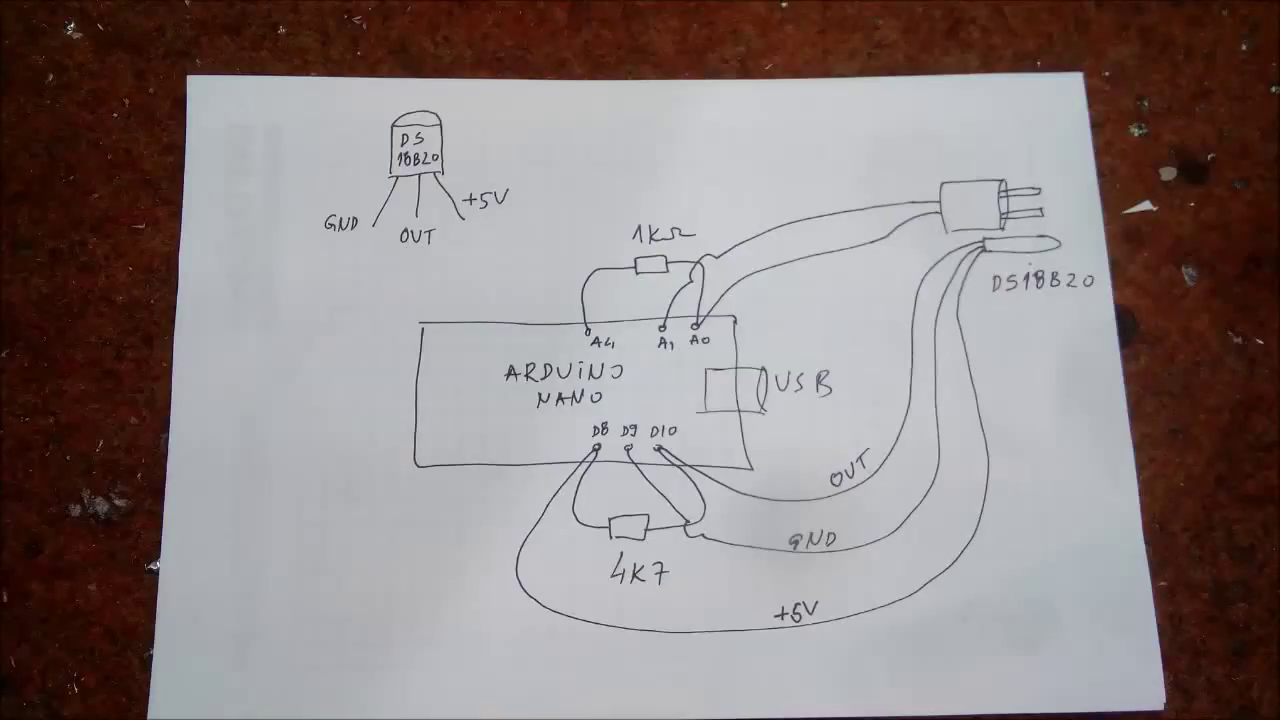
-Arduino - Uno/Mega
-Standard American two prong plug
-1 kohm resistor
-DS18B20 Waterproof Temperature Sensor
Limitations:
-
-
See www.MichaelRatcliffe.com/Projects for a Pinout and user guide or consult the Zip you got this code from
*/
//************************** Libraries Needed To Compile The Script [See Read me In Download] ***************//
// Both below Library are custom ones [ SEE READ ME In Downloaded Zip If You Dont Know how To install] Use them or add a pull up resistor to the temp probe
#include <OneWire.h>
#include <DallasTemperature.h>
//************************* User Defined Variables ********************************************************//
//##################################################################################
//----------- Do not Replace R1 with a resistor lower than 300 ohms ------------
//##################################################################################
int R1= 1000;
int Ra=25; //Resistance of powering Pins
int ECPin= A0;
int ECGround=A1;
int ECPower =A4;
//*********** Converting to ppm [Learn to use EC it is much better**************//
// Hana [USA] PPMconverion: 0.5
// Eutech [EU] PPMconversion: 0.64
//Tranchen [Australia] PPMconversion: 0.7
// Why didnt anyone standardise this?
float PPMconversion=0.7;
//*************Compensating for temperature ************************************//
//The value below will change depending on what chemical solution we are measuring
//0.019 is generaly considered the standard for plant nutrients [google "Temperature compensation EC" for more info
float TemperatureCoef = 0.019; //this changes depending on what chemical we are measuring
//********************** Cell Constant For Ec Measurements *********************//
//Mine was around 2.9 with plugs being a standard size they should all be around the same
//But If you get bad readings you can use the calibration script and fluid to get a better estimate for K
float K=2.88;
//************ Temp Probe Related *********************************************//
#define ONE_WIRE_BUS 10 // Data wire For Temp Probe is plugged into pin 10 on the Arduino
const int TempProbePossitive =8; //Temp Probe power connected to pin 9
const int TempProbeNegative=9; //Temp Probe Negative connected to pin 8
//***************************** END Of Recomended User Inputs *****************************************************************//
OneWire oneWire(ONE_WIRE_BUS);// Setup a oneWire instance to communicate with any OneWire devices
DallasTemperature sensors(&oneWire);// Pass our oneWire reference to Dallas Temperature.
float Temperature=10;
float EC=0;
float EC25 =0;
int ppm =0;
float raw= 0;
float Vin= 5;
float Vdrop= 0;
float Rc= 0;
float buffer=0;
//*********************************Setup - runs Once and sets pins etc ******************************************************//
void setup()
{
Serial.begin(9600);
pinMode(TempProbeNegative , OUTPUT ); //seting ground pin as output for tmp probe
digitalWrite(TempProbeNegative , LOW );//Seting it to ground so it can sink current
pinMode(TempProbePossitive , OUTPUT );//ditto but for positive
digitalWrite(TempProbePossitive , HIGH );
pinMode(ECPin,INPUT);
pinMode(ECPower,OUTPUT);//Setting pin for sourcing current
pinMode(ECGround,OUTPUT);//setting pin for sinking current
digitalWrite(ECGround,LOW);//We can leave the ground connected permanantly
delay(100);// gives sensor time to settle
sensors.begin();
delay(100);
//** Adding Digital Pin Resistance to [25 ohm] to the static Resistor *********//
// Consule Read-Me for Why, or just accept it as true
R1=(R1+Ra);// Taking into acount Powering Pin Resitance
Serial.println("ElCheapo Arduino EC-PPM measurments");
Serial.println("By: Michael Ratcliffe Mike@MichaelRatcliffe.com");
Serial.println("Free software: you can redistribute it and/or modify it under GNU ");
Serial.println("");
Serial.println("Make sure Probe and Temp Sensor are in Solution and solution is well mixed");
Serial.println("");
Serial.println("Measurments at 5's Second intervals [Dont read Ec morre than once every 5 seconds]:");
};
//******************************************* End of Setup **********************************************************************//
//************************************* Main Loop - Runs Forever ***************************************************************//
//Moved Heavy Work To subroutines so you can call them from main loop without cluttering the main loop
void loop()
{
GetEC(); //Calls Code to Go into GetEC() Loop [Below Main Loop] dont call this more that 1/5 hhz [once every five seconds] or you will polarise the water
PrintReadings(); // Cals Print routine [below main loop]
delay(5000);
}
//************************************** End Of Main Loop **********************************************************************//
//************ This Loop Is called From Main Loop************************//
void GetEC(){
//*********Reading Temperature Of Solution *******************//
sensors.requestTemperatures();// Send the command to get temperatures
Temperature=sensors.getTempCByIndex(0); //Stores Value in Variable
//************Estimates Resistance of Liquid ****************//
digitalWrite(ECPower,HIGH);
raw= analogRead(ECPin);
raw= analogRead(ECPin);// This is not a mistake, First reading will be low beause if charged a capacitor
digitalWrite(ECPower,LOW);
//***************** Converts to EC **************************//
Vdrop= (Vin*raw)/1024.0;
Rc=(Vdrop*R1)/(Vin-Vdrop);
Rc=Rc-Ra; //acounting for Digital Pin Resitance
EC = 1000/(Rc*K);
//*************Compensating For Temperaure********************//
EC25 = EC/ (1+ TemperatureCoef*(Temperature-25.0));
ppm=(EC25)*(PPMconversion*1000);
;}
//************************** End OF EC Function ***************************//
//***This Loop Is called From Main Loop- Prints to serial usefull info ***//
void PrintReadings(){
Serial.print("Rc: ");
Serial.print(Rc);
Serial.print(" EC: ");
Serial.print(EC25);
Serial.print(" Simens ");
Serial.print(ppm);
Serial.print(" ppm ");
Serial.print(Temperature);
Serial.println(" *C ");
/*
//********** Usued for Debugging ************
Serial.print("Vdrop: ");
Serial.println(Vdrop);
Serial.print("Rc: ");
Serial.println(Rc);
Serial.print(EC);
Serial.println("Siemens");
//********** end of Debugging Prints *********
*/
};


Comments