/*
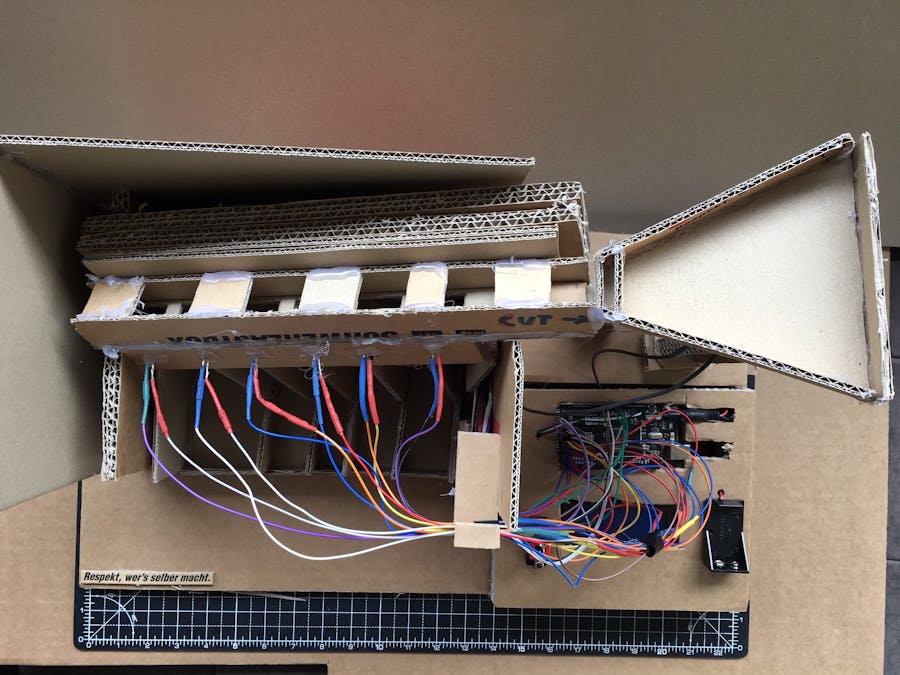
Geldsortiermaschine mit IR-Sensoren und Fotowiderstaenden/Lichtschranke zum Zaehlen des Geldbetrages
created by Gustav and Michael Engel
March/April 2020
Update:
1.4.2020>
hwardware-seitiger Umbau: Ausbau der restlichen 4 IR-Sensoren (wegen Ungenauigkeit) und Ersatz durch LED+Fotowiderstand (Lichtschranke)
3.4.2020>
Fotowiderstand #4 zur Messung der 5er ist konstant auf 1.000 (offen); unterbrochen bei ca. 1019 (closed) -> Toleranzfenster sehr klein
->Ursache: unbekannt -> zum Fix haette ich den Fotowiderstand komplett mit dem Kleber rausschneiden muessen
->war ein Fehler ohne Test das Ding einzusetzen und zu verkleben
4.4.2020>
Vergleich von 2 Varianten bzgl. der Abfrage der analogen Eingaenge (Fotowiderstand)
a) alle Eingaenge werden nacheinander durchlaufen
b) sobald ein Eingang ON (Geld festgestellt), dann werden die IF-Schleifen verlassen
->Zehn Versuche bzgl. Genauigkeit des gezaehlten Geldes machen -> bessere Variante wird genommen
5.4.2020>
Variante a) scheint die bessere Option zu sein.
Habe noch alle nicht gebracuhte Codezeilen rausgemacht
In der V4 sind alle Optionen noch enthalten und nur auskommentiert
-------
//Lessons Learned:
1. wenn das Geldstueck zu langsam ist, dann faellt es u.U. knapp vor der Lichtschranke im Spalt durch ->
durch zusaetzliche Guides aus Karton koennte man das zu frueh fallende Geldstueck in Richtung Lichtschranke lenken
4.4.2020> bisher keine Guide eingesetzt
http://www.arduino.cc/en/Tutorial/ButtonStateChange
*/
#include <Wire.h> // binde Bibliothek Wire fuer I2C ein
#include <LiquidCrystal_I2C.h> // binde Bibliothek LiquidCrystal_I2C ein
LiquidCrystal_I2C lcd(0x27,20,4); // setze LCD auf 16 Zeichen und 4 Zeilen
#define VCC5V1 30 //define Pin 30 as VCC5V for LED3
#define VCC5V2 32 //define Pin 32 as VCC5V for LED4
#define VCC5V3 34 //define Pin 34 as VCC5V for LED5
#define VCC5V4 36 //define Pin 36 as VCC5V for LED6
#define VCC5V5 38 //define Pin 38 as VCC5V for FotoDiode3
#define VCC5V6 40 //define Pin 40 as VCC5V for FotoDiode4
//---
#define VCC5V7 28 //define pin 28 as VCC5V for LED1
#define VCC5V8 26 //define pin 26 as VCC5V for LED2
//-----
#define VCC5V9 24 //define pin 24 as VCC5V for FotoDiode1
#define VCC5V10 22 //define pin 22 as VCC5V for FotoDiode2
#define VCC5V11 42 //define pin 42 as VCC5V for FotoDiode5
#define VCC5V12 44 //define pin 44 as VCC5V for FotoDiode6
//---
#define GND1 31 //define Pin 31 as Ground for LED3
#define GND2 33 //define Pin 33 as Ground for LED4
#define GND3 35 //define Pin 35 as Ground for LED5
#define GND4 37 //define Pin 37 as Ground for LED6
#define GND5 39 //define Pin 39 as Ground for FotoDiode3
#define GND6 41 //define Pin 41 as Ground for FotoDiode4
//----
#define GND7 29 //define Pin 29 as Ground for LED1
#define GND8 27 //define Pin 27 as Ground for LED2
//----
#define GND9 25 //define Pin 25 as Ground for FotoDiode1
#define GND10 23 //define Pin 23 as Ground for FotoDiode2
#define GND11 43 //define Pin 43 as Ground for FotoDiode5
#define GND12 45 //define Pin 45 as Ground for FotoDiode6
// Variables will change:
int fifty_cent_counter = 0; // counter for the number of button presses
int twenty_cent_counter = 0; // counter for the number of button presses
int five_cent_counter = 0; // counter for the number of button presses
int ten_cent_counter = 0; // counter for the number of button presses
int two_cent_counter = 0; // counter for the number of button presses
int one_cent_counter = 0; // counter for the number of button presses
double total=0;
int FotoDiode1 = 0;
int State_Diode1 =0; //hier wird der 1-0-Pegel gespeichert; es darf immer nur der 0-1-Wechsel gezaehlt werden
int FotoDiode2 = 0;
int State_Diode2 =0; //hier wird der 1-0-Pegel gespeichert; es darf immer nur der 0-1-Wechsel gezaehlt werden
int FotoDiode3 = 0;
int State_Diode3 =0; //hier wird der 1-0-Pegel gespeichert; es darf immer nur der 0-1-Wechsel gezaehlt werden
int FotoDiode4 = 0;
int State_Diode4 =0; //hier wird der 1-0-Pegel gespeichert; es darf immer nur der 0-1-Wechsel gezaehlt werden
int FotoDiode5 = 0;
int State_Diode5 =0; //hier wird der 1-0-Pegel gespeichert; es darf immer nur der 0-1-Wechsel gezaehlt werden
int FotoDiode6 = 0;
int State_Diode6 =0; //hier wird der 1-0-Pegel gespeichert; es darf immer nur der 0-1-Wechsel gezaehlt werden
//Threshold Fotowiderstand festelegen -> offene Lichtschranke
//basierend auf Prototypen-Bauzustand -> kann bei Fertigstellung durch zusaetzliche Cover mehr verdunkeln und dadurch sich veraendern
//ggf. muss nachjustiert werden -> unterschiedliche Werte koennen auch an den Toleranzen des Vorwiderstandes liegen
int threshold_diode_1 = 650; //A0 -> 1 cent
int threshold_diode_2 = 663; //A1 -> 2 cent;
//genauer Wert muss noch ermittelt werden -> bisher nur Annahmen
int threshold_diode_3 = 423; //A1 -> 10 cent;
int threshold_diode_4 = 999; //A1 -> 5 cent;
int threshold_diode_5 = 690; //A1 -> 20 cent;
int threshold_diode_6 = 832; //A1 -> 50 cent;
int threshold_tolerance = 20; //Toleranz, ab wann die Lichtschranke als Unterbrechung detektiert sein soll
void setup() {
//-------
//making 5V and GND to Digital Pins
//-------
pinMode(VCC5V1, OUTPUT);
digitalWrite(VCC5V1, HIGH);
pinMode(VCC5V2, OUTPUT);
digitalWrite(VCC5V2, HIGH);
pinMode(VCC5V3, OUTPUT);
digitalWrite(VCC5V3, HIGH);
pinMode(VCC5V4, OUTPUT);
digitalWrite(VCC5V4, HIGH);
pinMode(VCC5V5, OUTPUT);
digitalWrite(VCC5V5, HIGH);
pinMode(VCC5V6, OUTPUT);
digitalWrite(VCC5V6, HIGH);
pinMode(GND1, OUTPUT);
digitalWrite(GND1, LOW);
pinMode(GND2, OUTPUT);
digitalWrite(GND2, LOW);
pinMode(GND3, OUTPUT);
digitalWrite(GND3, LOW);
pinMode(GND4, OUTPUT);
digitalWrite(GND4, LOW);
pinMode(GND5, OUTPUT);
digitalWrite(GND5, LOW);
pinMode(GND6, OUTPUT);
digitalWrite(GND6, LOW);
//----
//--- //making 5V and GND to Digital Pins for LED
pinMode(VCC5V7, OUTPUT);
digitalWrite(VCC5V7, HIGH);
pinMode(VCC5V8, OUTPUT);
digitalWrite(VCC5V8, HIGH);
pinMode(GND7, OUTPUT);
digitalWrite(GND7, LOW);
pinMode(GND8, OUTPUT);
digitalWrite(GND8, LOW);
//-----
//--- //making 5V and GND to Digital Pins for FotoDiode
pinMode(VCC5V9, OUTPUT);
digitalWrite(VCC5V9, HIGH);
pinMode(VCC5V10, OUTPUT);
digitalWrite(VCC5V10, HIGH);
pinMode(VCC5V11, OUTPUT);
digitalWrite(VCC5V11, HIGH);
pinMode(VCC5V12, OUTPUT);
digitalWrite(VCC5V12, HIGH);
pinMode(GND9, OUTPUT);
digitalWrite(GND9, LOW);
pinMode(GND10, OUTPUT);
digitalWrite(GND10, LOW);
pinMode(GND11, OUTPUT);
digitalWrite(GND11, LOW);
pinMode(GND12, OUTPUT);
digitalWrite(GND12, LOW);
pinMode(A0, INPUT);
pinMode(A1, INPUT);
pinMode(A2, INPUT);
pinMode(A6, INPUT);
pinMode(A4, INPUT);
pinMode(A5, INPUT);
lcd.init(); // initalisiere LCD
lcd.backlight(); // Hintergrundbeleuchtung an
lcd.clear();
lcd.setCursor(0, 0); // Cursor auf Position 1, Zeile 1 (0, 0)
lcd.print("Coinsorting machine"); // senden Nachricht an LCD
lcd.setCursor(1,1);
lcd.print("50|20| 5|10| 2| 1|");
lcd.setCursor(1,2);
lcd.print(" 0 0 0 0 0 0");
lcd.setCursor(0,3);
lcd.print("total: euro");
// initialize serial communication:
Serial.begin(9600);
Serial.println("----");
//Analoge Eingaenge Fotowiderstand einlesen
FotoDiode1 = analogRead(A0);
FotoDiode2 = analogRead(A1);
FotoDiode3 = analogRead(A2);
FotoDiode4 = analogRead(A6);
FotoDiode5 = analogRead(A4);
FotoDiode6 = analogRead(A5);
//Ausgabe auf dem Seriellen Monitor
Serial.print("A0=");
Serial.println(FotoDiode1);
Serial.print("A1=");
Serial.println(FotoDiode2);
Serial.print("A2=");
Serial.println(FotoDiode3);
Serial.print("A3=");
Serial.println(FotoDiode4);
Serial.print("A4=");
Serial.println(FotoDiode5);
Serial.print("A5=");
Serial.println(FotoDiode6);
}
void loop() {
//Analoge Eingaenge Fotowiderstand einlesen
FotoDiode1 = analogRead(A0);
FotoDiode2 = analogRead(A1);
FotoDiode3 = analogRead(A2);
FotoDiode4 = analogRead(A6);
FotoDiode5 = analogRead(A4);
FotoDiode6 = analogRead(A5);
//-----------------------------------
//Variante a) -> siehe oben im Header
//-----------------------------------
if (FotoDiode1 > (threshold_diode_1+threshold_tolerance) && State_Diode1 ==0)
{
one_cent_counter++;
Serial.println("1 cent detected");
// delay(1000);
State_Diode1 = 1; //Pegel hat auf 1 gewechselt
Serial.print("A0=");
Serial.println(FotoDiode1);
}
else if (FotoDiode1 <= (threshold_diode_1+threshold_tolerance))
{
State_Diode1 = 0;
}
if (FotoDiode2 > (threshold_diode_2+threshold_tolerance) && State_Diode2 ==0)
{
two_cent_counter++;
Serial.println("2 cent detected");
// delay(1000);
State_Diode2 = 1; //Pegel hat auf 1 gewechselt
Serial.print("A1=");
Serial.println(FotoDiode2);
}
else if (FotoDiode2 <= (threshold_diode_2+threshold_tolerance))
{
State_Diode2 = 0; //Pegel wieder auf Null
}
if (FotoDiode3 > (threshold_diode_3+threshold_tolerance) && State_Diode3 ==0)
{
ten_cent_counter++;
Serial.println("10 cent detected");
// delay(1000);
State_Diode3 = 1; //Pegel hat auf 1 gewechselt
Serial.print("A2=");
Serial.println(FotoDiode3);
}
else if (FotoDiode3 <= (threshold_diode_3+threshold_tolerance))
{
State_Diode3 = 0; //Pegel wieder auf Null
}
if (FotoDiode4 > (threshold_diode_4+10) && State_Diode4 ==0)
{
five_cent_counter++;
Serial.println("5 cent detected");
// delay(1000);
State_Diode4 = 1; //Pegel hat auf 1 gewechselt
Serial.print("A3=");
Serial.println(FotoDiode4);
}
else if (FotoDiode4 <= (threshold_diode_4+10))
{
State_Diode4 = 0; //Pegel wieder auf Null
}
if (FotoDiode5 > (threshold_diode_5+threshold_tolerance) && State_Diode5 ==0)
{
twenty_cent_counter++;
Serial.println("20 cent detected");
// delay(1000);
State_Diode5 = 1; //Pegel hat auf 1 gewechselt
Serial.print("A4=");
Serial.println(FotoDiode5);
}
else if (FotoDiode5 <= (threshold_diode_5+threshold_tolerance))
{
State_Diode5 = 0; //Pegel wieder auf Null
}
if (FotoDiode6 > (threshold_diode_6+threshold_tolerance) && State_Diode6 ==0)
{
fifty_cent_counter++;
Serial.println("50 cent detected");
// delay(1000);
State_Diode6 = 1; //Pegel hat auf 1 gewechselt
Serial.print("A5=");
Serial.println(FotoDiode6);
}
else if (FotoDiode6 <= (threshold_diode_6+threshold_tolerance))
{
State_Diode6 = 0; //Pegel wieder auf Null
}
//Anzahl Geldstuecke auf LCD ausgeben
lcd.setCursor(2,2);
lcd.print(fifty_cent_counter);
lcd.setCursor(5,2);
lcd.print(twenty_cent_counter);
lcd.setCursor(11,2);
lcd.print(ten_cent_counter);
lcd.setCursor(8,2);
lcd.print(five_cent_counter);
lcd.setCursor(14,2);
lcd.print(two_cent_counter);
lcd.setCursor(17,2);
lcd.print(one_cent_counter);
//Berechne den Gesamtbetrag
total=fifty_cent_counter*0.5+twenty_cent_counter*0.2+ten_cent_counter*0.1+five_cent_counter*0.05+two_cent_counter*0.02+one_cent_counter*0.01;
//Gesamtbetrag auf LCD ausgeben
lcd.setCursor(7,3);
lcd.print(total);
}


Comments