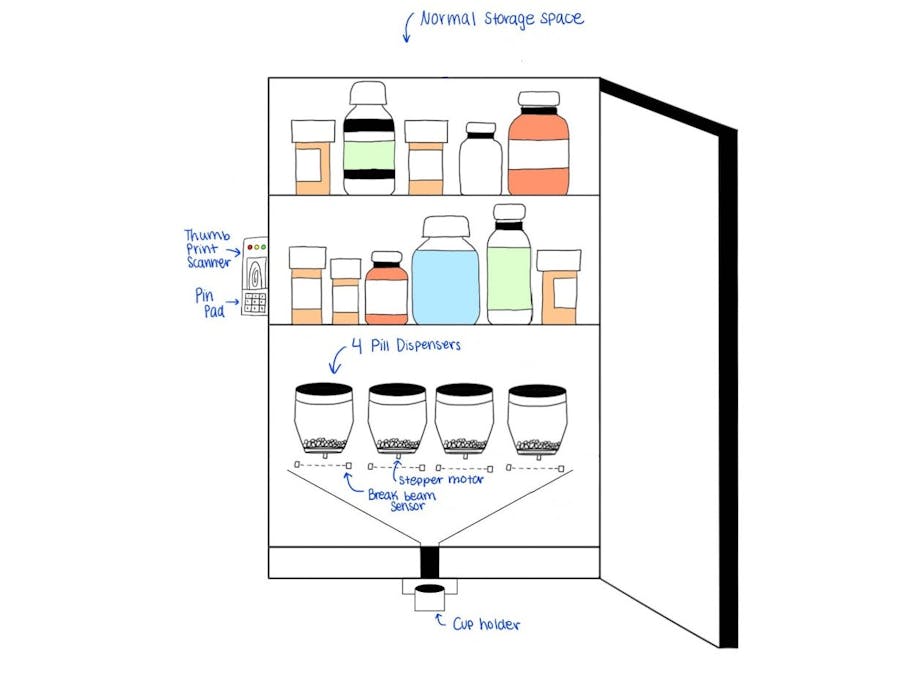
Matthew Gryzlo
Published © GPL3+

Smart Medicine Cabinet

Need to remember when you took your pills? Looking for a place to put all your medication and other toiletries? We've got the solution.

AdvancedWork in progress10 hours937
Smart Medicine Cabinet

Things used in this project

Hardware components

WROOMBEE -  ESP32 WROOM Xbee form factor
EngeBOT Technology WROOMBEE - ESP32 WROOM Xbee form factor
×1
Real Time Clock (RTC)
×1
180:1 Mini Plastic Gearmotor, 90° 3mm D-Shaft Output
×3
DRV8835 Dual Motor Driver Carrier
×3
Adafruit IR Break Beam Sensor - 3mm LEDs
×4
Adafruit Hall effect sensor - US5881LUA
×3
Adafruit High-strength 'rare earth' magnet
×3
Pololu Universal Aluminum Mounting Hub for 3mm Shaft, #2-56 Holes (2-Pack)
×2
DC12V AC Adapter
×1
Texas Instruments IC BATT CHARGE LI-ION/POL 24VQFN
×1
Samsung 25R 18650 2500mAh 20A Battery
×3
Pure Nickel Strip- 0.15x6x50mm
×1
onsemi LDO Voltage Regulators ANA 1.0 LDO REGULATOR
×1
Texas Instruments IC REG BUCK ADJ 2A DL 16HTSSOP
×1
SparkFun CAPACITIVE FINGERPRINT SCANNER
×1
Adafruit SOLENOID PULL 12V
×1

Story

Read more

Schematics

Power System

This is the power system used to power the Smart Medicine Cabinet

Code

Hello World

C/C++
Code to test the ESP32
#include <stdio.h>
#include "freertos/FreeRTOS.h"
#include "freertos/task.h"
#include "esp_system.h"
#include "esp_spi_flash.h"

//Function declarations
//void test_motors(void);
//void setupKeypad();


void app_main()
{
	//SETUP GPIOS TO MOTORS/KEYPAD


	//CALL TEST MOTORS BELOW
	//test motors();


	//THE FOLLOWING RUNS A "HI WOLF" Program
    printf("Hi wolf!\n");
    /* Print chip information */
    esp_chip_info_t chip_info;
    esp_chip_info(&chip_info);
    printf("This is ESP32 chip with %d CPU cores, WiFi%s%s, ",
            chip_info.cores,
            (chip_info.features & CHIP_FEATURE_BT) ? "/BT" : "",
            (chip_info.features & CHIP_FEATURE_BLE) ? "/BLE" : "");
    printf("silicon revision %d, ", chip_info.revision);
    printf("%dMB %s flash\n", spi_flash_get_chip_size() / (1024 * 1024),
            (chip_info.features & CHIP_FEATURE_EMB_FLASH) ? "embedded" : "external");
    for (int i = 10; i >= 0; i--) {
        printf("Restarting in %d seconds...\n", i);
        vTaskDelay(1000 / portTICK_PERIOD_MS);
    }
    printf("Restarting now.\n");
    fflush(stdout);
    esp_restart();
}

GPIO Skeleton

C/C++
Code for setting up the GPIO
#include <stdio.h>
#include <string.h>
#include <stdlib.h>
#include "freertos/FreeRTOS.h"
#include "freertos/task.h"
#include "freertos/queue.h"
#include "driver/gpio.h"

//Configure GPIO 2 as output
#define GPIO_OUTPUT_IO_0 	2
#define GPIO_OUTPUT_PIN_SEL  ((1ULL<<GPIO_OUTPUT_IO_0))// | (1ULL<<GPIO_OUTPUT_IO_1)) use this if you want to configure more than one

//Function dec
void setupGPIO(gpio_config_t);


void setupGPIO(gpio_config_t io_conf)
{

		 //SET ALL PINS THAT YOU NEED AS OUTPUT AND CONFIG
		 //set as output mode
		 io_conf.mode = GPIO_MODE_OUTPUT;
		 //bit mask of the pins that you want to set,e.g.GPIO18/19
		 io_conf.pin_bit_mask = GPIO_OUTPUT_PIN_SEL;	//this is the pin I selected
		 //disable pull-down mode
		 io_conf.pull_down_en = 0;
		 //disable pull-up mode
		 io_conf.pull_up_en = 0;
		 //configure GPIO with the given settings 	(Pass in the address of io_conf after all settings reset)
		 gpio_config(&io_conf);


		 //SET ALL PINS THAT I NEED AS INPUT AND CONFIG AGAIN:


}


void app_main(void)
{

	//Create an instance of io configuration and setupGPIO
	gpio_config_t io_conf;
	setupGPIO(io_conf);

	//Turns on and off
	int cnt = 0;
	    while(1) {
	        printf("cnt: %d\n", cnt++);
	        vTaskDelay(1000 / portTICK_RATE_MS);
	        gpio_set_level(GPIO_OUTPUT_IO_0, cnt % 2);

	    }
}

Credits

Matthew Gryzlo

Matthew Gryzlo

2 projects • 0 followers

Comments