

Hardware components | ||||||
 |
| × | 1 | |||
 |
| × | 1 | |||
 |
| × | 1 | |||
| × | 1 | ||||
 |
| × | 8 | |||
 |
| × | 1 | |||
Software apps and online services | ||||||
 |
| |||||
Seven Segment LED Displays are found in all kinds of devices from clocks and other appliances to instrument panels. They can show time, temperature, speed, direction, capacity (is the tank half full or half empty?) and many other types of information about things we want to monitor.
The purpose of this tutorial is to help you discover:
- How Seven Segment LED Displays work
- How to make one work in your project
This is a very basic introduction to Seven Segment LED Displays intended to help you to take a random single digit display and make it work even if you don't have any specific information. The display I am using, for example, was picked out of my spare parts collection and looks very similar to this one:
The difference between the picture and the display I will be using is that the number stamped on mine is 5161BS and that is all I know about it so far. You may already have a How-To, tutorial or FAQ that describes your display, but if you don't, a Google search on anything that looks like a part number on the display should come up with enough information to get started. My very first search result for "5161BS" returned a six page data sheet that clearly described everything I need to know about using this display and more.
Let's assume, however, that the search did not turn up anything useful and we will have to get this thing working without any additional information. We can start by outlining some of the properties that apply to these displays in general:
There are two main types of 7 Segment LED Displays:
- Common Anode: In this type of display, a positive voltage source is shared by the display segments. Segments are lit by setting their individual pins to Ground.
- Common Cathode: A common path to ground is shared by the segments. Individual segments are lit when their pin receives sufficient positive voltage.
The idea behind having a common cathode or anode display is that by sharing either positive voltage or a path to ground, fewer pins are necessary than if every segment had it's own pair of cathode and anode pins. Because most displays also include a decimal point, colon or apostrophe, there are usually eight segments, seven for the digit and one for punctuation. With one common pin, there should be at least 9 pins. However, when I counted the pins on my 5161BS display, there were 10 -- five on the bottom row and five on the top. As it turns out, there are usually an even number of pins on these displays, with the "extra" pins being tied together as part of the "common" set.
Mapping the Display PinsThe pins are numbered similarly to Integrated Circuits. From your bottom left, the first pin is number 1 and the numbering continues sequentially in a counterclockwise direction with pin 5 being at the bottom right, pin 6 at the upper right and concluding with pin 10 at the upper left. Many single digit 10 pin displays have the common pins in the center position of each row. Let's pretend we don't know this and determine the pin mapping by inspection. Prepare a test circuit according to this diagram:
Begin with a power source. I suggest using between +3.6VDC to +5VDC power and a ground from batteries or a bench top power supply. Run both the power and ground to their respective horizontal rail rows at the top of your breadboard. Connect a resistor from the power rail to an unused column of the breadboard. It doesn't matter which way the resistor is oriented. I am using a 220 Ohm resistor in this example, but anything in the range of 180 to 1,000 Ohms should work for mapping the display pins. We are limiting current flow with the resistor to protect LEDs in the segments from burning out.
Position the 7 Segment Display so that the top row of pins are separated from the lower pins by the center gutter that divides the breadboard. Then connect a jumper wire from the resistor to pin 1 of the display. Finally, touch a jumper from the ground rail to pin 2 of the display as shown on the above diagram.
What happened? Probably nothing -- and that is OK. This could be due to several reasons:
- Each segment of the display consists of at least one Light Emitting Diode or LED that only lights up when positive voltage is applied to the anode and there is a path to ground at the cathode. If your test connection polarity is backwards, nothing will happen.
- It is also likely, particularly at the beginning of the test, that your jumpers are not connected to the same segment, in which case there is no circuit and nothing will light up either.
- Both of the jumpers could be on common pins. Remember, we need to have a power jumper on the anode side of a segment and the ground jumper on the cathode before that segment will light.
If none of the segments light up at first attempt, leave the power jumper connected to Display pin 1 and step the ground jumper pin-by-pin counterclockwise from pin 3 to pin 10, observing the display. If none of the segments light, restart the test with the ground jumper connected to pin 1 and the power jumper at pin 2.
When the first individual segment lights up, you have most likely discovered a common pin. Note the relation of pins with respect to the lit segment and leave the jumper you have been moving connected to this common pin and begin moving the other jumper to empty pins counter-clockwise from pin 1 to pin 10, mapping the pins to the segments lettered A through G and Dp. Once the segments start lighting, you may encounter another common pin which will not light a segment. Use the following diagram to map the segments:
Here is an example of completed maps for a Common Cathode and Common Anode Seven Segment LED Displays:
With the mapping completed, we can begin wiring the display. The 5161BS display I am working with happens to be of the Common Anode variety, so I put one red jumper between the Arduino Uno's +5V power pin to pin 3 (VCC) of the display. It is not necessary to also connect the VCC pin 8 on the display to +5V as pins 3 and 8 are tied together internally. The rest of the wiring is as follows:
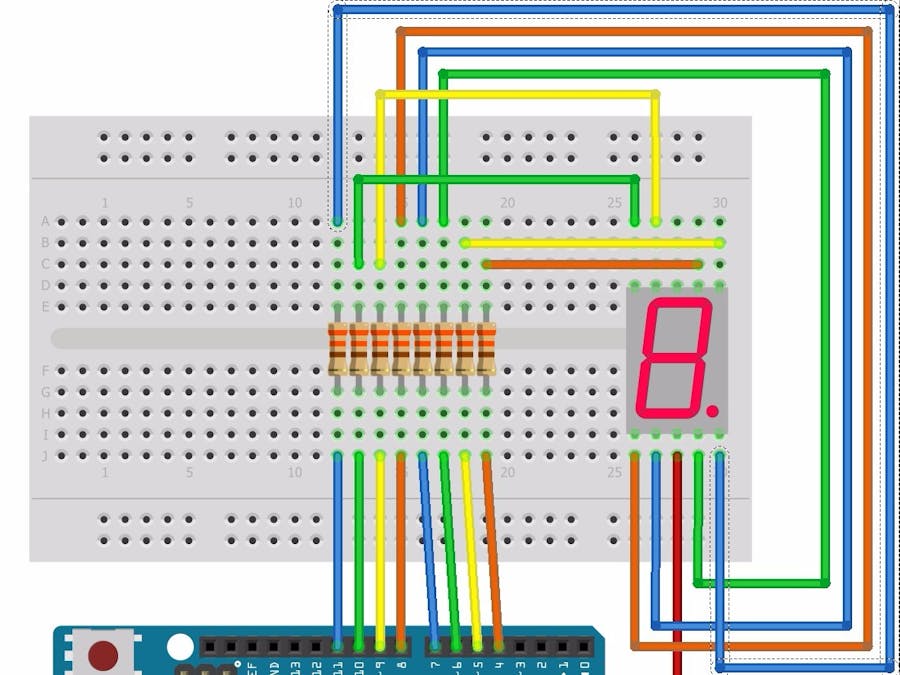
When completed, the wiring for this tutorial using the 5161BS Display should look like the following Fritzing diagram:
The program is divided into several sections:
- Global Declarations -- The values of Constants and Variables defined here are available throughout the entire sketch.
- Setup -- I/O pins are initialized and then every segment of the display is test lit sequentially.
- Loop -- This section repeats continuously, exercising the display with a progression of alphanumeric digits, characters and punctuation.
- User Defined Functions -- Two functions that update the display and map alphanumeric characters to the appropriate segments.
Three types of Declarations are made in this section:
- 8 Arduino I/O pins are sequentially associated with the eight Display Segments. While these pin assignments can be changed, the program logic depends on the pin numbers being in unbroken order, in this case, pins 4 through 11.
- Declaration of Display as Common Anode or Common Cathode. The appropriate line for the constant "common" should be un-commented and the other line commented out or removed. This should be the only code change necessary if the tutorial is completed as written. The sketch is already set up for a Common Anode Display.
- The Boolean Variable, decPt, used to control display of the Decimal Point is set to "true".
The Setup code block is executed one time following the Global Declarations and does the following:
- The eight Arduino I/O pins are initialized for OUTPUT in sequential order (4 to 11) inside a for loop. This is the reason the pins have to be in contiguous order. If different pin assignments have to made, this loop will need to be changed to suit the new arrangement.
- As each I/O pin is initialized, the display segment that is connected to that I/O pin through a resistor, is lit. This results in all 8 segments lighting up sequentially, with a 1/2 second pause between segments, until the entire display is lit.
The main work of the sketch is done here and once entered, following Setup, the Loop code block repeats endlessly until power is shut off or a necessary component is removed or fails.
At the beginning of each cycle through the Loop code block, the Global Decimal Point display variable, decPt, is flipped so that every time the program repeats the loop, the decimal point alternates between on and off.
The remainder of the Loop code block is another for loop that increments the local variable, i, from 0 to 15 and does the following:
- Calls the User Defined Function, myfnNumToBits, with the current value of the local integer variable i, as an argument. The function returns the byte initialized variable, bits, which consists of an 8 bit representation of the segments needed to display the alphanumeric character associated with the current value of i.
- The value of the Global variable, decPt, is checked and if true, the rightmost bit (LSB) of the local variable, bits is set to 1, which indicates the decimal point is to be displayed.
- The User Defined Function, myfnUpdateDisplay is then called with the value of the local variable, bits as an argument. When the display is updated, the program pauses for 3/4 of a second before continuing.
myfnNumToBits
This function uses a bitmap lookup table to retrieve combinations of display segments that define numbers and some letters. Not every letter can be represented on a 7 Segment LED display, so we will limit the example to the digits 0 to 9 and the letters A, b, C, d, E and F, which can represent Hexadecimal numbers plus abbreviations for Celsius and Fahrenheit temperature.
This is the resulting bitmap lookup table:
The first column of the display is for the characters to be mapped. The next 8 columns are labeled A-Dp and represent the individual segments. The 1s and 0s on each row indicate the segments to be lit in order to display the character. A 1 indicates the segment should be lit while segments with a 0 are not lit. The 1s and 0s for any character row are combined into a bitmap that will be sent to the display. The last column represent the Decimal (base 10) value of each row's bit map. Note that the Dp column is always 0.
The myfnNumToBits function is passed an integer in the range of 0 to 15 when called from the loop() code block. Any other value will be treated as an error and the display will show three horizontal bars. A switch-case code block is used to assign the proper combination of 8 bits to a byte which is then returned from the function.
myfnUpdateDisplay
This user-defined function accepts a single byte argument, eightBits, when called from the Loop code block and deconstructs it into individual bit values using the built-in function, bitRead(). The bits are read starting at bit 7 (MSB) and ending with bit 0 (LSB) by decrementing the local variable, thisBit.
Once a bit is read, the value of the Global variable, common, is checked and the bit is flipped for common anode displays before being used to set the appropriate I/O pin in the range segA (MSB) to segP (LSB). When all eight segments have been updated the display should show the proper alphanumeric character and decimal point, if appropriate. Program control is then returned to the Loop code block.
SummaryThe purpose of this tutorial is to demonstrate, as clearly as possible, how Seven Segment LED Displays work, suggest some methods for determining how to discover the properties of a randomly selected display and test. The wiring example demonstrated, in the interest of simplicity, will not scale well for a production application as it uses too many I/O pins. I suggest looking into using shift registers, which is the subject of the next tutorial in this series, "7 Segment LED Displays 102 -- Using a Shift Register".


_3u05Tpwasz.png?auto=compress%2Cformat&w=40&h=40&fit=fillmax&bg=fff&dpr=2)
Comments