Various options available. A food storage container with latching lid was used. This is to protect the temperature and humidity photon, battery, and components from the elements. A clear enclosure was selected to allow light to the photo cell.
×
1
LightMe Portable 15W 130lm Solar LED Light Bulb
This was used for its battery, solar panel, and charging circuit.
Graphs temperature, humidity, light levels, and battery voltage over time.
Hand tools and fabrication machines
Soldering iron (generic)
Story
A Quick Video Description of the Project
What It Is
Morning routines can be rushed, often times leading to inappropriate clothing choices. The ability to make informed attire decisions is critical for the day's success. Watching the morning news or pulling up a weather app slows the process of getting ready. The Temperature Mirror allows the user to quickly make weather based decisions without routine interruption.
The Temperature Mirror uses a Particle Photon as a weather station to collect temperature, humidity, and light data. The Photon publishes this data to the cloud using unique variable names. A second Photon subscribes to the first Photon’s event. The weather data is displayed on an OLED and mounted behind a one way mirror.
Weather Station Setup
The following items are required for the weather station setup:
One weatherproof enclosure
One breadboard or prototype board
One Particle Photon
Three resistors (arbitrary values)
One photoresistor
One DHT11 breakout board (or make your own circuit)
One LiPo battery cell (hacked from a solar LED light)
One solar cell (hacked from a solar LED light)
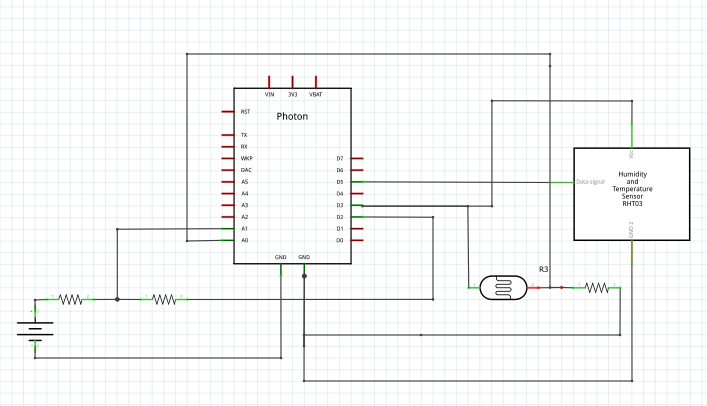
The wiring is fairly straight forward:
Two resistors are used as a voltage divider to detect battery voltage at an analog pin. Voltage is fed through the voltage divider since it is over 3.3 V at full charge. This allows the Photon to detect voltage half that of the battery's full charge if set up with matching resistors, and programmatically calibrate it to the true voltage. Note that the ground for the voltage divider exists on a digital pin otherwise the battery would continue to drain to ground through the resistors.
A photocell is placed in a voltage divider to detect ambient light levels. Light levels are used for error states when the battery fails to charge. In the event it is dark or cloudy, and the battery voltage falls below optimal levels, the Photon will enter deep sleep mode for a longer period than for the standard loop operation. This will provide the solar cell the opportunity to catch back up when light is available.
A DHT11 is wired to two digital pins and ground. One digital pin provides power, and the other collects temperature and humidity data. The Photon ground in is used as writing a digital pin as low for ground resulted in too many losses for reliable operation of the DHT11 breakout board.
The solar panel and battery are wired to the positive and negative side of one BUS and provide power to the Photon through Vin and ground pins.
Some issues that were encountered along with way was a poor solder connection at the battery cell. The battery was opened up, and both positive and negative multi-strand leads re-soldered and replaced with solid core wires. The length was extended and looped back along the side of the battery before taping in place with Gorilla tape. This will reduce stress on the solder joints in the even maintenance needs to be performed, or something needs to be moved.
Broken Negative Battery Lead
Longer Solid Core Battery Leads
Weather Station Outdoors
Weather Station Internal Closeup
Mirror Setup
The following items are required for the mirror setup:
One 12” by 12” one way mirror
One 12” by 12” shadow box
One Particle Photon
Four rainbow jumper wires
One OLED (0.96”)
One breadboard
The shadow box’s glass pane is removed and replaced with the one way mirror. The breadboard is then mounted onto the back of the mirror. Next, the Photon is mounted on the breadboard and connected to the OLED as follows: Vin to Vcc, GND to GND, D0 to SDA, and D1 to SCL. The OLED is secured inside of the shadow box with tape and the shadow box is closed up.
Issues encountered along with way with the OLED display involved the Particle libraries. Including the Adafruit Graphics and SSD1306 libraries through Particle IDE resulted in a directory error. We simply copied the libraries in their entirety and pasted them directly into the project code.
OLED Libraries Copied Into the Project
Breadboard Mounted to Shadow Box
OLED Mount to Mirror
Final Mirror Display
ThingSpeak Output
Data is plotted in ThingSpeak. Currently no MATLAB Analysis is implemented on this channel, and the variables are simply monitored over time. JSON integration is used, following the guide by Hans and Robert Mawrey.
This code is used to display weather data to an OLED on a Photon indoors.
/* Power on USB * +-----+ * +----------| USB |----------+ * | +-----+ * | * To OLED Vcc | [*] VIN 3V3 [ ] | * To OLED Gnd | [*] GND RST [ ] | * | [ ] TX VBAT [ ] | * | [ ] RX [S] [R] GND [ ] | * | [ ] WKP D7 [ ] | * | [ ] DAC +-------+ D6 [ ] | * | [ ] A5 | * | D5 [ ] | * | [ ] A4 |Photon | D4 [ ] | * | [ ] A3 | | D3 [ ] | * | [ ] A2 +-------+ D2 [ ] | * | [ ] A1 D1 [*] | To OLED SCL * | [ ] A0 D0 [*] | To OLED SDA * | | * \ [] [______] / * \_______________________/ * * */#include"application.h"#include"Adafruit_GFX.h"#include"Adafruit_SSD1306.h"// OLED//Use I2C with OLED RESET pin on D4#define OLED_RESET D4Adafruit_SSD1306oled(OLED_RESET);unsignedlongpreviousMillis;unsignedlonginterval=30000;// Define temperature, humidity, and light variables for later useinttemperature;inthumidity;intlight;// bool lowVolts; // Low voltage display, not currently workingvoidsetup(){//OLED// by default, we'll generate the high voltage from the 3.3v line internally.// initialize with the I2C addr 0x3D (for the 128x64)oled.begin();//oled.display(); // uncomment to show Adafruit splashscreen on start.Time.zone(-4);// Set Eastern timezone.// lowVolts=0; // set low volt initial state. Not currently working.}voidloop(){// DataParticle.subscribe("t49megr3171temperature",Temp_Handler);Particle.subscribe("t49megr3171humidity",Humidity_Handler);Particle.subscribe("t49megr3171light",Light_Handler);// Particle.subscribe("t49megr3171LowVoltage", Low_Voltage); // Low voltage handler, not currently functional.//OLED Timeoled.clearDisplay();delay(200);oled.setTextSize(2);oled.setTextColor(WHITE);oled.setCursor(0,0);oled.print("Time");oled.setCursor(0,32);oled.setTextSize(3);oled.print(Time.format(Time.now(),"%I:%M%p"));;oled.setTextColor(BLACK,WHITE);// 'inverted' textoled.display();delay(2500);// OLED Tempoled.clearDisplay();delay(200);oled.setTextSize(2);oled.setTextColor(WHITE);oled.setCursor(0,0);oled.print("Temp.");oled.setCursor(0,32);oled.setTextSize(3);oled.print(String(temperature)+" F");oled.setTextColor(BLACK,WHITE);// 'inverted' textoled.display();delay(2500);// OLED Humidityoled.clearDisplay();delay(200);oled.setTextSize(2);oled.setTextColor(WHITE);oled.setCursor(0,0);oled.print("Humidity");oled.setCursor(0,32);oled.setTextSize(3);oled.print(String(humidity)+"%");oled.setTextColor(BLACK,WHITE);// 'inverted' textoled.display();delay(2500);// OLED Humidityoled.clearDisplay();delay(200);oled.setTextSize(2);oled.setTextColor(WHITE);oled.setCursor(0,0);oled.print("Light");oled.setCursor(0,32);oled.setTextSize(3);oled.print(String(light)+"%");oled.setTextColor(BLACK,WHITE);// 'inverted' textoled.display();delay(2500);if((temperature==0)&&(humidity==0)){oled.clearDisplay();delay(200);oled.setTextSize(2);oled.setTextColor(WHITE);oled.setCursor(0,0);oled.print("Error");oled.setCursor(0,24);oled.setTextSize(1);oled.print("Temp. = Humidity = 0");oled.setCursor(0,48);oled.setTextSize(1);oled.print("Check Sensor");oled.setTextColor(BLACK,WHITE);// 'inverted' textoled.display();delay(2500);}/* -- Low voltage display, not currently working if(lowVolts==1){ oled.clearDisplay(); delay(200); oled.setTextSize(3); oled.setTextColor(WHITE); oled.setCursor(0,0); oled.print("CHECK"); oled.setCursor(0,16); oled.setTextSize(3); oled.print("BATTERY"); oled.setCursor(0,32); oled.setTextSize(3); oled.print("VOLTS"); oled.setTextColor(BLACK, WHITE); // 'inverted' text oled.display(); delay(2500); } */}// Retrieve and convert the temperature data to an integervoidTemp_Handler(constchar*event,constchar*data){Serial.println(String(data)+"F");Stringk=data;temperature=k.toInt();}// Retrieve and convert the humidity data to an integervoidHumidity_Handler(constchar*event,constchar*data){Serial.println(String(data)+"%");Stringk=data;humidity=k.toInt();}// Retrieve and convert the light level data to an integervoidLight_Handler(constchar*event,constchar*data){Serial.println(String(data)+"%");Stringk=data;light=k.toInt();}// Low voltage handler - Not currently working./*void Low_Voltage(const char *event, const char *data){ if (strcmp(data,"Low Volts")==1){ lowVolts=1; } else if (strcmp(data,"Low Volts, Low Light")==1){ lowVolts=1; } else{ lowVolts=0; }}*/
Temperature/Humidity Station
C/C++
This is the code for the Photon which is used to sense temperature and humidity data. It also self monitors voltage, and light level to help determine which sleep state to use.
/* This sketch experiments with battery & solar power for use with a temperature and humidity sensor. A photocell isimplemented to monitor light levels, and battery voltage is checked as well. A DHT11 digital temperature and humidityis used; however, it would be equally feasible to use other sensors in the DHT family or a BME280 for greater accuracyand additional featuresThe DHT data line goes to pin 5.Currently setup for use with a DHT11Light sensor voltage is taken from pin A0Battery voltage is tested at pin A1System power taken from a digital pin to prevent battery drain during sleep * +-----+ * +----------| USB |----------+ * | +-----+ * | * | [ ] VIN 3V3 [ ] | * | [ ] GND RST [ ] | * | [ ] TX VBAT [ ] | * | [ ] RX [S] [R] GND [*] | * | [ ] WKP D7 [ ] | * | [ ] DAC +-------+ D6 [ ] | * | [ ] A5 | * | D5 [*] |------ DHT Signal * | [ ] A4 |Photon | D4 [ ] | * | [ ] A3 | | D3 [*] |------ Voltage Supply Pin (set high) * | [ ] A2 +-------+ D2 [*] |------ Voltage Test Ground * Battery Voltage Sense----| [*] A1 D1 [ ] | * Light Sensor -----| [*] A0 D0 [ ] | * | | * \ [] [______] / * \_______________________/ * * *//* begin particle webhook code snippit to add to particle webhook interface on console // For thingspeak: { "api_key": "{{k}}", "field1": "{{1}}", "field2": "{{2}}", "field3": "{{3}}", "field4": "{{4}}", "field5": "{{5}}", "field6": "{{6}}", "field7": "{{7}}", "field8": "{{8}}", "lat": "{{a}}", "long": "{{o}}", "elevation": "{{e}}", "status": "{{s}}" }}*/// Add the OLED and temp/humidity sensor libraries#include"application.h"#include"Adafruit_GFX.h"#include"Adafruit_SSD1306.h"#include<Adafruit_DHT.h>// DHT parameters#define DHTPIN 5#define DHTTYPE DHT11// This is the code for the OLED if you want to use the temp/humidity station photon to simply display/publish indoor temperature data. // Uncomment if you want to use the OLED with this portion of the program. It could be useful to check sensors working without opening a browser.// OLED/*//Use I2C with OLED RESET pin on D4 #define OLED_RESET D4 Adafruit_SSD1306 oled(OLED_RESET);unsigned long previousMillis;unsigned long interval = 30000;*/// Variablesinttemperature;inthumidity;intlight;floatvoltage;intvsup=D3;// This will be used to supply voltage to the DHT11 and photoresistorintsysdgnd=D2;// Inadequate voltage from the GPIO pin due to losses using this setup to power the DHT11. Can still ground photocell and voltage read.intvbatt_pin=A1;// Pin A1 will test battery voltageintlight_sensor_pin=A0;// Assign light sensor pinlongsleeptime=1200;// Sleep for 15 minutes/900 seconds 10 minutes/1200s 30 minutes/1800sconstStringkey="YOUR_API_KEY_HERE";// Setup DHT sensor pin for use with librariesDHTdht(DHTPIN,DHTTYPE);// Begin the setup loopvoidsetup(){// Start DHT sensordht.begin();Serial.begin(9600);pinMode(vsup,OUTPUT);// Setup voltage supplypinMode(sysdgnd,OUTPUT);// Setup system ground//OLED// oled.begin(); // initialize with the I2C addr 0x3D (for the 128x64)// oled.display(); // show splashscreenTime.zone(-4);}voidloop(){// Turn on the system. Delay for sensors to stabilize.digitalWrite(vsup,HIGH);digitalWrite(sysdgnd,LOW);delay(1000);// Temperature measurement taken from sensortemperature=dht.getTempFarenheit();delay(500);// Humidity measurement taken from sensorhumidity=dht.getHumidity();// Light level measurement. Note this is simply a voltage divider with an appropriate resistor & photocell.floatlight_measurement=analogRead(light_sensor_pin);light=(int)(light_measurement/4096*100);// Battery voltage measurementfloatvolt_measurement=analogRead(vbatt_pin);// Serial.println(volt_measurement);Particle.publish("volt_measurement",String(volt_measurement));voltage=(float)(2*volt_measurement*3.3/4096*4.08/4.029);// Publish data to thingSpeakParticle.publish("thingSpeakWrite_All","{ \"1\": \""+String(temperature)+"\","+"\"2\": \""+String(humidity)+"\","+"\"3\": \""+String(light)+"\","+"\"4\": \""+String(voltage)+"\","+// "\"5\": \"" + String(var5) + "\"," +"\"k\": \""+key+"\" }",60,PRIVATE);delay(1000);// Publish data for a buddy's photon, could pull from ThingSpeak if desired? (work in progress)boolpubtemp=Particle.publish("t49megr3171temperature",String(temperature));delay(1000);boolpubhum=Particle.publish("t49megr3171humidity",String(humidity));delay(1000);boolpublit=Particle.publish("t49megr3171light",String(light));delay(1000);boolpubv=Particle.publish("t49megr3171voltage",String(voltage));delay(1000);// Extra sleep on low voltage. Even more on low light. Try to recover some voltage. Send notification to IFTTT maybe? Haven't gotten that far.if(voltage<3.65){lowVoltageSleep();}if((pubtemp==TRUE)&&(pubhum==TRUE)&&(publit==TRUE)&&(pubv==TRUE)){System.sleep(SLEEP_MODE_DEEP,sleeptime);}/* Uncomment to set up with OLED. Be sure to comment out sleep mode if you want to display to the OLED. //OLED Time oled.clearDisplay(); delay(200); oled.setTextSize(2); oled.setTextColor(WHITE); oled.setCursor(0,0); oled.print("Time"); oled.setCursor(0,32); oled.setTextSize(3); oled.print(Time.format(Time.now(), "%I:%M%p")); oled.setTextColor(BLACK, WHITE); // 'inverted' text oled.display(); delay(2500); // OLED Temp oled.clearDisplay(); delay(200); oled.setTextSize(2); oled.setTextColor(WHITE); oled.setCursor(0,0); oled.print("Temp."); oled.setCursor(0,32); oled.setTextSize(3); oled.print(String(temperature) + " F"); oled.setTextColor(BLACK, WHITE); // 'inverted' text oled.display(); delay(2500); // OLED Humidity oled.clearDisplay(); delay(200); oled.setTextSize(2); oled.setTextColor(WHITE); oled.setCursor(0,0); oled.print("Humidity"); oled.setCursor(0,32); oled.setTextSize(3); oled.print(String(humidity) + "%"); oled.setTextColor(BLACK, WHITE); // 'inverted' text oled.display(); delay(2500); // OLED Humidity oled.clearDisplay(); delay(200); oled.setTextSize(2); oled.setTextColor(WHITE); oled.setCursor(0,0); oled.print("Light"); oled.setCursor(0,32); oled.setTextSize(3); oled.print(String(light) + "%"); oled.setTextColor(BLACK, WHITE); // 'inverted' text oled.display(); delay(2500); */}// End of loop// Low voltage, so sleep extra long. Hopefully recover some extra battery. Sleep even longer with low light.voidlowVoltageSleep(){if(light<45)lowLightSleep();elseParticle.publish("t49megr3171LowVoltage",String("Low Volts"));System.sleep(SLEEP_MODE_DEEP,4*sleeptime);}voidlowLightSleep(){Particle.publish("t49megr3171LowVoltage",String("Low Volts, Low Light"));System.sleep(SLEEP_MODE_DEEP,10*sleeptime);}
ThingSpeak WebHook
JSON
This is the JSON webhook for ThingSpeak integration


Comments