

Hardware components | ||||||
 |
| × | 1 | |||
 |
| × | 4 | |||
| × | 1 | ||||
| × | 1 | ||||
Software apps and online services | ||||||
 |
| |||||
Hand tools and fabrication machines | ||||||
| ||||||
| ||||||
In this project we will be be using an MSP430 G series microcontroller to make a simple LED accent for clothing or backpack. You can also use the same project with ultra bright LEDs to make a flashlight or headlamp.
LED Accent project
BOM:
• MSP430G2553 (included with MSP430G2 LaunchPad)
• Mini breadboard - http://www.makershed.com/products/mini-breadboards
• Coin cell Breakout board with Switch - https://www.adafruit.com/products/1871
• up to 8x LEDs (your choice of colors) - https://www.sparkfun.com/products/12062
• CR2032 battery
LED Mini Flashlight project
BOM:
• MSP430G2553 (included with MSP430G2 LaunchPad)
• Mini breadboard - http://www.makershed.com/products/mini-breadboards
• Coin cell Breakout board with Switch - https://www.adafruit.com/products/1871
• 4x ultra bright white LEDs - http://www.adafruit.com/products/754
• CR2032 battery
You will also need some scissors to trim your LED pins. You may also need some adhesives or fasteners (glue, tape, string, thread, wire) to mount the LEDs to your item
The activity will involve adding an LED accent / mini flashlight to a headscarf or hat or backpack. This means we want to keep the project small so it is easy to embed in our clothing and wearables. We will also want it battery powered so that it can be wire free and keep its small size. Because we are using the low power MSP430, a coin cell battery (the popular CR2032) will do nicely. You can also use two AAA or AA batteries (combined in series they make 3V which is enough to power the MSP430) if you want more battery life over less space and weight saving.
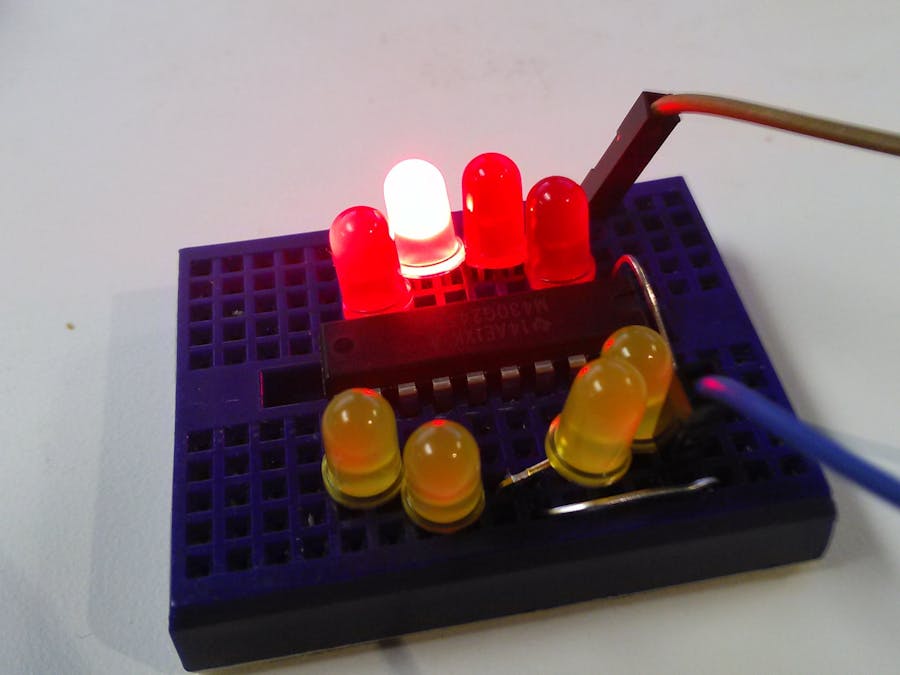
The best option we will find is to program the MSP430G2553 (or similar) microcontroller. This is a great device because it utilizes a DIP package that can be removed from the LaunchPad after programming and be placed on a solderless breadboard (we can use a mini breadboard to keep it compact).
The first step will be to program the microcontroller on the LaunchPad. You can use the sample code as a getting started point. If you want to make more LED sequences, you can define some new custom functions.
Download Energia if you don't have it and set up the drivers for you LaunchPad. Open up the Energia IDE. Make sure you have the drivers installed for the MSP-EXP430G2 LaunchPad. Go ahead and copy and paste the sample program into Energia. Select MSP430G2553 from Tools > Board, and select the right COM port from Tools > Serial Port. Click the upload button. to flash the code.
Next take the microcontroller chip out of the LaunchPad (use an IC Puller or another tool like pliers to cleanly remove it - If you use your hands you can bend the legs and break them) and embed it on their breadboard. The microcontroller can control up to 8 LEDs by itself.
Now you can add your LEDs. Trim your LED legs so they can mount closely to the breadboard. You notice with LEDs that one leg is longer than the other. Go ahead an trim at a diagonal so you can still tell the difference between the legs. An LED only work in one direction so it's important to plug it in correctly, but if it's not lighting up then just run it the other way. Keep the legs, don't throw them away. We can use them later to hook up things.
Pin 2 | + LED 1
Pin 3 | - LED 1
Pin 4 | + LED 2
Pin 5 | - LED 2
Pin 6 | + LED 3
Pin 7 | - LED 3
Pin 8 | + LED 4
Pin 9 | - LED 4
Pin 10 | -
Pin 11 | + LED 5
Pin 12 | - LED 5
Pin 13 | + LED 6
Pin 14 | - LED 6
Pin 15 | + LED 7
16 is RESET - Needs to be held HIGH
17 is TEST
Pin 18 | - LED 7
Pin 19 | + LED 8
Pin 20 | - LED 8
Plug the coin cell breakout to the bread board on the side with a notch. You can use the legs you cut from the LEDs to connect 3V and GND to the MSP430. You also need to connect Pin 16 to VCC for the MSP430 to start properly.
And that's it! You should have your LEDs lighting up.
Use it directly to accent various items. Put it inside of items to illuminate the interior.


Comments