

Hardware components | ||||||
| × | 1 | ||||
Software apps and online services | ||||||
 |
| |||||
 |
| |||||
This workshop is created to introduce new engineers to microcontrollers and embedded systems and holistically how to work with these processors in a modern way.
Microcontrollers are low power minicomputers that can be used in systems as programmable controllers. While modern microcontrollers can be quite high performance, typically these processors shine when used in simple systems where a few system tasks need to be controlled or monitored.
There are many microcontrollers available on the market from many companies. Each one may vary based on their architecture, or the actual internal design of the chip or device. To understand how these electronic components work, we will first read the master document called a datasheet. Beyond the datasheet there may be supplemental documentation provided from the vendor or user community, but the datasheet should provide a significant amount of information to get started.
Microcontrollers are programmable devices, which means we can direct it how to add control to a system or electronic circuit. To program these chips, there are several high level concepts we need to understand, as programming is used to describe a variety of quite different actions.
The first concept is the physical programming, which is we develop code or a working program and then transfer that to the hardware. This process is done by compiling the code. The compiler will confirm there are no major errors (compile errors only based on the rules in the compiler, which are not the same as logic errors in your code), and then put that code into a binary format that the hardware will be able to understand. This binary file is transferred over to a hardware programmer from your host computer that you wrote the code on. The hardware programmer (also called hardware emulator) in most modern applications will be some type of USB interface. The microcontroller typically will be mounted on a Printed Circuit Board (PCB) but not always as some microcontrollers have the ability to mount to breadboards. The hardware programmer will be wired to the correct pins of the microcontroller to transfer the binary code. In the case where the microcontroller has USB capability built in, it is possible to directly program the chip if it has the correct USB interface, but many microcontrollers don't have this capability and for those an external programmer is required. This process of transferring the binary code is called flashing the device. The code is going to the Flash memory of the device which will stay in memory even if the device is not powered and will execute when the device gets powered up. A key feature of embedded systems is this ability to restart the device by disconnecting the power. The code will return to the initial state any time a power switch is pressed or a battery is connected.
The next concept is the programming of the software, or writing the code. The code writing for a microcontroller can be done in several ways but the most popular is using C programming. The lowest level of software is binary because the hardware has registers that can be flipped on and off, which enables different things in the hardware circuit. Binary is extremely complicated for humans to program in, so the first programming done on these processors was called Assembly which is a type of low level programming that uses an assembler to make in commands to use these hardware registers. Assembly programming was very common in earlier days and provides great opportunities for optimization of hardware resources, but with modern designs, assembly is not used commonly. Popularity with C compilers for microcontrollers is still the most often used method for writing embedded software. Typically microcontrollers are low performance so setting up any other types of programming languages is not an option, but there are some rare exceptions. So for microcontroller programming C programming is the way to go but within C programming there are different levels which can be called abstractions that can be used to write code. The most traditional way to do it is low level register programming with C. This is programming in C but still using registers to enable the hardware control for a lot of the circuits. The next level is using C libraries and drivers to write software. These libraries are usually provided by the vendor to help customers speed up their development. These libraries, drivers, or software development kits (SDKs) usually have accompanying documentation on how to use these tools and can be easier to program the device instead of using the low level programming. Another level of abstraction in C is use of either an operating system or framework. Real-Time Operating Systems are an example of a light weight and basic operating system that can run on these low power processors. While they are not full function like the OS that we know running on our computers, they offer similar benefits of helping with system tasks the hardware needs to handle. These RTOS systems can be used to program the device in C but with specialized structure and syntax. The other type of programming is done with a framework, such as Arduino. This is a way to write code in a specialized syntax with custom functions that can then be translated over to the hardware that is the target for the code. This style of programming is popular for beginners because the learning curve is low and it is easy to import code examples but for professional development it has some limitations and therefore engineers tend to seek lower level code to better optimize their software.
Writing your code is also very flexible. Most modern development will use an Integrated Development Environment (IDE) which is a self contained code editor with many tools needed to make the device programming go smoothly. A popular IDE is called Eclipse but there are many others that are provided or recommended for the microcontroller you use. It is usually best to go with the vendor provided tools unless you have good experience or other reasons to use alternative tools. The IDE will typically include a code editor with compilers and assemblers and linkers to help you build your software and then flash that to target hardware attached to your host computer. Some IDEs may offer other features to help with the code editing ease of use or with debugging tools such as analysis of memory, power, and other system diagnostics during code execution. While many IDEs are free to download and use on your local computer, some have paid licenses or have limits such as code size to use for free. Just be aware of this and it could affect what microcontrollers you choose to work with. Getting your host computer set up with the IDE and tools needed to program is usually one of the first and most important steps of getting started with a new microcontroller.
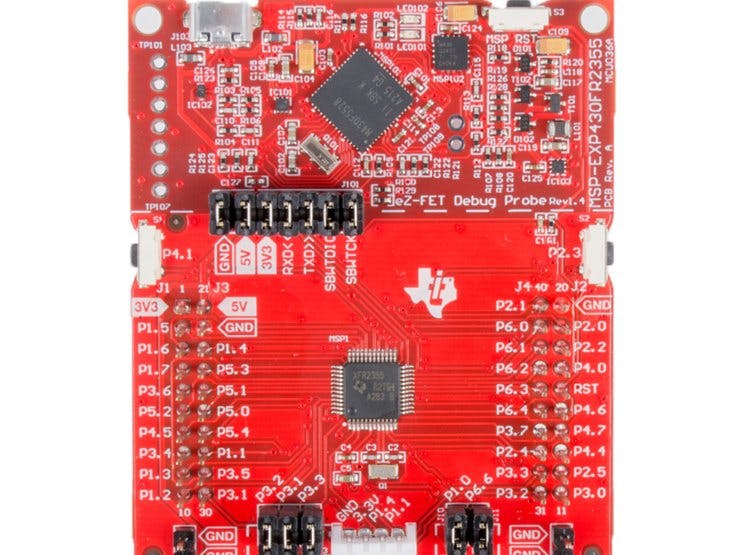
For the rest of the workshop we will focus on a specific microcontroller. Most microcontrollers are part of a family of devices which often share similar architecture and tools but with differences being small details such as memory size, pin outs, packages, and peripherals. In this workshop we are going to proceed with the MSP430, a famous family of microcontrollers from Texas Instruments. There are many varieties or variants of the MSP430 line and the one we will examine specifically is the MSP430FR2355. Now in electronics most things are designated by part numbers. These number and letter strings sometimes appear very generic or sometimes have specific meaning for the part or vendor. In the case of the MSP430FR2355, MSP430 is the microcontroller family which is used for marketing purposes, the FR is for FRAM memory which is a subset of the MSP430 line that has this memory technology integrated in the device, the 2355 indicates the specific capabilities the microcontroller does and how it is referred in documentation. An extended part number will also indicate more details such as production silicon, special silicon that meets qualifications such as automotive or military use, the package it is offered in, revision number, and other useful design information. The complete part number of the micrcontroller we have is the MSP430FR2355TPT. This is what you would search for if you were trying to purchase the exact same part. Now there is also a part number associated with the board that the microcontroller is attached to, which is the MSP430FR2355 LaunchPad development kit (Part # MSP-EXP430FR2355). So you can see in this way it might be confusing because we often refer to development boards like the LaunchPad as microcontrollers but the microcontroller is actually the device on the board which has a unique part number.
MSP430 is a very popular 16-bit RISC processor design by TI and put into many types of end equipment throughout its history, particularly products requiring low power as priority. Today it still compares very favorably with other options when considering the lowest possible power consumption and a simpler architecture to understand and master.
Topics1. How to read your datasheet and find things on ti.comProceed to the "product folder" of your microcontroller. Here you can find all the technical documentation specific to the device and its variants. A microcontroller can come in different options such as package sizes. These will all be designated with a unique part number but should be similar to part numbers within the same device or device family.
https://www.ti.com/product/MSP430FR2355
The LaunchPad is an evaluation kit, so it has a website called a "tool folder" which has information specific to the dev board.
https://www.ti.com/tool/MSP-EXP430FR2355
Within the product folder and tool folder you may find links to other documents you could find useful when working with the microcontroller. A common document is called an Application Note or app note. This describes a specific use or case when working with that hardware and may be relevant information to what you are doing. Sometimes it is good to search out these app notes when researching your design. Another common document is called a White Paper which will describe some high level concepts that are related to the device.
For the board, which is some times called a kit or Evaluation Module (EVM), there is usually a user guide document which will explain the operation of the board. There also should be some code examples readily accessible either as a packaged download or part of a software suite. Most microcontroller boards will have some kind of default code running when first used and this is flashed at the factory. There should also likely be reference the original schematics and sometimes the board design files, so that you can take these for your own design.
Another good thing to know is parts availability so you know where the device can be purchased, either direct or through distributors and the inventory levels. You may also find some online tools to help you compare similar parts or find parts that match the same capability or size.
2. Setting up your IDE optionsCCS Cloud is the quickest way to do development using your browser (Chrome recommended). Go to dev.ti.com and log in to your ti account to access your CCS Cloud workspace. First time users will download their browser extension and TI Cloud Agent utility. Easily send firmware examples and custom code to the MSP430 LaunchPad using Resource Explorer.
Code Composer Studio is the free to use and recommended IDE for MSP430 development. Download CCS here: http://www.ti.com/ccstudio
http://processors.wiki.ti.com/index.php/Category:CCS
IAR Embedded Workbench is an IDE option that is well regarded for its compiler and other features. Follow the instructions here to set up IAR: https://www.iar.com/iar-embedded-workbench/partners/texas-instruments/
https://www.iar.com/support/user-guides/user-guidesiar-embedded-workbench-for-ti-msp430/
MSPGCC command line tools are a way to access the open source MSP430 toolchain.
http://www.ti.com/tool/MSP430-GCC-OPENSOURCE
MSP430 GCC Guide: http://www.ti.com/lit/ug/slau646b/slau646b.pdf
3. Configuring your portsUtilize the materials from TI and the E2E forum http://processors.wiki.ti.com/index.php/Digital_I/O_(MSP430)
MSP430 is a classic chip, google is your friend to find plentiful resources
http://maxembedded.com/2013/12/io-port-operations-in-msp430/
http://www.simplyembedded.org/tutorials/msp430-configuration/
4. MCU BasicsHere we will cover some basic code examples using the TI LaunchPad. Code Composer Studio Desktop is recommended as the best solution for IDE but we will use CCS Cloud for convenience.
So we will load up our IDE first. Proceed to dev.ti.com and log in to your TI account after clicking on the CCS Cloud option on the page. This will load your coding environment in the browser. You can connect your LaunchPad hardware to your computer with the included USB cable at this point and when you are ready click the green RUN button at the top of the screen. This will prompt you to download the browser extension and TI Cloud Agent.
Next we will run through some examples starting with the out of box. The out of box experience comes with a GUI which we will navigate to first. Go back to dev.ti.com and this time click on Resource Explorer. You will want to go to the left hand navigation and click on the MSP430ware > Development Tools > MSP-EXP430FR2355
5. Arduino programmingUsing Arduino is popular for beginners to microcontrollers, but when we are talking about the context of embedded systems, it can be a little tricky as Arduino describes both the method of programming and the hardware. Arduino programming offers a lot of accessibility when writing software for embedded. The Arduino hardware itself is pretty standard and describes a specific family of boards put out by a company. Other hardware like the LaunchPad can be programmed using Arduino software but itself is not Arduino hardware or part of the ecosystem. The TI Arduino software is called Energia.
In this example we can run the Arduino code by opening Energia sketches in CCS Cloud. Go to your CCS Cloud and click File > New Energia Sketch... Here we will select MSP430
6. Importance of RTOSYou can use Real-Time operating systems in situations where there are many things happening in the system that need to be managed by the microcontroller. The RTOS can help offload some of the complexity as the code scales. Many times an RTOS is not needed to effectively write firmware code for embedded systems, but it can help in more and more modern scenarios. It woudl be worthwhile to explore RTOS in advanced learning on microcontrollers.
http://processors.wiki.ti.com/index.php/MSP430_Real_Time_Operating_Systems_Overview
http://processors.wiki.ti.com/index.php/SYS/BIOS_for_the_MSP430
7. Learning moreTI provides more in-depth online training. The main evaluation kit used for the MSP430 is the TI LaunchPad, which will be the most common way new and experienced engineers will first try out the MSP430 and see what it can do.
To view the TI provided videos, go to the link directly to watch the material.
https://training.ti.com/msp430-workshop-series
The workshop is broken down into common segments which cover the major topics of the microcontroller and its peripherals.
1. Intro to Code Composer Studio
2. Intro to MSPWare and using MSPWare with GPIO
3. Reset Modes
4. Clocks
5. DCO initialization/calibration
6. System Initialization
7. Lab Abstract
8. Interrupts
9. Timers
10. Low-Power Optimization
11. Interrupts
12. Non-Volatile Memory
13. USB Communications
14. Energia (Arduino)
Additional learning resources are actually provided directly from TI. The MSP430 datasheet will contain everything needed to understand the MCU capabilities. TI provides application notes and user guides to further explain how to use MSP430 in certain situations. Tons of customer questions and answers exist on TI's E2E forum. There are textbooks and numerous online courses that feature the MSP430.
To setup your workshop files download the lab zip files: http://software-dl.ti.com/trainingTTO/trainingTTO_public_sw/MSP_Design_Workshop/MSP_Design_Workshop_Lab_Files.zip
You can extract the zip and set it as your workspace in CCS or import the solutions into CCS Cloud.
Hope you enjoyed this introductory look at microcontrollers. Good luck on your continue explorations!


Comments