Hardware components | ||||||
 |
| × | 1 | |||
 |
| × | 1 | |||
 |
| × | 1 | |||
| × | 1 | ||||
Software apps and online services | ||||||
 |
| |||||
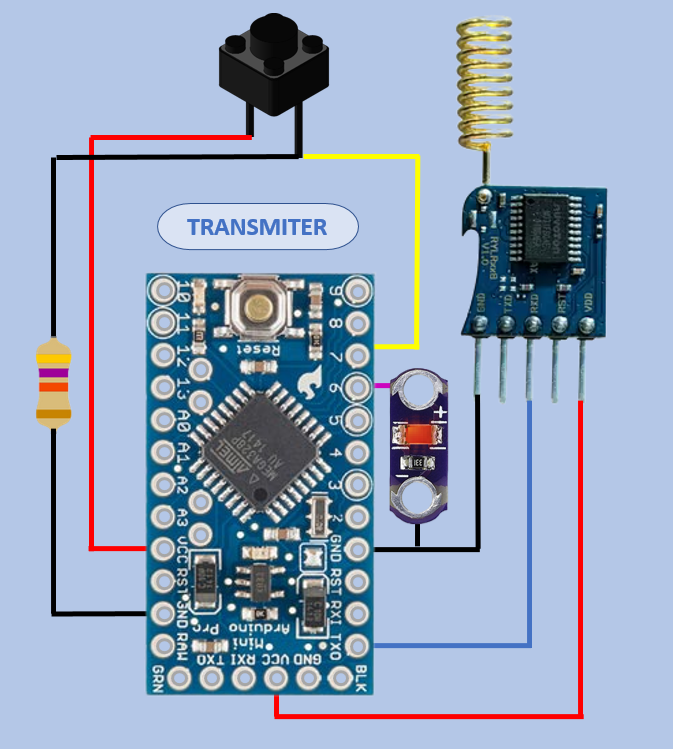
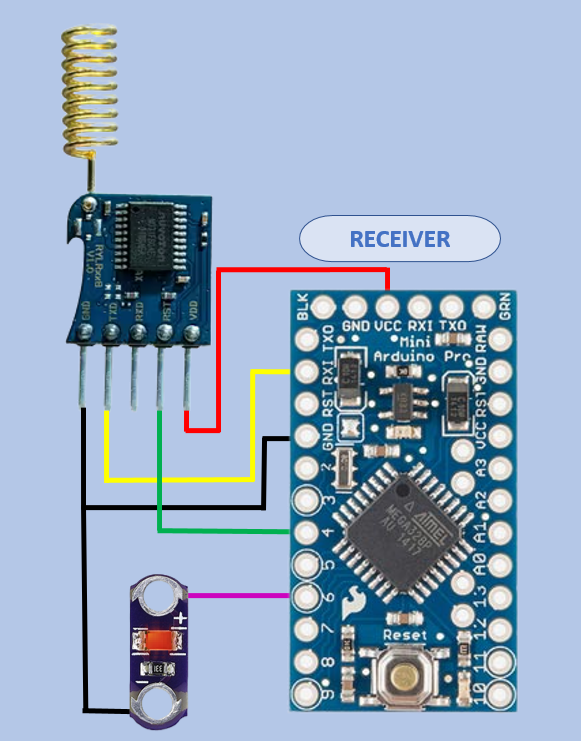
In this tutorail I will show you how to program RYLR998 LORA radio modules from Reyax. How to connect them to Arduino. I will also create the code that will allow to remotely control the state of LED with the pushbutton.
Hope you will find this video Useful.
int PushButton=7;
int LED=5;

int LED_state=LOW;
int Button_state=LOW;

int Button_newstate;

void setup() {
 Serial.begin(57600);
 pinMode(PushButton, INPUT);
 pinMode(LED, OUTPUT);
 Button_state=digitalRead(PushButton);
}
void loop() {
  Button_newstate=digitalRead(PushButton);
  if (Button_newstate > Button_state) {
    if (LED_state==LOW){
      digitalWrite(LED, HIGH);
      LED_state=HIGH;
      Serial.println("AT+SEND=2,1,H");
    }
    else {
      digitalWrite(LED, LOW);
      LED_state=LOW;
      Serial.println("AT+SEND=2,1,L");
    }
  }
  Button_state=Button_newstate;
}
Receiver - receiving the state of the pushbutton and setting LED state based on that information
Arduino#define LEDPin 6
String incomingstring;
void setup() {
pinMode(LEDPin,OUTPUT);
Serial.begin(115200);
}
void loop() {
if(Serial.available()){
incomingstring= Serial.readString();
if (incomingstring.indexOf("H") >0) {
digitalWrite(LEDPin, HIGH);
}
else if (incomingstring.indexOf("L") >0) {
digitalWrite(LEDPin, LOW);
}
}
}
Receiving state of the pushbutton and controlling the LED with Displaying received data on OLED
Arduino#include <SPI.h>
#include <Wire.h>
#include <Adafruit_GFX.h>
#include <Adafruit_SSD1306.h>
// Oled display size
#define SCREEN_WIDTH 128 // OLED display width, in pixels
#define SCREEN_HEIGHT 64 // OLED display height, in pixels
#define OLED_RESET 4 // Reset pin # (or -1 if sharing Arduino reset pin)
Adafruit_SSD1306 display(SCREEN_WIDTH, SCREEN_HEIGHT, &Wire, OLED_RESET);
#define LEDPin 6
String incomingstring;
String inString;
void setup() {
Serial.begin(57600);
// SSD1306_SWITCHCAPVCC = generate display voltage from 3.3V internally
if(!display.begin(SSD1306_SWITCHCAPVCC, 0x3C)) { // Address 0x3D for 128x64
Serial.println(F("SSD1306 allocation failed"));
for(;;); // Don't proceed, loop forever
}
// Show initial display buffer contents on the screen --
// the library initializes this with an Adafruit splash screen.
display.display();
delay(2000); // Pause for 2 seconds
display.clearDisplay();
display.setTextSize(1);
display.fillRect(0, 0, 128, 15, SSD1306_INVERSE);
display.setTextColor(SSD1306_BLACK);
display.setCursor(4,4);
display.println("RECEIVING: ");
display.println("");
display.setTextColor(SSD1306_WHITE);
display.display();
pinMode(LEDPin,OUTPUT);
digitalWrite(LEDPin,LOW);
}
int Received;
void loop() {
if(Serial.available()){
incomingstring= Serial.readString();
display.print(incomingstring);
display.display();
if (incomingstring.indexOf("H") >0) {
digitalWrite(LEDPin, HIGH);
}
else if (incomingstring.indexOf("L") >0) {
digitalWrite(LEDPin, LOW);
}
}
}


_3u05Tpwasz.png?auto=compress%2Cformat&w=40&h=40&fit=fillmax&bg=fff&dpr=2)
Comments