

Hardware components | ||||||
| × | 1 | ||||
| × | 1 | ||||
| × | 1 | ||||
| × | 1 | ||||
| × | 1 | ||||
Software apps and online services | ||||||
 |
| |||||
 |
| |||||
If you are a visual learner, here I created a video that shows you step by step the whole process of building this project.
The video is in spanish but electronics are electronics, and coding is coding in the same language.
Hope you like it.
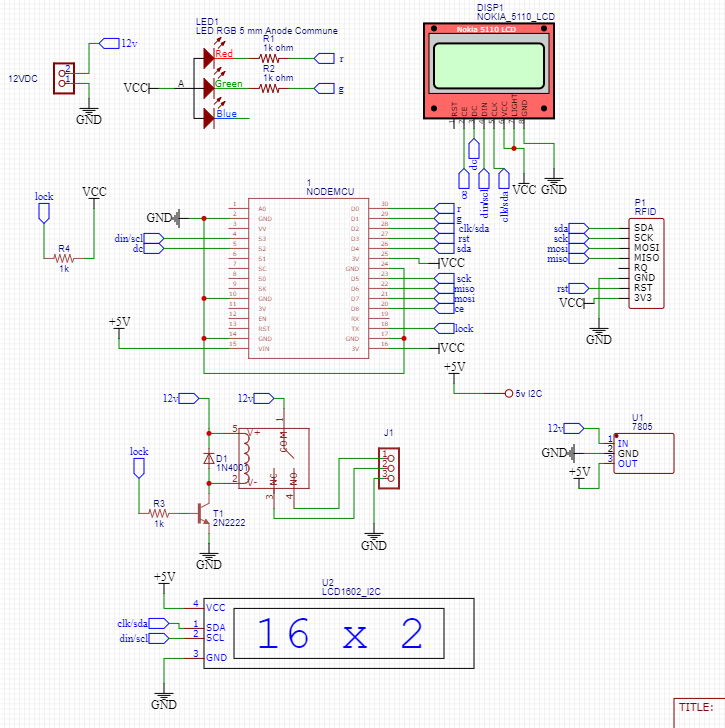
PCB Design:Here you can download the Gerber File so you can order your PCBs proffesionally made on PCBGOGO.
Soldering Process:You just need to place all the components in the right spot, solder them with a clean soldering iron and that's it.
Coding:Here's the code so you can program your ESP8266 board.
Assambly:Wire up all the components together, install the electric lock, wire it to the enclosure and place the PCB and the power supply inside the box, close the lid and everything is almost ready.
IoT Ubidots Settings:- Create an account of Ubidots.
- Go the devices section and notice that should be a device called "RFID" listed.
- Inside of it, should be a variable called "asistencia".
- If on steps 2 and 3 the device is not automatically created, create it by yourself by the mentioned names.
- Go to dashboards and create a new one.
- Select a widget called "Values table" and link it to the rfid->asistencia variable.
- Create an histogram and link it to the same variable.
- Then you are ready to visualize the names of the people who get into the room.
Swipe a RFID card or token and the lock will open, and the Ubidots interface will show you the name who enter.
_IX1ywUwFAh.png)


_IX1ywUwFAh.png)
Comments