


Hardware components | ||||||
 |
| × | 1 | |||
Software apps and online services | ||||||
 |
| |||||
Hello to everyone, today I am here to show you how to control a LED strip attached to a Gaming Laptop with Alexa and the ESP8266. I am recycling one of my last projects, the Infrared WiFi Switch that activates a Triac and also can drive an IR LED.
Here I leave you a tutorial with all the information so you can make your own version. If you are a visual learner I know that a video worth more than 1000 words, so here is a Tutorial video. (I am a Spanish speaker, so please consider turning on English subtitles):
Step 1: Skills Required:
This project may seem difficult or very complex, but it is definitely not completely, since you will have all the guidance for the construction, it was difficult for me to design it to make life a little easier for you. Any conceptual doubt, you are free to ask it without problems.
- You should have an understanding of:
- Handling main voltages
- Arduino programming (I give you the code).
- Soldering through hole components.
Step 2: Components and Parts List
🛒Materials to build it wit custom PCB:
- 1x ESP8266 (ESP-01) https://amzn.to/2EZ4e6g
- 2x 470 ohm Resistores 1/2W https://amzn.to/2KAjVok
- 5x 1kohm Resistores 1/4W https://amzn.to/2KCMAJd
- 1x Hi-Link Fuente de poder 3.3v https://amzn.to/2KCMAJd
- 1x Terminal Block dos pines https://amzn.to/2KCMAJd
- 1x Terminal Block tres pines. https://amzn.to/2KCMAJd
- 1x Capacitor 100nf 400v https://amzn.to/2KCMAJd
- 1x MOC3010 (OptoTriac) https://amzn.to/2KCMAJd
- 1x Triac BTA16-24 https://amzn.to/2KCMAJd
- 1x IR LED
- 1x 2n2222 npn transistor
- LED Strip: https://amzn.to/3iDWRWb
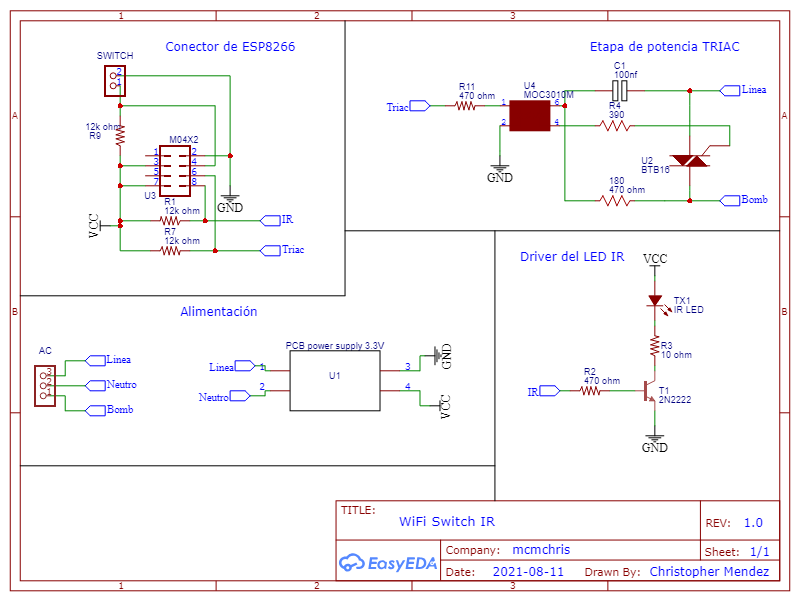
Step 3: Circuit Diagram and Schematic + PCB
Here is the Circuit Diagram of our project:
It has all the internal connections of the circuit that will us allow to create the PCB design later.
I also attached the PNG of the Schematics so you can see it better.
Gerber File (Free, just put 0 in the charge box).
For the implementation of a good project we need a reliable assembly for the circuit that makes it up, and there is no better way to do it than with a good PCB.
I suggest JLCPCB:
$2 for 1-4 Layer PCBs⚡, Get SMT Coupons🎫
Step 4: Learning IR Remote Codes
- Unbox your remote controlled LED strips and test it works fine.
- Get an IR sensor, finout its pinout and wire it to your ESP8266 (signal on pin 0).
- Upload the Code.
- Point the sensor with the remote controller and press your wanted buttons.
- Annotate the codes and verify the Hex.
Step 5: Uploading the Final Code
- Go to code lines 30 and 31 and put your WiFi credentials.
- Go to code lines 105 and 109 and place the Hex codes after the 0x (Ex. irsend.sendNEC(0xFF827D, 32);)
- Go to code line 33 and name the device that will appear in the Alexa app.
- Upload the code to the ESP8266 using the programming board
Step 6: Bind Your Project With Alexa
- Connect an AC cable to the L an N terminal block and power up the board.
- Verify your ESP8266 turn on it LEDs and they blink for a while (searching por wifi).
- Then tell your Alexa " Alexa, discover new devices " and wait, it should say " 1 device discovered ".
- Verify in your app that the devices was added.
- Test the IR LED activates when you say Alexa to turn on or off the device.
- Wire up the LED strip and test it controls it.
Step 7: Custom Any Space With Your LED Strip and Enjoy
You can control this LED strip particularly with a bluetooth APP while you can turn on and off it with your voice with Alexa.
Note: you must need an Alexa physical speaker not just the app.


Comments