


Hardware components | ||||||
 |
| × | 1 | |||
| × | 1 | ||||
| × | 1 | ||||
Software apps and online services | ||||||
| ||||||
Hand tools and fabrication machines | ||||||
| ||||||
 |
| |||||
I’ve been on a mission: To build a real IoT solution with the dweet™ and freeboard™ platforms.
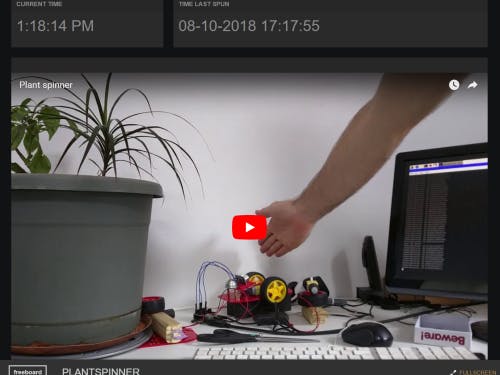
First, I created a Thing (Plant Spinner™, it spins your plants for 360° sunlight coverage), then I connected that Thing to the Internet (using dweetPro). Next, I built a dashboard for my thing (using freeboard). Here is a look at the final solution:
Step 1: Build your Thing
I started with a Raspberry Pi Zero W board (W for wireless), and a robotics kit from CamJam. This kit is meant for kids, which means it was perfect for my non-existent skill set. The CamJam kit comes with beginner programming instructions, which helped me figure out the motor spin code.
The rest of the hardware includes a plant, a Lazy Susan bearing, a block of wood, a piece of plastic, a couple screws, and a rubber band.
Step 2: Connect your Thing
Once the hardware was all set up, I created the python code to run it.
Here is the python code. Feel free to use this code as your guide.
First, import your libraries. For my baseline code I used GPIO and time. For the timestamp, I added datetime. For dweetPro, you need to import requests and json.
Next, I did the RPi GPIO setups, declared my variables, and set up my condition:
The python code spins a motor for 3 seconds, prints the time, then sleeps for 30 seconds. The code then sends the timestamp to dweetPro. In order to do that you must declare the URL, setup the Header, configure the Payload, then run it.
The dweetheader is critically important. There are two different Authorization Tokens that could be used here. A Thing Token (recommended) does not expire, but only has access to a few APIs. A Session Token can also be used, but it expires, and is not recommended for hard coded things.
You must also add the ‘content-type’ variable in the header, to inform the system that JSON data will be sent.
The payload_data is also important. Here you declare your Thing-Name (in this case “testie”), you add your Key (Master Key recommended), and you specify the content (Key:value pairs, separated by comma).
Once this is setup, run your code!
If your code runs successfully, you will be able to GET your dweets from the dweetPro console. Use the dweetPro guide above to see how.
Step 3: Visualize your data
Now that your RPi is successfully connected to the dweetPro platform, you can build a custom dashboard to showcase your solution with freeboard.
The freeboard platform is free to try, free to use if self-hosting, and has many low cost options available.
To connect your dweetPro data to freeboard, begin by adding a new datasource. freeboard has two dweetPro options. For this exercise, I used the dweetPro streaming API (Dweet V2), setup as follows:
Use the same Account Token (Thing Token) used in your python code. Next, I connect the datasource to a widget, like so:
In this case I used the Text widget, however all the standard widgets are available to the dweetV2 datasource. The historical API (Dweet V2 Storage) is an alternative datasource, and it works with the Historical widget.
Click Save, and voila!
Here is the example dashboard I created:
https://freeboard.io/board/06fnCt
I have some plans for adding a button to my dashboard that will spin the plant when pressed, along with some hardware upgrades, but for now, this example project is complete.
Hopefully, this guide will help you figure out how to use dweetPro in your next IoT project. If you have any questions, let me know.
- mpeddi (Bug Labs, Inc.)


Comments